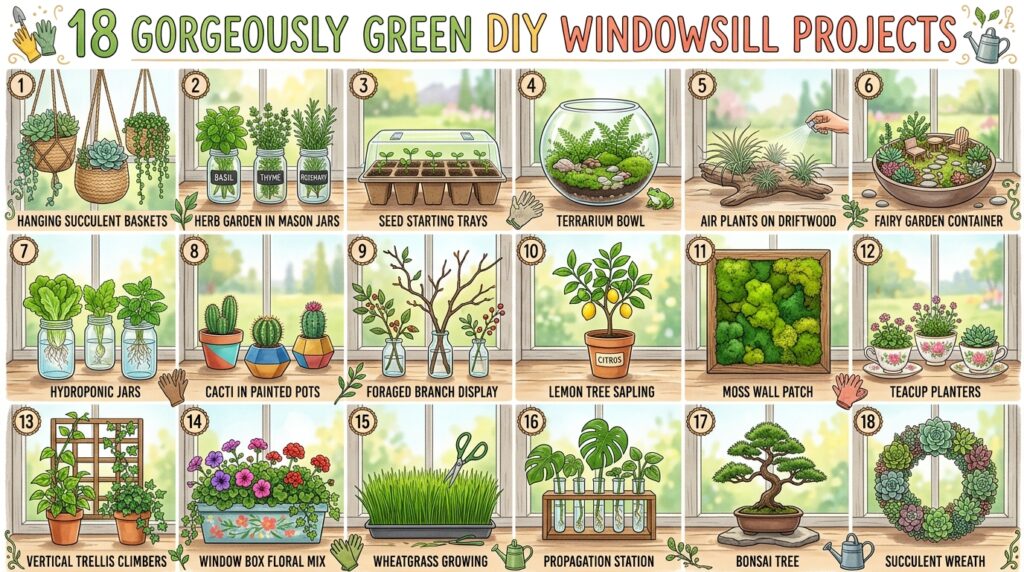
Your windowsill is one of the most underused pieces of real estate in your entire home — a sun-drenched strip of possibility that most people fill with nothing more than a forgotten candle or a dusty ornament. But a little creativity and a handful of plants can turn even the narrowest ledge into something genuinely breathtaking. These 18 DIY windowsill projects range from beginner-friendly herb tins to sculptural air plant displays, covering every skill level, budget, and light condition. Ready? Let’s explore all 18 of them.
Why DIY Windowsill Projects Are Worth Your Time
Windowsills occupy a unique sweet spot in home gardening: they sit right at the intersection of interior décor and functional plant care. Unlike shelf displays tucked in dim corners, a windowsill project actually gives your plants what they crave — natural light — while simultaneously becoming a feature wall you didn’t have to pay a decorator for. The aesthetic payoff for the effort invested is extraordinary.
From a practical standpoint, DIY windowsill gardens are among the most space-efficient gardening approaches available. You’re working with surfaces that already exist, require no drilling into walls, and can be rearranged on a whim. Many of these projects cost under £10 to assemble from materials you likely already own or can source at a charity shop. That makes them ideal for renters, flat dwellers, and anyone who wants greenery without commitment.
Here’s a lesser-known fact that surprises many beginners: a south-facing windowsill in the Northern Hemisphere typically receives 6–8 hours of direct sun — enough to grow compact tomatoes, chillies, and a full herb selection year-round. Most people assume windowsills are only for low-light plants, but that’s simply not true when you choose the right window orientation.
These projects are particularly ideal for apartment dwellers, busy working parents, students, and anyone who wants to engage with plants daily without the upkeep demands of an outdoor garden. You’ll check on them every morning, water takes 30 seconds, and the results are visible from your first cup of coffee.
At a Glance
- Tin can herb gardens cost virtually nothing and produce fresh basil, thyme, and mint within 3–4 weeks of planting from seed.
- Recycled wine bottles make elegant self-watering propagation stations that keep cuttings alive for 2–3 weeks without attention.
- A mounted driftwood air plant display requires zero soil, zero watering schedule — just a 10-second mist every 10 days.
- Stacked terracotta strawberry towers grow 8–12 strawberry plants in the footprint of a single pot, perfect for a wide sill.
- Painted concrete mini pots created with kitchen moulds cost under £3 each and last indefinitely — a genuinely stunning handmade gift.
1. Upcycled Tin Can Herb Garden
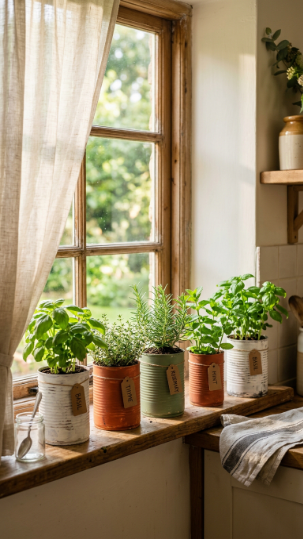
Tin cans are the single most accessible upcycling material for a DIY windowsill herb garden — free, food-safe, and surprisingly beautiful when given a coat of chalk paint.
Collect standard 400g food tins, clean them thoroughly, and punch three drainage holes in the base using a hammer and nail. Fill with a mix of 70% multipurpose compost and 30% perlite for drainage. Basil, thyme, flat-leaf parsley, and chives are ideal first choices — all reliably productive on a south- or east-facing windowsill receiving 4+ hours of direct sun.
Paint the tins with chalk paint in earthy tones: sage, terracotta, cream, and warm grey create a cohesive palette without looking “matchy.” Let them dry fully before planting, as damp paint can harbour mould at the base. Stagger heights using small wooden blocks or a folded tea towel hidden underneath to create visual interest across the row.
The most common mistake is overcrowding — one herb variety per tin, always. Grouping mint and basil together invites root competition and weakens both. Mint in particular is a vigorous grower and benefits enormously from having its own dedicated container.
Pro Tip: Drill holes with a pin vice rather than a hammer and nail — it gives you cleaner, circular holes without warping the tin base, which keeps pots sitting level on your windowsill.
Internal link: Explore our complete guide to kitchen windowsill herb gardens — greenbotanicalgarden.com/kitchen-windowsill-herb-garden/ External link: RHS advice on growing herbs in containers — rhs.org.uk/vegetables/herbs/grow-your-own
A row of painted tins on a sunny kitchen sill is, genuinely, one of the most satisfying small projects you’ll ever complete.
2. Wine Bottle Propagation Station
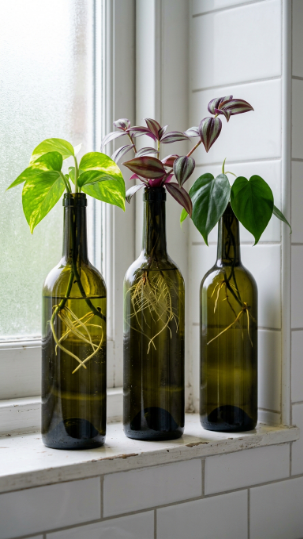
Propagating plants in glass bottles is one of the most visually satisfying DIY windowsill projects you can attempt — and wine bottles, with their narrow necks, are perfect for holding single cuttings upright without any fiddly supports.
Collect dark green or amber wine bottles — the coloured glass slows algae growth compared to clear glass, meaning you’ll change the water every 10–14 days rather than every week. Choose fast-rooting plants: pothos (Epipremnum aureum), tradescantia, impatiens, or mint all root reliably within 2–3 weeks in plain water at room temperature.
Take cuttings 10–15cm long, remove all leaves from the bottom third, and place in the bottle so the node (the small bump where a leaf meets the stem) sits below the waterline. Position on a bright but indirect windowsill — direct midday sun heats the water and promotes bacterial growth, which kills cuttings before roots form.
Once roots reach 3–4cm, transfer cuttings to soil immediately. Leaving them in water too long produces weak, water-adapted roots that struggle in compost.
Pro Tip: Add a single drop of liquid seaweed fertiliser to the water — it accelerates root development by delivering concentrated micronutrients without promoting algae the way standard fertiliser does.
Internal link: Read more about water propagation for beginners — greenbotanicalgarden.com/water-propagation-guide/ External link: Gardenersworld.com guide to propagating houseplants — gardenersworld.com/how-to/grow-plants/how-to-propagate-plants/
Once you’ve watched roots emerge from a cutting in a bottle, you’ll never buy another houseplant you can propagate for free.
3. Driftwood Air Plant Frame Display

Air plants (Tillandsia spp.) are the ultimate low-maintenance DIY windowsill project — no soil, no pots, no drainage holes required, just a good driftwood piece and a spray bottle.
Source a flat piece of driftwood 30–40cm wide from a beach, craft shop, or online. Attach Tillandsia ionantha, T. caput-medusae, and T. xerographica using small blobs of aquarium-safe silicone or fine floral wire looped gently around the base — never glue the leaves themselves. Position on a bright windowsill with indirect light; south-facing works well if there’s a sheer curtain to filter the harshest midday rays.
Mist the entire display every 10 days using filtered or rainwater — tap water in hard-water areas deposits white calcium on the delicate grey trichomes (the tiny scales that absorb moisture), permanently scarring the leaves. After misting, turn the driftwood upside down for 20 minutes to let excess water drain from the base of each plant — standing moisture at the base causes rot within 48 hours.
Best Tillandsia varieties:
- Best beginner: T. ionantha — small, hardy, blooms pink-red
- Most dramatic: T. xerographica — large silvery rosette, statement piece
- Fastest bloomer: T. stricta — produces purple blooms within 6–8 months
- Most forgiving of neglect: T. caput-medusae — tolerates occasional missed misting
Internal link: Discover our full air plant care guide — greenbotanicalgarden.com/air-plant-care-tillandsia/ External link: Missouri Botanical Garden Tillandsia profile — missouribotanicalgarden.org
A driftwood air plant display turns a windowsill into a piece of living sculpture that changes subtly as each plant matures.
4. Stacked Terracotta Strawberry Tower
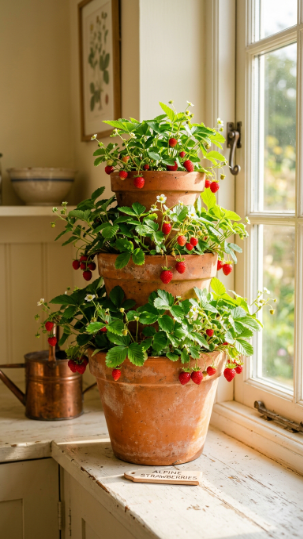
A stacked terracotta strawberry tower allows you to grow up to 12 strawberry plants in the footprint of a single pot — one of the most productive DIY windowsill projects you can build for a wide south-facing sill.
Use three graduating terracotta strawberry pots (also called herb pots) with side planting pockets. Stack them by placing a smaller pot upside-down inside the largest, creating height levels. Fill each pocket with a mix of 60% John Innes No. 2 and 40% perlite — the added drainage is non-negotiable, as terracotta with standard compost stays too wet indoors. Alpine strawberries (Fragaria vesca ‘Alexandria’) are ideal for windowsills: compact, everbearing, and highly productive in containers.
Plant one plug per pocket, firming the roots gently. Water deeply when the top 2cm of compost feels dry — twice weekly in summer, once in winter. Feed every 10 days from April through August with a high-potassium liquid fertiliser (tomato feed works perfectly and costs less than specialist strawberry formulas).
Pro Tip: Place a shallow tray filled with gravel beneath the tower stack — it catches drainage while increasing local humidity around the plants, which improves fruit set on indoor strawberries noticeably.
Internal link: Read our guide to growing strawberries indoors in containers — greenbotanicalgarden.com/growing-strawberries-indoors-containers/ External link: RHS guide to strawberry container growing — rhs.org.uk/fruit/strawberries/grow-your-own
Nothing beats picking a ripe Alpine strawberry from your own kitchen windowsill on a grey February morning.
5. Handmade Concrete Mini Pots
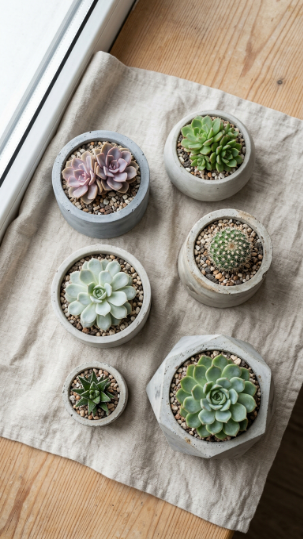
Concrete pots cast from yoghurt pots and bowls cost under £3 each in materials and produce planters that are completely unique, genuinely weighty, and architecturally striking on any windowsill.
You’ll need rapid-setting concrete mix, two plastic containers (one larger as the mould, one smaller as the inner former), cooking oil spray, and rubber gloves. Mix concrete to a thick milkshake consistency, pour 3cm into the base of the larger container, place the smaller container inside (filled with water to weigh it down), then fill the gap between the two containers. Leave to set for 48 hours before demolding. Sand the rim with 80-grit sandpaper for a refined finish.
Plant with echeveria, haworthia, or small cactus varieties — concrete has a naturally alkaline pH that suits these plants perfectly. Use a specialist succulent compost or mix standard compost 50/50 with coarse horticultural grit. Concrete also provides excellent thermal mass, keeping roots cooler in summer and warmer in cold snaps, which reduces temperature-shock stress.
Best plants and tips:
- Best plants: Echeveria elegans, Haworthia fasciata, Gymnocalycium mihanovichii cactus
- Avoid: moisture-loving ferns or maidenhair — concrete wicks water quickly
- Advanced version: add iron oxide pigment to the mix for rust-toned or charcoal pots
Internal link: Explore our complete succulent container guide — greenbotanicalgarden.com/succulent-container-guide/ External link: Better Homes & Gardens DIY concrete planters tutorial — bhg.com/gardening/container/plans-ideas/diy-concrete-planters/
Concrete pots made by your own hands carry a quiet pride that shop-bought planters simply can’t replicate.
6. Washi Tape Geometric Terrarium Build
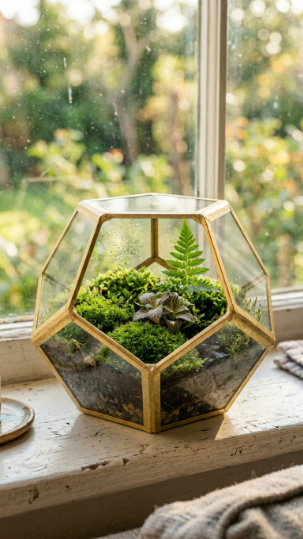
Terrariums create a self-contained micro-climate that lets you grow moisture-loving plants in the driest indoor environments — and washi tape applied to seams transforms a basic glass box into something editorial.
Start with a clip-frame glass box (IKEA SAMMANHANG or similar) — these are inexpensive and perfectly sized for a windowsill. Apply gold or copper washi tape along every external seam for a geometric terrarium effect. Layer the base with 2cm horticultural grit, then a thin layer of activated charcoal, then 5–6cm of peat-free terrarium compost. The charcoal layer prevents bacterial build-up in the closed micro-environment.
Plant with miniature varieties suited to high humidity: Fittonia albivenis (nerve plant), Selaginella uncinata (rainbow moss), and Asplenium trichomanes (maidenhair spleenwort fern) are all excellent. Mist the interior walls lightly once a week — you’ll see condensation form and “rain” back down naturally, indicating the ecosystem is functioning correctly.
Pro Tip: Place a thin layer of living sphagnum moss over the compost surface — it actively regulates humidity by absorbing excess moisture and releasing it slowly, reducing your need to mist by 60–70%.
Internal link: See our guide to building a closed terrarium for beginners — greenbotanicalgarden.com/closed-terrarium-build-guide/ External link: The Sill: Understanding terrarium ecosystems — thesill.com/blogs/plants-101/terrarium
A washi tape terrarium is as much a work of art as it is a garden — and it requires almost no effort to maintain once properly established.
7. Vintage Teacup Succulent Garden
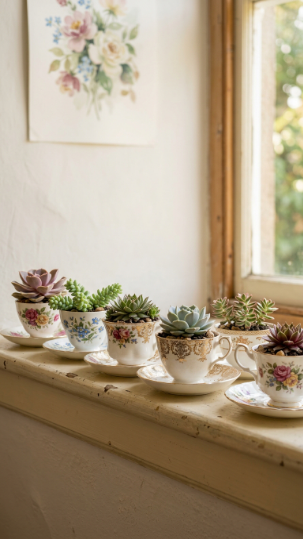
Charity shop teacups make the most charming DIY windowsill containers for succulents — and their mix of patterns and sizes creates an effortlessly curated display that looks expensive and entirely intentional.
The key challenge with teacups is drainage — they have none. Solve this by layering the base with 1.5cm of horticultural grit before adding a thin layer of activated charcoal, then top with succulent-specific compost. This layered base acts as a reservoir buffer, meaning excess water sits in the grit layer rather than saturating the roots. Water only when the top 1cm of compost is bone dry — typically every 12–14 days indoors.
Choose compact, slow-growing varieties: Echeveria ‘Lola’, Sedum dasyphyllum, and Sempervivum ‘Red Beauty’ are ideal. Sempervivums (houseleeks) are particularly forgiving — they tolerate underwatering enthusiastically and will produce small offsets within the first season, giving you free new plants for additional teacups.
Best varieties and tips:
- Best for no-drainage teacups: Sempervivum, Sedum dasyphyllum, Haworthia cooperi
- Avoid: Echeveria gibbsiflora — too large; Aloe — too deep-rooted
- Advanced option: create a mismatched set in a single colour family for a more refined look
Internal link: See our guide to planting succulents without drainage holes — greenbotanicalgarden.com/succulents-without-drainage-holes/ External link: Penn State Extension: succulent care indoors — extension.psu.edu/succulents-and-cacti
A teacup succulent collection grows itself effortlessly and sparks more conversation from visitors than almost anything else in your home.
8. Macramé Hanging Planter Trio
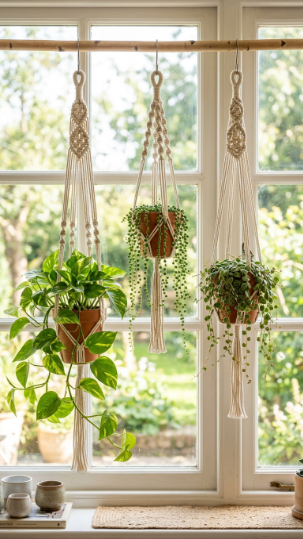
Macramé hanging planters let you utilise the vertical air space above a windowsill — effectively tripling the number of plants you can grow without using any additional surface area.
You need 4mm natural cotton macramé cord, a wooden dowel or branch 40cm wide, and three 10cm plastic nursery pots. Each planter uses four lengths of cord cut to 3.5m, folded in half and knotted at the top. The basic square knot pattern is achievable by a complete beginner within an hour. Hang the dowel using two cup hooks screwed into the window frame, positioning the plants at different heights — stagger at 30cm, 45cm, and 60cm below the dowel.
Choose trailing or compact plants that tolerate bright indirect light: golden pothos (Epipremnum aureum ‘Neon’), string of pearls (Senecio rowleyanus), and trailing peperomia are all ideal. Avoid heavy plants above 500g in pot — cotton cord macramé has limits, and a falling pot on a glass windowsill is a serious hazard.
Pro Tip: Thread a hook through the base of each nursery pot liner so you can lift pots out for watering at the sink, then return them clean and dry — this prevents water damage to your windowsill and to the macramé cord itself.
Internal link: Learn more about trailing plants for hanging displays — greenbotanicalgarden.com/trailing-plants-hanging-planters/ External link: Almanac: best hanging houseplants for indoors — almanac.com/plant/hanging-houseplants
Once you’ve made one macramé hanger, you’ll find yourself eyeing every window in the house as potential growing space.
9. Painted Mason Jar Bulb Forcing Garden
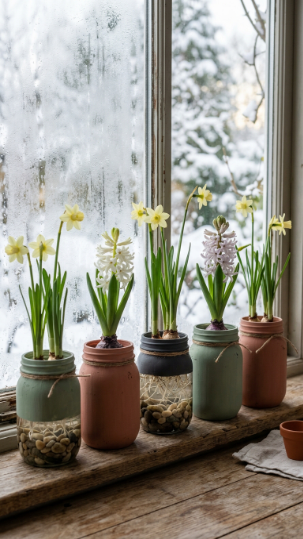
Forcing bulbs in painted mason jars is one of the most rewarding DIY windowsill projects for winter — you grow blooming hyacinths or narcissus indoors from November through February when almost nothing else is growing.
Paint the outside of wide-mouth mason jars with chalk paint in botanical tones, leaving a small viewing panel unpainted so you can monitor root development. Fill jars with decorative pebbles to the halfway point, nestle a prepared (pre-chilled) hyacinth or ‘Paperwhite’ narcissus bulb in the pebbles flat-side down, and add water until it just touches the bulb base — not submerging it, which causes rot. Pre-chilled bulbs (available from October in garden centres) are essential; they’ve undergone the cold period they need to trigger flowering.
Place on a cool, bright windowsill — 10–15°C is ideal for the first 4–6 weeks while roots establish. Once roots are 5–8cm long and green shoots appear, move to a warmer spot (18–20°C) and blooms will follow within 3–4 weeks. The whole process from pebbles to flowers takes 8–10 weeks.
Internal link: Discover our complete guide to winter windowsill bulb forcing — greenbotanicalgarden.com/forcing-bulbs-windowsill-winter/ External link: RHS guide to forcing indoor hyacinths — rhs.org.uk/plants/types/bulbs/forcing-hyacinths
Forcing bulbs in painted jars is one of those projects that makes January feel genuinely hopeful.
10. Living Moss Frame Windowsill Art
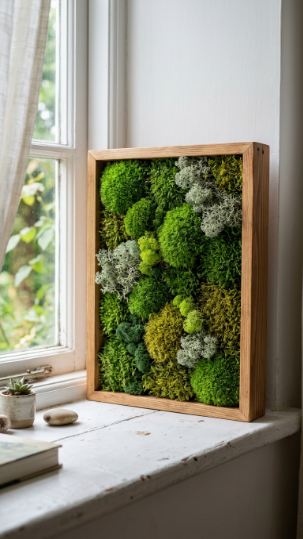
A moss frame is a DIY windowsill project that doubles as botanical wall art — and using preserved moss means zero maintenance, no watering, and permanent colour for 3–5 years.
Use a deep shadow box frame (at least 4cm depth) with the backing board still in place. Attach chicken wire across the opening using a staple gun, then push preserved sheet moss, cushion moss, and reindeer moss into the wire grid, mixing textures for visual depth. Secure with small U-pins (floral pins) pushed through the moss into the backing board. No glue is needed — the layered compression holds everything in place.
Preserved moss contains glycerin from the preservation process, which keeps it supple and prevents brittleness. It requires no light, no water, and no soil — making it genuinely the most low-maintenance windowsill project on this list. For a windowsill display, prop the frame upright rather than hanging it.
Pro Tip: Lightly mist preserved moss with water once every 2–3 months — the glycerin treatment means it can still absorb a small amount of ambient humidity, which keeps the colours richer and prevents the grey brittleness that sometimes develops in very dry, centrally-heated rooms.
Internal link: See our guide to moss wall art for beginners — greenbotanicalgarden.com/preserved-moss-wall-art-guide/ External link: Gardeners World: using moss in home décor — gardenersworld.com/how-to/garden-design/how-to-use-moss-in-your-garden-and-home/
A moss frame brings the texture of a forest floor onto your windowsill — and it asks absolutely nothing of you in return.
11. Chalkboard Pot Herb Label System
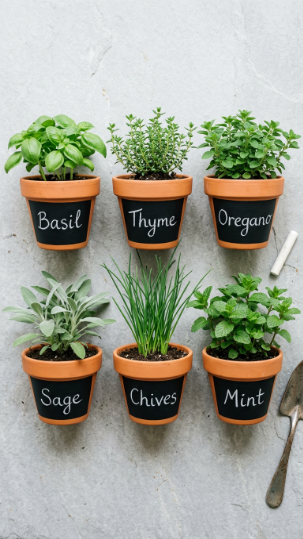
Painting a chalkboard section onto terracotta pots solves one of the most common beginner frustrations: not knowing which herb is which after a few weeks of growth.
Apply two coats of chalkboard paint (available from DIY shops for under £5 for a 250ml tin) to the front third of each terracotta pot, letting each coat dry for 30 minutes. Once cured for 24 hours, use chalk or a chalk pen to write the herb name and watering frequency directly on the pot — “BASIL — 2x week” keeps care information at a glance. Wipe clean with a damp cloth and rewrite as needed, making it infinitely updatable as you change plants seasonally.
This project works especially well for beginner herb gardens because seedlings of basil, parsley, and coriander look nearly identical at the two-leaf stage. Noting watering days directly on the pot also dramatically reduces both overwatering and neglect.
Best chalk pens and tips:
- Best chalk pens for legibility: white Posca PC-3M or Molotow Chalk Marker
- Avoid regular chalk on outdoor pots — it washes off in rain within days
- Advanced version: add a small botanical illustration above the herb name
Internal link: Read our guide to labelling and organising a windowsill herb garden — greenbotanicalgarden.com/organising-windowsill-herb-garden/ External link: Almanac: growing herbs indoors on a windowsill — almanac.com/plant/herbs
A chalkboard pot system turns a basic herb garden into something intentional, organised, and genuinely attractive to look at every single day.
12. Recycled Colander Strawberry Planter
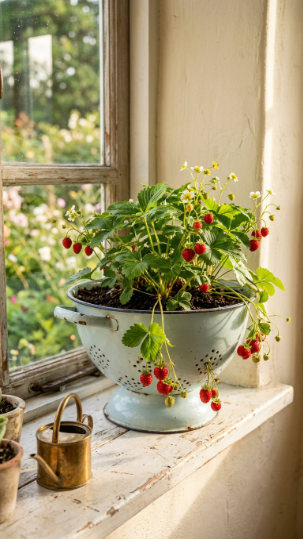
An old enamel or metal colander makes one of the most brilliantly functional DIY windowsill planters in existence — the built-in holes provide perfect drainage without any modification, and the shape allows trailing strawberry runners to cascade elegantly through the sides.
Line the interior with two layers of burlap or hessian sacking (not cling film, which blocks airflow) to retain compost while allowing excess water to escape freely through the holes. Fill with 60% John Innes No. 2 and 40% coarse grit. Plant 3–4 trailing variety strawberry plugs (Fragaria ‘Elan’ or ‘Temptation’) at intervals, angling the roots gently toward the sides so runners eventually escape through the holes and hang decoratively.
The key advantage of a colander planter over a standard pot is airflow around the root ball — this significantly reduces the fungal issues (botrytis grey mould) that commonly affect strawberries in stagnant container environments. Water from the top until it runs freely from the base holes, then wait until the top 3cm of compost is dry before watering again.
Pro Tip: Spray the exterior of a plain metal colander with enamel spray paint in any colour before planting — it takes 20 minutes, protects against rust indefinitely, and transforms a car boot find into a bespoke planter.
Internal link: Explore our windowsill fruit growing ideas — greenbotanicalgarden.com/windowsill-fruit-growing-ideas/ External link: University of Florida Extension: growing strawberries in containers — extension.ufl.edu/gardening/strawberries/
A colander strawberry planter is the kind of project that earns a genuinely delighted reaction from everyone who sees it.
13. Carved Driftwood Succulent Bowl
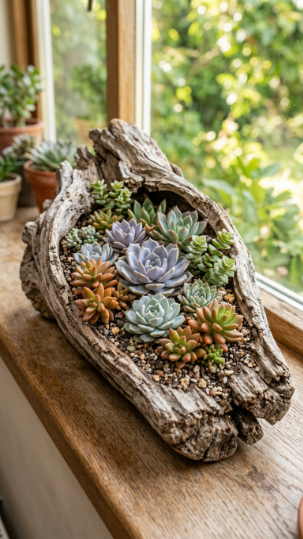
Naturally hollow driftwood pieces make extraordinary planting vessels — no carving required if you forage well — and the organic shape creates an irreplaceable sculptural quality no manufactured pot can match.
Look for driftwood with a natural concave hollow large enough to hold at least 5cm of compost depth. Seal the base interior with two thin coats of PVA glue diluted 50/50 with water — this slows moisture transmission through the wood without eliminating it entirely, extending the vessel’s life significantly. Fill with pure succulent compost mixed 50/50 with horticultural grit for maximum drainage.
Plant a mixture of small rosette-forming succulents at slightly different heights: Echeveria ‘Lola’, Sedum album, Crassula perforata, and Sempervivum arachnoideum all work beautifully together. Water sparingly — once every 12–16 days in summer, once every 3–4 weeks in winter. Direct sun for 5+ hours daily keeps the colours vivid.
Internal link: Discover our guide to succulent arrangement design — greenbotanicalgarden.com/succulent-arrangement-design-tips/ External link: Missouri Botanical Garden: Echeveria plant profile — missouribotanicalgarden.org
Driftwood succulent bowls are deeply individual — no two are ever quite alike, and that’s exactly what makes them so compelling.
14. Mini Indoor Water Garden in a Glass Bowl
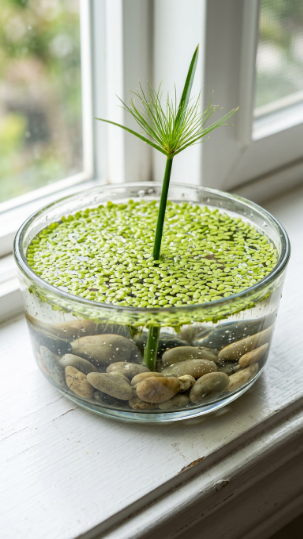
A glass bowl water garden is one of the most unexpected DIY windowsill projects on this list — aquatic plants grow at a remarkable pace, the water element adds a meditative quality, and the upkeep is genuinely minimal once established.
Use a clear glass bowl at least 20cm in diameter and 15cm deep. Add a 3cm base layer of aquatic compost, then place dwarf varieties in 7cm aquatic planting baskets: miniature papyrus (Cyperus papyrus ‘Nanus’), water lettuce (Pistia stratiotes), or hornwort (Ceratophyllum demersum) are all ideal. Add duckweed (Lemna minor) on the surface for a floating layer.
Top up with rainwater or de-chlorinated tap water. Place on a south or west-facing windowsill receiving 4–6 hours of light. Change 25% of the water every 2 weeks to prevent stagnation and algae overgrowth.
Pro Tip: Drop a single pond snail into your water garden — it grazes on algae that forms on the glass walls, dramatically reducing green clouding without any chemical treatment or effort on your part.
Internal link: See our guide to indoor water gardens for beginners — greenbotanicalgarden.com/indoor-water-garden-bowl-guide/ External link: RHS: aquatic plants for small containers — rhs.org.uk/plants/types/aquatic/in-containers
A water garden on your windowsill does something no other project achieves — it brings the sound and light of water into your everyday indoor space.
15. Woven Seagrass Basket Fern Display
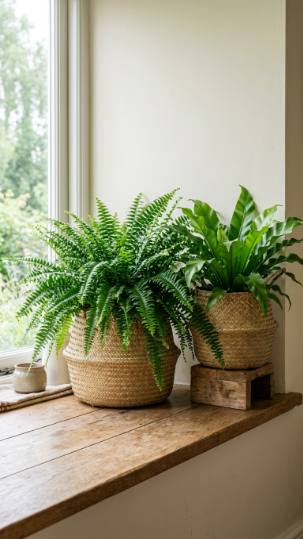
A north-facing windowsill often frustrates gardeners because most plants struggle in low light — but ferns are perfectly suited to exactly these conditions, and a seagrass basket transforms a functional pot into something genuinely beautiful.
Boston fern (Nephrolepis exaltata) and bird’s nest fern (Asplenium nidus) are the two best windowsill ferns for low-light conditions — both tolerate 1–3 hours of indirect light daily and actually prefer it to direct sun. Place nursery pots directly inside seagrass baskets without removing them; the basket provides the aesthetic while the plastic nursery pot retains moisture and prevents basket rot.
Ferns will show brown leaf tips within 2–3 weeks in a centrally heated room with under 40% humidity. Use a pebble tray filled with water beneath each basket, and mist fronds every 3–4 days with room-temperature water.
Best ferns and tips:
- Best for north-facing windowsills: Asplenium nidus, Nephrolepis exaltata, Adiantum raddianum
- Avoid on north-facing sills: succulents, herbs, cacti — they will not survive below 3 hours of light
Internal link: Read our complete guide to ferns as houseplants — greenbotanicalgarden.com/ferns-as-houseplants-care-guide/ External link: Gardenersworld.com: how to grow indoor ferns — gardenersworld.com/how-to/grow-plants/how-to-grow-ferns-indoors/
A seagrass basket fern display turns the most neglected windowsill in your home into its most lushly satisfying corner.
16. Salad Leaf Grow-and-Cut Window Box
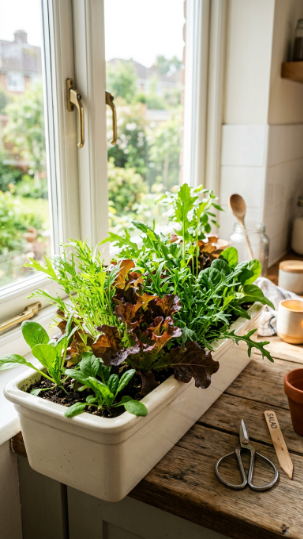
A windowsill salad box is one of the most immediately practical DIY windowsill projects on this list — you’re growing food you can harvest and eat within 25–30 days of sowing, and you can keep harvesting from the same plants for 3–4 months.
Use a window box at least 60cm long and 12cm deep. Fill with free-draining multi-purpose compost mixed with 20% perlite. Sow cut-and-come-again varieties thickly: ‘Salad Bowl’ mixed lettuce, wild rocket, ‘Mighty Red’ mustard, spinach ‘Medania’, and mizuna work brilliantly together and mature at similar rates.
Thin to 5cm spacing once seedlings reach 3cm tall — overcrowded salad leaves compete for nutrients and become vulnerable to damping off fungal disease. Feed every 10 days with a nitrogen-rich liquid fertiliser to promote lush, tender leaves rather than tough, bitter ones.
Pro Tip: Harvest by cutting only the outer leaves to 3cm above the base — the central growing point remains intact and produces fresh growth within 7–10 days, giving you a continuous crop rather than a single harvest.
Internal link: See our complete windowsill salad growing guide — greenbotanicalgarden.com/windowsill-salad-growing-guide/ External link: RHS guide to growing salad leaves in containers — rhs.org.uk/vegetables/lettuce/grow-your-own
Nothing makes you feel more genuinely connected to your food than snipping fresh rocket from your own kitchen windowsill for tonight’s salad.
17. Vintage Book Spine Succulent Shelf
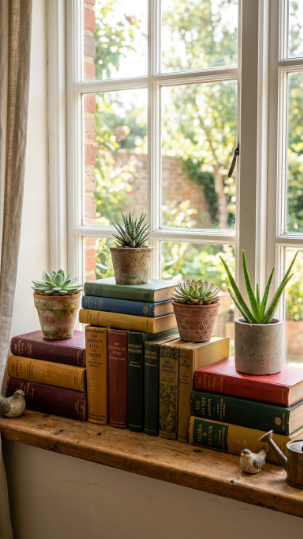
Stacking vintage hardbacks as risers beneath windowsill pots creates height variation that makes even a simple row of succulents look thoughtfully curated — a styling trick used by professional plant stylists that costs nothing if you already own books.
Choose hardback books with visually interesting spines in earthy tones — ochres, burgundies, and forest greens complement plant material best. Stack in groups of two to four to create varying platform heights: 4cm, 8cm, and 12cm elevations create a pleasingly dynamic rhythm across the windowsill. Protect books against water damage by placing each pot on a small cork trivet or adhesive felt pad.
This approach is particularly effective for displaying succulent collections — position compact varieties at the back (elevated) and trailing forms at the front (lower), mimicking the tiered planting structure of a professional arrangement.
Best plants and styling tips:
- Best for tiered display: trailing Sedum ‘Burro’s Tail’ at front; upright Crassula ovata behind
- Book protection tip: wrap each book in brown kraft paper before use — preserves spines indefinitely
- Advanced option: colour-coordinate book spines for a single-hue tonal backdrop
Internal link: Explore our windowsill plant styling ideas — greenbotanicalgarden.com/windowsill-plant-styling-ideas/ External link: Better Homes & Gardens: how to style a windowsill with plants — bhg.com/gardening/houseplants/windowsill-plant-styling/
The book riser trick is proof that the best plant styling solutions are often the ones that were sitting on your shelf the whole time.
18. Painted Pebble Drainage Marker System
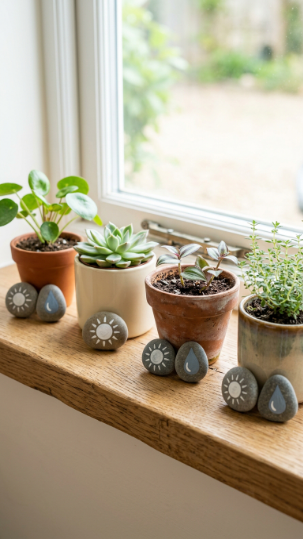
Painted pebbles used as plant care markers are one of those simple DIY windowsill ideas that solves a real problem beautifully — they provide an at-a-glance care system for every plant on your sill without any technology or paper labels.
Collect smooth river pebbles (30–50mm diameter) and paint each with one of three symbols using a fine brush and chalk paint: a sun symbol for “full sun — south-facing only,” a half-sun for “indirect light — east or west-facing,” and a water droplet symbol for “high moisture — water twice weekly.” Place the relevant pebble beside each plant pot. Over time, develop your own symbol language — a snowflake for cold-tolerant, a thermometer for temperature-sensitive.
This system is particularly valuable for beginners managing mixed windowsill collections where care requirements vary significantly plant-to-plant. It also makes it easy to water-sit for someone else — they simply match the symbol to the instruction card you leave them.
Pro Tip: Use a chalk pen rather than a brush for symbols — the precise tip produces clean, readable marks, and symbols can be wiped away and updated with a damp cloth if you change which plant occupies that position.
Internal link: Discover our beginner’s guide to windowsill plant care routines — greenbotanicalgarden.com/windowsill-plant-care-routines-beginners/ External link: Gardenersworld.com: plant care basics for beginners — gardenersworld.com/how-to/grow-plants/plant-care-for-beginners/
A pebble care marker system turns a busy windowsill garden into something genuinely manageable — even when life gets distracting.
Getting Started With DIY Windowsill Projects
The best first step is genuinely the simplest one: go to your windowsill right now and observe it for light. Stand at the window at midday and note whether you see direct sun hitting the sill. South-facing sills with 4+ hours of direct light can support herbs, succulents, salad leaves, and strawberries. East or west-facing sills suit propagation stations, ferns, and trailing vines. North-facing sills are best reserved for moss frames, preserved displays, or very low-light houseplants like asplenium fern. Knowing your light orientation takes 30 seconds and prevents every beginner’s most expensive mistake: buying the wrong plant for the window.
The most common error among new windowsill gardeners is attempting too many projects simultaneously. Start with exactly one project from this list — ideally a tin can herb garden or a salad leaf window box, both of which show visible results within 2–3 weeks and reinforce the habit of daily observation. A single herb tin of basil on a sunny sill teaches you more about watering, light, and plant behaviour in one month than any book or video can.
Your first purchase should be a 3-litre bag of perlite (£3–£4) — it’s the single most universally useful amendment across every project on this list, improving drainage for succulents, herbs, salad, and container fruits alike. One pot, one plant, one bag of perlite: that’s everything you need to start.
Expect your first windowsill project to look somewhat untidy for the first 3–4 weeks as plants establish and settle in. By week six, healthy plants on a well-lit sill will fill in their containers and begin to look deliberately composed. Patience through the first month is the single trait that separates successful windowsill gardeners from those who give up too early.
Frequently Asked Questions
What are the best DIY windowsill projects for a north-facing window?
North-facing windowsills receive minimal direct light, so the best projects are those that suit low-light conditions or require no light at all. A preserved moss frame (project 10) is an excellent choice — it requires zero light whatsoever. For living plants, Boston fern (Nephrolepis exaltata) in a seagrass basket thrives in 1–3 hours of indirect light, as does the bird’s nest fern (Asplenium nidus). Avoid herbs, succulents, and salad leaves entirely on north-facing sills — they require a minimum of 4 hours of direct sun and will decline within 2–3 weeks in low light.
How often should I water plants on a south-facing windowsill in summer?
South-facing windowsills in summer can reach 28–35°C on the glass itself, dramatically accelerating evaporation from the compost. Succulents will need watering every 7–10 days. Herbs like basil and mint need watering every 2–3 days — check by pushing your finger 2cm into the compost; if it’s dry at that depth, water thoroughly. Salad leaves may need daily watering in peak summer heat. A terracotta pot retains moisture less than a glazed ceramic pot, so factor in your container material when assessing frequency.
Can I do windowsill projects if I’m a complete beginner with no gardening experience?
Absolutely — many of the projects on this list are specifically designed for gardening beginners. The tin can herb garden (project 1) is an ideal starting point: the plants are forgiving, growth is visible within days of germination, and the project teaches all the foundational skills (watering, light observation, soil mixing) that transfer to more complex projects later. A painted pebble marker system (project 18) requires no plant knowledge at all and takes 30 minutes to complete. Start with one project, succeed with it, then expand.
Why are my windowsill herbs dying even though I water them regularly?
Overwatering is far and away the most common reason windowsill herbs die — and the symptoms (yellowing leaves, wilting, stem collapse) look identical to underwatering. If the compost feels wet or cool to the touch and the plant is wilting, you are overwatering. Allow the top 2–3cm of compost to dry completely between waterings for most herbs. Basil prefers slightly more consistent moisture but still despises soggy roots. Ensure every pot has drainage holes; pots without drainage accumulate water at the base and suffocate roots within days.
What soil mix should I use for DIY windowsill projects?
Different projects require different mixes. For herbs and salad leaves: 80% multipurpose compost, 20% perlite. For succulents and cacti: 50% multipurpose compost, 50% horticultural grit or coarse perlite. For ferns and moisture-loving plants: 70% peat-free multipurpose compost, 15% perlite, 15% fine bark chips. For bulb forcing in pebbles: no compost needed — use washed river pebbles alone. The universal rule is to avoid standard garden soil, which compacts in containers, drains poorly, and usually contains weed seeds.
A Few Final Thoughts
These 18 DIY windowsill projects represent the full spectrum of what a single strip of glass and sunlight can become — from edible herb gardens to sculptural air plant displays, from water gardens to literary succulent shelves. A windowsill is not a limitation; it’s a canvas. And every single project on this list can be started today with materials you either already own or can source for under £10.
The most important insight across all 18 ideas is this: match the project to the light you have, not the light you wish you had. One successful, well-chosen project will do more for your confidence as a plant parent than ten ambitious attempts in the wrong conditions. Start with the idea that excites you most, put it in the right window, and give it four weeks. By then, you’ll know exactly which project to try next.
One seed, one pot, one sunny windowsill — your green DIY windowsill project adventure starts today.