
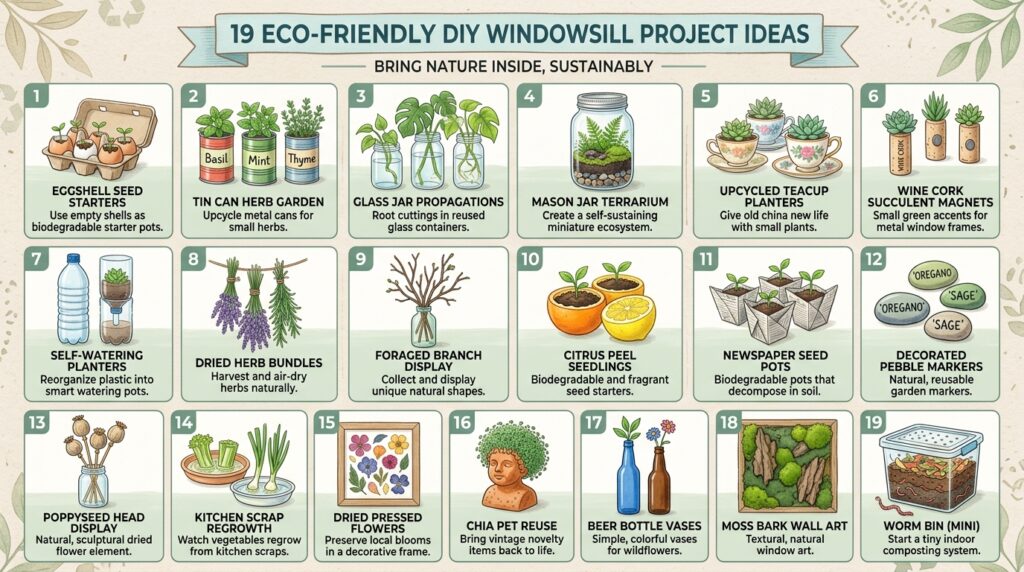
Your windowsill is one of the most sustainable gardening spaces in your home — sun-powered, rain-fed if you position pots correctly, and perfectly sized for projects that use materials most people already own or can rescue from the recycling bin. If you’ve been wanting to create a greener, more intentional windowsill but don’t know where to begin without buying a heap of new plastic, these 19 eco friendly DIY windowsill project ideas will show you exactly what’s possible. Each one prioritises upcycled containers, peat-free growing media, water conservation, or zero-waste plant propagation — because sustainable gardening should start with the smallest, most accessible space you have. Ready? Let’s explore all 19 of them.
Why Eco Friendly DIY Windowsill Projects Are Worth Your Time
Eco friendly windowsill projects are genuinely more satisfying than their conventional equivalents — not because sustainability is a trend, but because working with what you already have, growing from seed, and closing the loop between kitchen scraps and new plants creates a connection to the growing process that buying a packaged plant from a supermarket simply doesn’t provide. Gardeners consistently find that upcycled container projects and seed-saving experiments produce more pride per plant than any purchased display.
The practical environmental benefits are real and cumulative. Choosing peat-free compost reduces demand for extracted bog habitat. Using reclaimed containers eliminates single-use plastic. Collecting rainwater for windowsill watering reduces your household’s treated water consumption. Propagating from cuttings rather than buying new plants multiplies your collection at zero environmental or financial cost. Each small decision compounds into a meaningfully different kind of garden.
A lesser-known fact: peat-free compost blends based on coir, bark, and green compost now match or outperform traditional peat-based mixes for most houseplants and herbs — the reputation of peat-free as “inferior” is largely outdated, and many growers find root development is actually superior in modern peat-free formulations.
These projects are ideal for eco-conscious beginners, renters, zero-waste households, and anyone who wants their plant collection to align more honestly with their environmental values.
At a Glance
- Growing microgreens in a repurposed takeaway container produces your first harvest in just 7–10 days — the fastest possible return on any eco friendly DIY windowsill project.
- A single comfrey plant grown on a windowsill ledge from a root cutting provides unlimited free liquid fertiliser for every other plant in your home, costing nothing once established.
- Egg carton seed trays are genuinely compostable directly into the soil when seedlings are ready to transplant — no plastic to dispose of, ever.
- Collecting the condensation water from a cold window on a humid morning can provide enough water for a small pot plant — every drop of harvested water reduces treated water use.
- Saving seeds from a single supermarket chilli pepper produces 20–30 seeds for free, enough to fill an entire windowsill propagation project the following spring.
1. Upcycled Tin Can Herb Garden with Drainage Holes
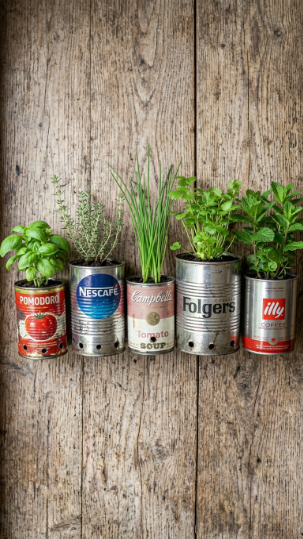
Tin can herb planters are the most immediately achievable of all eco friendly DIY windowsill project ideas — they use containers that would otherwise go to landfill and cost absolutely nothing.
Collect food-grade tin cans: tomato tins (400g, ideal for single herb plants), large coffee cans (excellent for mint and basil), and smaller bean tins for chives and thyme. Use a hammer and a thick nail to punch 5–6 drainage holes in the base of each can. To prevent rust staining the windowsill, press a circle of cork sheet or a small rubber mat under each can — this also improves air circulation around the base.
Fill with a peat-free multipurpose compost mixed with 15% perlite for drainage. Plant one herb per can: keep mint in its own tin to prevent root spread. Place on a south or west-facing windowsill with 4–6 hours of direct sun. Water when the top centimetre of compost feels dry — typically every 2–3 days in summer for metal containers, which heat up faster than terracotta and can dry out more quickly.
The expert trick: paint the outside of the cans with chalk paint mixed with a teaspoon of baking soda for a matte, breathable finish that reduces the heat-absorption of bare metal in direct sun.
💡 Pro Tip: Line tin cans with a single sheet of newspaper before adding compost — it absorbs excess moisture, slows rust development on the inside of the can, and extends the planter’s useful life by 12–18 months.
Read about upcycled tin can herb garden ideas for eco windowsill projects and find herb container growing guidance from The Old Farmer’s Almanac.
A row of tin can herbs on your kitchen windowsill is the simplest possible proof that eco friendly gardening costs less, not more.
2. Egg Carton Seed Tray for Compostable Sowing

Egg carton seed trays are compostable, freely available in any kitchen, and — unlike plastic seed trays — can be planted directly into soil once seedlings are ready, roots and all, with zero transplant shock and zero plastic waste.
Use a standard 6 or 12-cup cardboard egg carton, not polystyrene. Pierce a small drainage hole in the base of each cup with a pencil. Fill each cup with a fine peat-free seed compost (Melcourt or Klasmann peat-free formulations are both excellent for small seeds). Sow 2–3 seeds per cup, covering to a depth of twice the seed’s diameter — most small herb and flower seeds need no more than 3mm of cover.
Water by misting with a spray bottle rather than pouring — direct water flow on small seeds displaces them and causes uneven germination. Once seedlings develop their first true leaves (the second pair after the initial seed leaves), cut each carton cup apart individually with scissors and plant the whole cup directly into a larger container. The cardboard decomposes within 3–4 weeks, feeding the soil as it breaks down.
💡 Pro Tip: Soak the egg carton base briefly in water before filling with compost — this pre-moistens the cardboard, which otherwise draws moisture away from the compost and can slow germination by several days.
Discover compostable seed tray alternatives for eco windowsill sowing and explore seed sowing in containers from Penn State Extension.
Growing from compostable egg cartons means your eco friendly windowsill project creates zero packaging waste from the very first seed.
3. Peat-Free Succulent Windowsill Display in Reclaimed Crockery
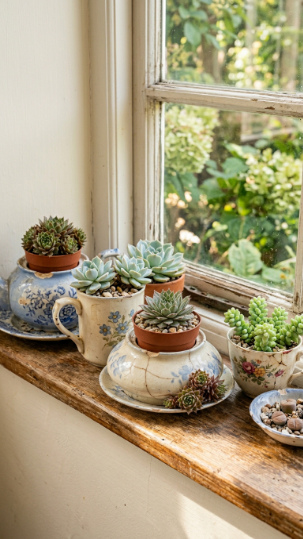
Repurposing chipped or broken crockery as succulent containers is the most poetic of eco friendly DIY windowsill project ideas — giving damaged objects a second life as planters rather than sending them to landfill.
Crockery without drainage holes works for succulents provided you use a very gritty growing medium and water with extreme restraint. Mix three parts coarse horticultural grit with one part peat-free cactus compost — this creates a mix so free-draining that roots dry out between waterings even without drainage, preventing the rot that would kill succulents in standard compost without drainage. Add a 1cm layer of activated charcoal at the base to absorb any excess moisture and prevent bacterial build-up.
Sempervivum tectorum (common houseleek) and compact Echeveria varieties are the best choices for drainage-free crockery: both are genuinely drought-adapted, drawing on their own internal water reserves between waterings. Water only a tablespoon’s worth every 14–21 days — far less than instinct suggests.
Position on a south-facing windowsill with 4–6 hours of direct sun. The crockery’s ceramic material retains warmth, which succulents appreciate, but also retains moisture — erring on the side of underwatering is always correct here.
Explore reclaimed crockery succulent planters and peat-free growing mixes and find sempervivum care from Missouri Botanical Garden.
A chipped mug with a sempervivum rosette is one of those things that looks like it was found in a beautiful shop — not rescued from the recycling.
4. Kitchen Scrap Regrowth Windowsill Station
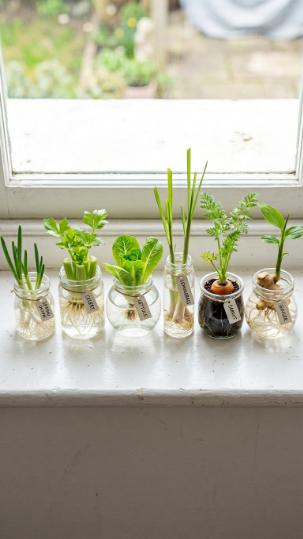
Regrowing kitchen scraps on a windowsill is the purest expression of zero-waste gardening — turning food you’ve already bought into new, productive plants at exactly zero additional cost.
Spring onions (Allium fistulosum) are the most reliable starting point: place the root end (the last 3–4cm with roots intact) in a glass jar with 1cm of water. New green shoots emerge within 3–5 days and can be harvested repeatedly for weeks. Celery base, fennel stump, and Chinese cabbage hearts all regrow similarly — change the water every 2 days to prevent bacterial build-up.
Ginger (Zingiber officinale) and turmeric (Curcuma longa) require a different approach: press a fresh rhizome (with visible growth nodes or “eyes”) just below the surface of peat-free multipurpose compost in a 12cm pot. Keep the compost consistently moist at 18–22°C on a warm windowsill. New shoots emerge in 2–4 weeks, and the plant can be maintained as a long-term tropical windowsill specimen.
Carrot tops and beetroot crowns regrow attractive ferny foliage in a shallow tray of water, purely as decorative green displays rather than productive crops — beautiful and effortless.
Best kitchen scraps for windowsill regrowth:
- Spring onion roots — new shoots in 3–5 days
- Lemongrass stalk — roots in water, transplant to pot
- Celery base — leaves in 7–10 days in water
- Ginger rhizome — full growing plant in compost
Learn about kitchen scrap regrowth projects for eco windowsill stations and find vegetable regrowth guidance from BHG.
A kitchen scrap regrowth station turns the act of cooking into the beginning of the next growing project.
5. Rainwater Collection Jar for Windowsill Watering
🖼️ IMAGE PROMPT: A realistic close-up photograph of a large repurposed glass kilner jar positioned on an outside windowsill ledge in light rain, collecting rainwater, with a small watering scoop beside it and a potted herb visible in the window behind. Lighting: soft overcast grey natural light. Color palette: clear glass, steel-grey sky, green herb, rain droplets. Mood: practical, ecological, calm. Photography

: close-up eye-level. Background: rainy grey sky. Style tags: photorealistic, 8K, botanical photography, magazine quality, no people.
Collecting rainwater for windowsill plants is the most direct eco friendly upgrade you can make to your indoor plant care routine — rainwater’s naturally soft, slightly acidic chemistry benefits acid-preferring plants noticeably over hard tap water.
Position a large glass kilner jar or repurposed food jar on your outer windowsill ledge during rain. A 2-litre jar fills in approximately 15–20 minutes of moderate rainfall and provides enough water for 4–6 small windowsill pots. Store collected water in a cool, dark location and use within 2 weeks — beyond this, standing water can develop algal or bacterial growth.
Rainwater is particularly beneficial for Ferns, Calathea, Gardenia, and any lime-hating plants that show brown leaf tips and yellowing when watered with hard tap water. These symptoms are caused by the fluoride and calcium carbonate in mains water — rainwater contains neither. In practice, switching a Calathea ornata from tap water to collected rainwater consistently reverses tip burn within 3–4 watering cycles.
If you cannot collect rainwater, leave tap water in an open container overnight before using — this allows chlorine to dissipate and the temperature to equalise to room temperature, both of which reduce the risk of shocking sensitive plant roots.
💡 Pro Tip: Add a small piece of window screen mesh secured over the jar opening with a rubber band — this keeps out debris, insects, and dust while still allowing rain to collect freely.
Read about rainwater collection for indoor and windowsill plant care and find watering guidance for container plants from Penn State Extension.
Collected rainwater is the simplest possible gift you can give to the plants that struggle most with your local tap water.
6. Eco Friendly DIY Windowsill Seed Saving Station
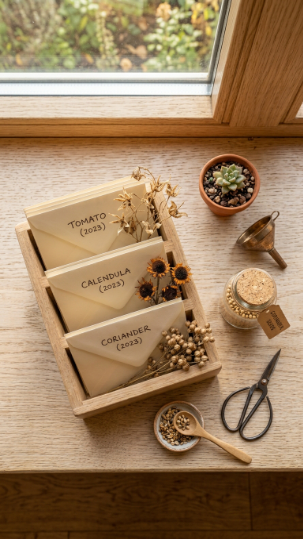
A seed saving station turns a windowsill into an annual zero-waste seed bank — saving seeds from your strongest plants year-on-year produces both a free supply of seeds and, over successive generations, plants increasingly adapted to your specific windowsill conditions.
Collect seed from open-pollinated or heirloom varieties only — F1 hybrid seeds do not breed true from saved seed, producing unpredictable results. The best windowsill crops for seed saving: coriander (Coriandrum sativum, seeds dry fully on the stem), basil (Ocimum basilicum, let one stem flower and set seed before cutting), calendula (Calendula officinalis, seed heads dry visibly brown on the plant), and chilli peppers (remove seeds from ripe fruit, dry on a paper towel for 5–7 days).
Allow seed heads to dry fully on the plant before collecting — harvesting damp seeds into envelopes causes mould. Once harvested, spread seeds in a single layer on a paper plate on the windowsill for 7–10 days of additional drying. Store in small paper envelopes (not plastic bags, which trap residual moisture) labelled with plant name, variety, and collection date. Keep in a cool, dry, dark drawer — seeds stored correctly retain viability for 2–5 years depending on species.
Explore eco windowsill seed saving techniques and open-pollinated seed guides and find seed saving and storage guidance from Missouri Botanical Garden.
A seed saving station makes your windowsill garden genuinely self-sustaining from one season to the next.
7. Newspaper Seed Pots for Zero-Waste Propagation
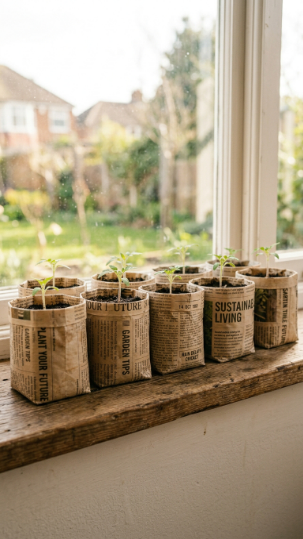
Newspaper seed pots are fully compostable, free to make, structurally sturdy for the 6–8 weeks most seedlings need before transplanting, and require nothing but a cylindrical object like a wine bottle as a mould.
Take a full broadsheet page and fold it in half lengthwise, then fold in half again to produce a 60cm × 15cm strip. Wrap around the base of a cylindrical object (a wine bottle, a glass, a rolling pin) with approximately 5cm extending beyond the base. Fold the extending paper inward and press firmly to form the base — no glue needed. Slide off the mould and press the base flat. The finished pot is approximately 8cm in diameter and 10cm tall: the right size for tomato, chilli, and courgette seedlings.
Fill with peat-free seed compost, sow 2 seeds per pot at the appropriate depth, and water by standing pots in a tray of water for 30 minutes (bottom watering prevents displacing seeds and reduces damping-off disease risk). When seedlings are ready to transplant, plant the entire newspaper pot — the paper decomposes within 4–6 weeks and root growth passes through it freely.
💡 Pro Tip: Use black and white newspaper pages only — coloured ink sections contain heavy metal pigments that are not appropriate for edible plant growing, even in compostable pots.
Find newspaper seed pot making guides for eco windowsill propagation and read seed starting and propagation methods from Penn State Extension.
A newspaper seed pot is a perfect loop: yesterday’s news becomes today’s propagation tool and tomorrow’s garden compost.
8. Peat-Free Moss Terrarium in a Recycled Glass Jar
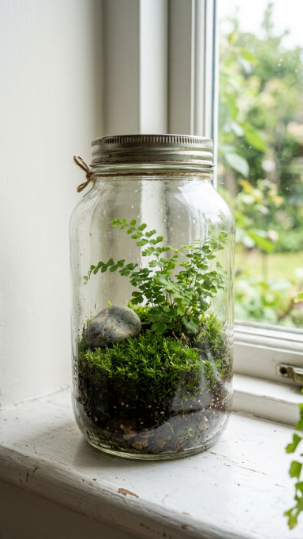
A recycled glass jar terrarium uses a container that would otherwise be recycled into new glass and creates a self-sustaining micro-ecosystem with minimal ongoing resource input — no drainage, minimal watering, and no purchased containers.
Clean a large glass jar thoroughly — pasta sauce jars (700g–1kg), pickle jars, and large coffee jars all work well. Add a base layer of pebbles collected from a garden path or purchased in small quantities (2–3cm depth) for drainage, a thin layer of activated charcoal, then 4–5cm of peat-free terrarium compost or a mix of multipurpose peat-free compost with added sphagnum moss.
Press a small piece of cushion moss firmly onto the compost surface — foraged from your own garden sustainably or purchased from a garden centre. Add a single small fern (Asplenium trichomanes is excellent for jar terrariums) tucked against one side. The jar’s closed environment creates its own humidity cycle: moisture evaporates from the soil, condenses on the glass, and returns to the soil. Mist once every 2–3 weeks rather than watering.
Position on a north or east-facing windowsill with bright indirect light — direct sun through glass concentrates heat and will cook the moss within days.
Explore peat-free moss terrarium projects using recycled glass containers and read moss terrarium and closed ecosystem plant care from the RHS.
A glass jar terrarium is the closest thing to a self-sustaining windowsill ecosystem that requires almost nothing from you once established.
9. Comfrey Liquid Fertiliser from a Windowsill Pot
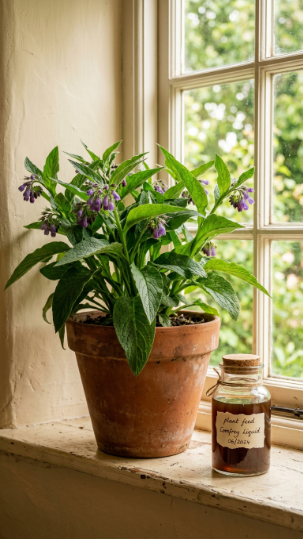
Growing comfrey on your windowsill provides an unlimited, genuinely free source of liquid fertiliser that is richer in potassium and phosphorus than most commercial products — and it’s ready within weeks of planting.
Comfrey (Symphytum officinale) grows vigorously from a root cutting planted in a 20–25cm deep terracotta pot filled with peat-free multipurpose compost. A west or east-facing windowsill with 3–4 hours of light is adequate — comfrey is not fussy. Once established (4–6 weeks from planting), harvest outer leaves by cutting at the base; new leaves regrow within 2 weeks.
To make liquid fertiliser: pack harvested comfrey leaves into a lidded container, cover with water, and leave for 3–4 weeks. The resulting liquid is strongly coloured dark brown and pungent — dilute at 1:15 with water before applying to any plant. Applied every 2 weeks during the growing season, comfrey feed produces measurably improved fruit and flower production in tomatoes, peppers, and flowering plants compared to unfed controls.
The only challenge: comfrey liquid fertiliser smells unpleasant during fermentation. Keep the container lidded and place outdoors or in a well-ventilated space during the 3–4 week steeping period.
Best plants to feed with comfrey liquid fertiliser:
- Tomatoes — use from first flower formation
- Chilli peppers — dilute 1:15, feed fortnightly
- Pelargonium — improves flowering significantly
- Cucumber — feed at fruit development stage
Find how to grow comfrey and make free liquid fertiliser for windowsill plants and read organic fertiliser and plant feeding guidance from Gardeners’ World.
A pot of comfrey on your windowsill is an investment that pays dividends to every other plant you grow.
10. Eco Friendly DIY Windowsill Microgreens in Repurposed Trays
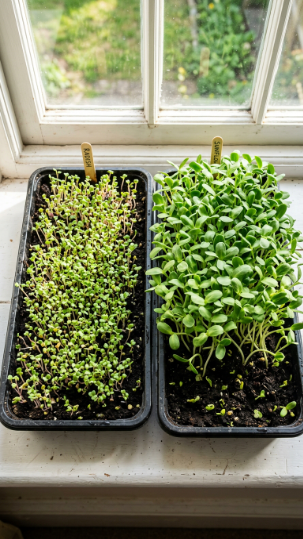
Microgreens grown in repurposed takeaway trays are the fastest possible return on any eco friendly DIY windowsill project — first harvest in 7–10 days, maximum nutritional density, and containers that would otherwise be single-use plastic.
Rinse takeaway trays thoroughly (both the base and lid — the lid becomes a bottom-watering tray). Pierce 8–10 small drainage holes in the base tray using a hot skewer. Fill with 3cm of peat-free compost, lightly firmed. Sow microgreen seeds thickly: the entire surface should be covered with seeds touching but not overlapping. Good eco choices for seeds: save chilli and tomato seeds from your kitchen (dry for 5 days first), buy organic sunflower seeds from a health food shop, or use garden cress seeds saved from last season.
Cover the sown tray with the takeaway lid (or a second tray placed upside down) for the first 3–4 days — darkness and warmth accelerate germination. Remove the cover when shoots are 2–3cm tall and expose to a bright south-facing windowsill. Harvest with scissors when shoots reach 5–7cm, cutting just above soil level. One tray produces 2–3 harvests from the same sowing.
💡 Pro Tip: Bottom-water microgreen trays by pouring water into the lid tray and standing the seeded tray in it for 20 minutes — this prevents disturbing the dense seed bed and dramatically reduces the risk of damping-off fungal disease.
Discover microgreen growing guides for eco windowsill projects using repurposed trays and find microgreen sowing and harvesting guidance from BHG.
Growing microgreens in a takeaway tray closes the loop between single-use packaging and productive, nutritious food — in under ten days.
11. Chilli Seed Saving and Resowing from Supermarket Peppers
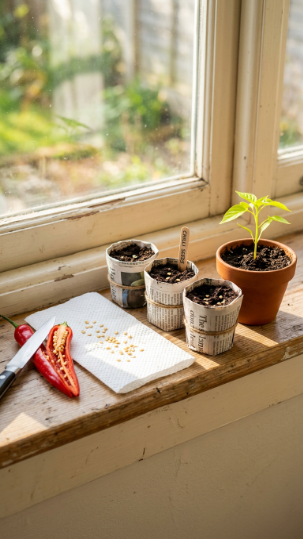
Saving seeds from a single supermarket chilli and resowing them on your windowsill is one of the most satisfying eco friendly DIY windowsill project ideas — producing 20–30 seeds from a pepper that cost less than 50p, entirely for free.
Use a fully ripe chilli (red or orange — green chillies contain immature seeds with lower viability). Slice open, extract seeds with a small spoon, and spread in a single layer on a paper towel on the windowsill for 5–7 days until completely dry. Dried seeds rattle when the paper is moved — this indicates sufficient drying for storage or sowing.
Sow in small newspaper pots or egg carton cups filled with peat-free seed compost, pressing each seed 5mm deep and covering firmly. Maintain at 22–25°C — chilli seeds require warmth to germinate reliably. A south-facing windowsill in spring is usually sufficient; a heated propagator pad set to 22°C accelerates germination significantly and is worth borrowing or purchasing if you plan to sow regularly.
Germination takes 10–21 days. Once seedlings reach 8–10cm with several true leaves, transplant into 10cm pots and continue growing on the windowsill. A windowsill chilli plant can produce 15–30 fruits across a summer season if fed with potassium-rich fertiliser (comfrey feed is ideal) every 10–14 days.
Learn about saving chilli seeds from supermarket peppers and growing on windowsills and find chilli pepper growing guidance from The Old Farmer’s Almanac.
Every chilli you save seeds from adds one more year of free growing to your windowsill collection.
12. Wool Wicking Self-Watering Windowsill Insert
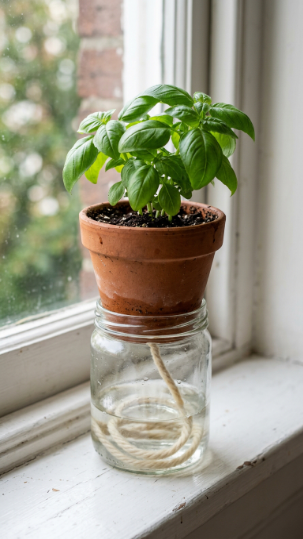
A wool wicking self-watering insert is the most sustainable low-tech irrigation solution for busy windowsill gardeners — natural wool wicks moisture by capillary action at exactly the rate the plant demands, using nothing but gravity and a glass jar.
Thread a 30cm length of 100% natural undyed wool yarn (not synthetic fibre — only natural wool wicks reliably by capillary action) through the drainage hole of a standard terracotta pot, leaving 10–15cm coiled in the compost at the base and 15cm hanging below the pot. Fill the pot with peat-free compost. Position the pot on a raised platform (a glass jar, a small terracotta saucer on a block, or a purpose-built wicking stand) with the wool tail submerged in a reservoir of water beneath.
The wool draws water upward continuously as the compost dries, maintaining consistent moisture at root level without any overwatering risk — the plant draws only what it needs. This system is particularly effective for basil, which suffers from both drought stress and overwatering and benefits enormously from consistent moisture without waterlogging.
Refresh the reservoir every 5–7 days. Replace the wool wick every 3–4 months as natural fibres eventually break down and lose wicking efficiency.
💡 Pro Tip: Use a dark glass jar as the reservoir — it prevents light penetrating the water and dramatically slows algal growth, keeping the water clean and clear for longer between refills.
Find DIY self-watering wicking systems for eco windowsill containers and read container plant watering techniques from Missouri Botanical Garden.
A wool wick system reduces water waste to near zero while keeping your most demanding windowsill plants perfectly hydrated.
13. Eggshell Seedling Starters for Calcium-Rich Transplanting
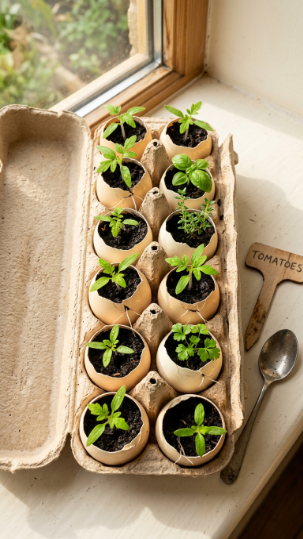
Eggshell seed starters are fully compostable, provide calcium directly to seedling roots as the shell decomposes, and add a subtle charm to any eco friendly windowsill propagation display.
Save eggshells carefully by tapping the top off gently rather than cracking in half — you need the lower two-thirds intact as a planting vessel. Rinse thoroughly and allow to dry. Use a pin to pierce one tiny drainage hole in the very base of each shell. Return the shells to the egg carton for stability and fill with peat-free seed compost using a small spoon or coffee stirrer.
Sow 1–2 seeds per shell at the appropriate depth: tomato and basil seeds need no more than 5mm cover; large seeds like sunflowers or courgettes are too large for this method. When seedlings are ready to transplant, crack the shell lightly between your fingers (several hairline fractures are sufficient) and plant shell and seedling together — the cracked shell decomposes within 3–4 weeks and the calcium it releases feeds the young plant’s cell wall development during its most vulnerable establishment phase.
This is particularly valuable for tomato seedlings: calcium deficiency is a contributing factor in blossom end rot, and eggshell calcium at the planting stage provides a useful early supplement.
💡 Pro Tip: Crush 4–5 extra eggshells and mix the fragments into the surface compost of any window pot where you’ve had slug or snail damage — the sharp edges deter molluscs without any chemical treatment.
Explore eggshell seed starter tutorials and calcium-rich compostable propagation ideas and find seed starting and seedling care from Penn State Extension.
Eggshell seedling starters prove that the most sustainable inputs are often already sitting in your kitchen bin.
14. Repurposed Wine Cork Succulent Terracotta Display
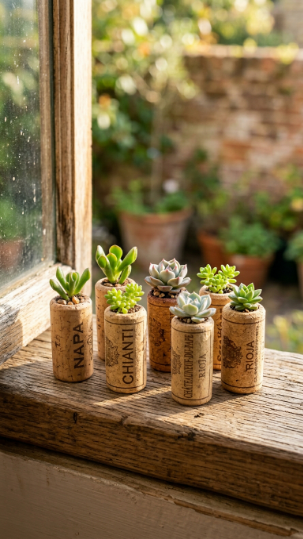
Hollowed wine corks planted with the tiniest succulents make the most miniature and conversation-starting eco friendly DIY windowsill project — each one takes five minutes to make and requires no tools beyond a hand drill.
Collect natural wine corks (not synthetic plastic corks, which cannot be drilled cleanly). Use a 10mm drill bit to bore a hole approximately 1.5cm deep in the centre of the flat end of each cork. Fill the hollow with a tiny pinch of cactus compost mixed with coarse sand. Use tweezers to plant a single small offset — a Crassula rupestris stem tip, a tiny Sedum cutting, or a small echeveria offset — pressing gently into the compost.
Cork’s natural properties make it surprisingly functional as a planting medium: it’s porous (allows air to roots), insulating (moderates temperature), and naturally anti-fungal (cork contains suberin, which inhibits mould growth). The tiny volume of compost means watering very sparingly — one small drop of water per cork every 10–14 days is genuinely sufficient.
Display in a tight cluster of five to nine, or glue to a small piece of driftwood as a wall-mounted micro-garden. Position on a south-facing windowsill with 3–4 hours of direct sun.
Find wine cork planter ideas and tiny succulent windowsill displays and explore miniature succulent varieties and care from The Sill.
Nine wine corks with nine tiny succulents on a windowsill is the kind of detail that makes a room feel genuinely inhabited by someone who notices small things.
15. Eco Friendly DIY Windowsill Wormery in a Repurposed Bin
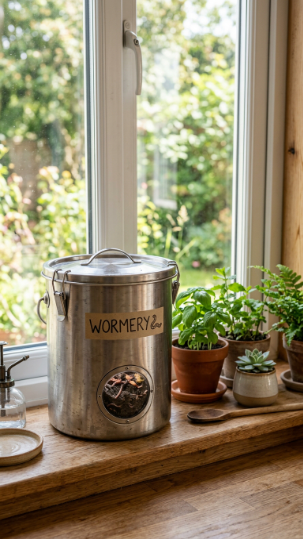
A miniature windowsill wormery in a repurposed metal bin converts a handful of kitchen scraps each day into the richest possible plant food, without the smell, space requirement, or complexity of a full outdoor compost system.
Repurpose a 5–8 litre metal or heavy plastic bin with a secure lid. Drill 6–8 ventilation holes in the lid (5mm diameter) and 4 drainage holes in the base — stand the bin on a small tray to collect the liquid “worm tea.” Create a bedding layer of dampened torn cardboard and newspaper (no glossy paper). Add 50–80 tiger worms (Eisenia fetida) — available from fishing supply shops and online composting suppliers.
Feed small quantities of kitchen scraps every 2–3 days: vegetable peelings, coffee grounds, tea bags, and fruit scraps work best. Avoid citrus, onions, garlic, meat, and dairy in a small windowsill system — the enclosed space makes odour from unsuitable materials more noticeable. Keep the bin out of direct sun; tiger worms prefer 15–22°C and will move away from heat or cold extremes.
Within 8–10 weeks, harvest worm castings from the base and mix one part castings to four parts peat-free compost when potting any windowsill plant — the nitrogen, phosphorus, and beneficial microbial content is extraordinary.
Discover miniature windowsill wormery setup and worm composting for small spaces and find vermicomposting guidance from University of Florida Extension.
A windowsill wormery proves that even in the smallest living space, you can close the loop between food waste and garden fertility.
16. Propagation Station from Repurposed Glass Bottles
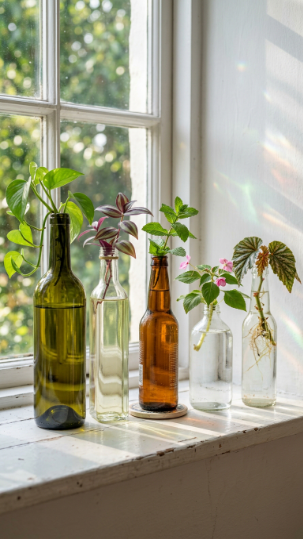
Repurposed glass bottles as propagation vessels are more beautiful and more functional than purpose-built propagation stations — their varying heights, colours, and shapes create a genuinely artful windowsill display while rooting your new plants.
Collect glass bottles in varying heights and colours: wine bottles (deep green, elegant), olive oil bottles (tall and clear), amber beer bottles (warm toned), and sauce bottles (shorter, for smaller cuttings). Clean thoroughly and remove labels by soaking in hot water with a splash of white vinegar for 30 minutes. The glass colour affects the growing environment: green and amber glass reduces light penetration to the water, which slows algae growth — one of the most practical reasons to use coloured glass over clear.
Take cuttings 10–15cm long from healthy parent plants, stripping all leaves except the top two or three. Good candidates for bottle propagation: Epipremnum aureum (golden pothos, roots in 2–3 weeks), Tradescantia zebrina (1–2 weeks), fresh supermarket mint (roots in 7 days), and Impatiens (10–14 days). Change the water every 5–7 days in clear bottles, every 7–10 days in coloured glass.
💡 Pro Tip: Add one small piece of natural charcoal to each bottle — it absorbs impurities and bacterial waste products from the water, significantly extending the time between water changes without any deterioration in root health.
Read about repurposed glass bottle propagation stations for eco windowsill displays and find plant propagation techniques from Penn State Extension.
A row of glass bottles catching the morning light with roots growing inside is the most beautiful argument for propagation over purchasing.
17. Peat-Free Hanging Pocket Garden from Reclaimed Fabric
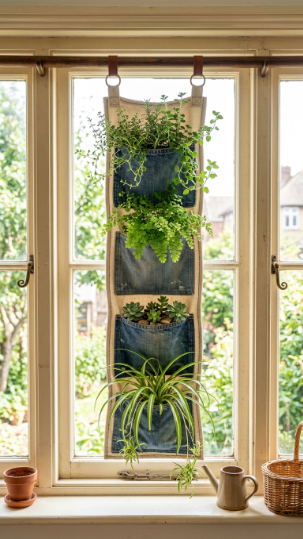
A fabric hanging pocket garden made from reclaimed material creates a vertical living wall effect in front of a window — using otherwise discarded fabric to replace plastic wall planters and PVC grow pockets.
Select a durable fabric that won’t rot quickly when in contact with moist compost: repurposed denim, heavy canvas, or thick cotton duck are all suitable. Cut into a 40cm × 60cm rectangle. Fold the lower third up and sew three vertical seams to create four horizontal pockets. Line each pocket with a piece of old polythene (a carrier bag works well, cut to fit) before filling with compost — this prevents immediate moisture transfer through the fabric while still allowing air circulation.
Fill each pocket with peat-free multipurpose compost and plant with compatible, compact species: Chlorophytum comosum (spider plant), Sedum spurium (stonecrop, tolerates the shallow pocket depth), flat-growing Thymus varieties, and small ferns for lower-light positions. Hang from the curtain rail using a wooden dowel threaded through the top hem and S-hooks.
Water pockets carefully by directing a small-headed watering can at each individual pocket — water runs between pockets if you’re not precise, and the lower pockets can become waterlogged while the upper ones stay dry.
Learn about reclaimed fabric hanging pocket gardens for eco windowsill displays and read vertical container gardening ideas from BHG.
A fabric pocket garden in front of your window makes the most of every inch of light while giving discarded textile a genuinely purposeful second life.
18. Biodegradable Wax Paper Forcing Bags for Bulbs
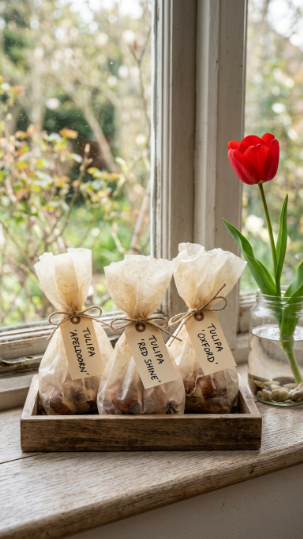
Forcing spring bulbs in biodegradable wax paper bags rather than plastic bags for cold stratification is an eco friendly DIY windowsill refinement that eliminates unnecessary plastic from the most seasonal indoor gardening project.
Tulips (Tulipa), hyacinths, and muscari all require 8–12 weeks at 5–7°C to break dormancy before they will bloom indoors. The standard method uses plastic zip-lock bags filled with slightly damp compost. The eco alternative: cut wax paper (baking parchment is fully compostable) into 30cm × 30cm squares, fill the centre with a handful of barely damp peat-free compost, place the bulb in the compost, and twist the paper into a parcel secured with a biodegradable paper tie or a strip of torn fabric.
Store in the bottom of a domestic refrigerator (not near ethylene-producing fruit, which inhibits flower development) for the required cold period. After stratification, unwrap bulbs and plant directly into peat-free bulb compost in a 12cm pot on your windowsill — no plastic to dispose of at any stage.
💡 Pro Tip: Label each wax paper parcel with the planting date and variety in pencil — pencil marks survive the cold and damp of refrigerator storage where pen ink can bleed and become illegible.
Read about forcing spring bulbs in biodegradable materials on a windowsill and find bulb forcing and cold stratification guidance from the RHS.
Biodegradable forcing bags close the final loop in a fully plastic-free seasonal bulb display.
19. Willow Water Rooting Aid for Eco Friendly Propagation
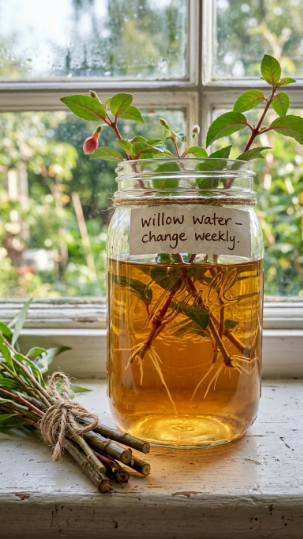
Willow water — made by steeping fresh willow stems in water — contains natural indolebutyric acid (IBA) and salicylic acid, the same rooting hormones found in commercial rooting powder but entirely free, organic, and self-made from foraged material.
Collect young willow stems (Salix species — any common willow, including pussy willow or weeping willow) in spring when they are actively growing and IBA concentrations are highest. Chop stems into 2–5cm pieces and steep in room-temperature water for 24–48 hours (cold water extraction) or bring to a simmer for 20 minutes (hot water extraction, faster and more potent). Strain out the willow material and store the amber-coloured willow water in a labelled glass jar in the refrigerator for up to 2 weeks.
Soak cuttings in the willow water for 2–24 hours before placing in your propagation vessel — this primes the cut surface for root initiation. You can also use willow water directly in your propagation bottles instead of plain water. Gardeners consistently find that cuttings started in willow water develop roots 30–50% faster than those in plain water, with higher overall success rates, particularly for woody-stemmed plants like Fuchsia, rosemary, and hydrangea.
Willow water is genuinely one of the most remarkable eco friendly discoveries in windowsill propagation — it replaces synthetic rooting hormones entirely with a foraged, zero-cost, biodegradable alternative.
Explore willow water propagation and natural rooting hormone guides and find plant propagation from cuttings at Gardeners’ World.
Willow water is the kind of knowledge that makes you feel genuinely connected to the science and the generosity of the natural world.
Getting Started With Eco Friendly DIY Windowsill Projects
The easiest possible starting point today is the kitchen scrap regrowth station (section 4). Take the root end of a spring onion from your next meal preparation, place it in a small glass jar with 1cm of water, and set it on your brightest windowsill. New green shoots will emerge within 3–5 days — a genuinely visible result before the end of the week, with zero cost and zero materials required beyond what you already own.
A challenge many eco-conscious beginners face is assuming that sustainable gardening requires buying a new set of sustainable products. In practice, the most eco friendly windowsill approach starts with what you already have: a glass jar, a tin can, some kitchen scraps, and seeds saved from this week’s cooking. Resist the impulse to purchase an eco kit — begin with what’s already in your kitchen.
For your very first deliberate purchase, make it one bag of peat-free seed compost and a packet of mixed herb seeds. These two items open the door to almost every project in this article: newspaper pots, egg carton sowing, eggshell starters, and tin can planters all use the same basic materials.
Results come faster than most people expect from eco windowsill projects. Microgreens germinate in 2–5 days and are harvestable in 7–10. Spring onion regrowth is visible in 3–5 days. Propagation cuttings in willow water root in 10–14 days. You’ll have your first genuinely satisfying eco windowsill result within a fortnight.
Frequently Asked Questions
What is the best peat-free compost for eco friendly windowsill projects?
Peat-free composts based on wood fibre, coir, or green compost blends have improved enormously in recent years. For general windowsill herb and plant growing, Melcourt SylvaGrow and Klasmann peat-free blends are both consistently well-reviewed by gardeners. For seed sowing, a finer-grade peat-free seed compost is essential — standard peat-free multipurpose can be too coarse for small seeds. Add 15–20% perlite to any peat-free mix used in small containers to improve drainage, as peat-free blends can retain more moisture than peat-based equivalents.
Can I use kitchen food waste directly in windowsill containers as fertiliser?
Raw kitchen food waste should not be added directly to windowsill containers — it attracts fruit flies, may introduce harmful pathogens, and can create nutrient burn as it decomposes against roots. The correct approach is to process kitchen waste first through a wormery (section 15) or as comfrey liquid fertiliser (section 9) before applying to plants. Diluted liquid from a worm tray at 1:10 with water, or comfrey liquid at 1:15, are both excellent organic fertilisers for windowsill plants and are safe to apply directly to soil.
How do I prevent mould on eco friendly DIY windowsill projects using newspaper or cardboard?
Mould on newspaper and cardboard seed pots is almost always caused by overwatering or poor air circulation rather than the material itself. Water only when the compost surface is dry, use bottom-watering (standing pots in a tray) rather than overhead watering, and ensure there is adequate airflow around pots — avoid crowding them together tightly. A light dusting of cinnamon powder on the compost surface has natural anti-fungal properties and is a genuinely effective organic treatment for surface mould without any synthetic fungicides.
Are eco friendly DIY windowsill project ideas suitable for rented flats?
All 19 projects in this article require no permanent fixtures, no drilling, and no modification to the property. Tin can herb gardens, glass jar propagation stations, egg carton sowing, and worm bins all work on any windowsill in any rental. The only consideration for renters is weight: large glass jars and heavy pots on a narrow windowsill should be positioned against the window frame rather than balanced on a projecting ledge, for safety. Most eco windowsill projects are actually lighter than conventional terracotta pot displays.
How do I know if my windowsill gets enough light for eco friendly herb growing?
A south-facing window in the UK receives 4–6 hours of direct sun in summer — sufficient for most culinary herbs and microgreens. East and west-facing windows receive 2–4 hours of direct sun and suit herbs like mint, chives, and parsley, which tolerate partial shade. North-facing windows receive no direct sun and are best reserved for moss terrariums, ferns, propagation cuttings (which don’t need direct sun to root), and microgreens (which tolerate lower light for 7–10 days before harvest). If your herbs become pale, leggy, or fail to develop flavour intensity, insufficient light is almost always the cause.
A Few Final Thoughts
These 19 eco friendly DIY windowsill project ideas span the full spectrum of sustainable windowsill gardening — from the first spring onion regrowth in a glass jar to the long-term satisfaction of a seed-saving station, a willow water propagation shelf, and a miniature wormery converting kitchen waste into the richest plant food available. The truth that every eco conscious gardener discovers is that sustainable gardening is genuinely cheaper, more creative, and more connected to the natural world than conventional approaches. Even beginning with one project — a tin can on the windowsill, a jar of cuttings, a handful of seeds saved from this week’s supper — changes how you see the resources around you. Your eco friendly windowsill doesn’t need new equipment or a significant budget. It needs your kitchen scraps, your used glass jars, and your sunniest ledge. One scrap, one jar, one bright window — your green and sustainable journey starts today.

