Who says Christmas decorations have to come from a store? If you’ve got a pile of old tires sitting in your garage or spotted a stack at your local tire shop, you are sitting on a goldmine of Christmas decorating potential — and we’re about to prove it in the most spectacular way possible. Recycled tire Christmas decor is one of those brilliantly creative gardening and DIY trends that ticks every box simultaneously: it’s eco-friendly, it’s incredibly affordable, it’s completely customizable, and the results are so stunning that your neighbors will genuinely think you hired a professional decorator. From tire wreaths and reindeer to giant Christmas baubles and cascading planter displays, there’s an idea in here for every skill level, every garden size, and every Christmas aesthetic. Ready to transform rubber into Christmas magic? Let’s dive in!
At a Glance
- Recycled tire Christmas decor turns waste rubber into stunning seasonal garden features at a fraction of the cost of bought decorations — most projects require only basic tools, exterior paint, and a few hours of enthusiastic effort.
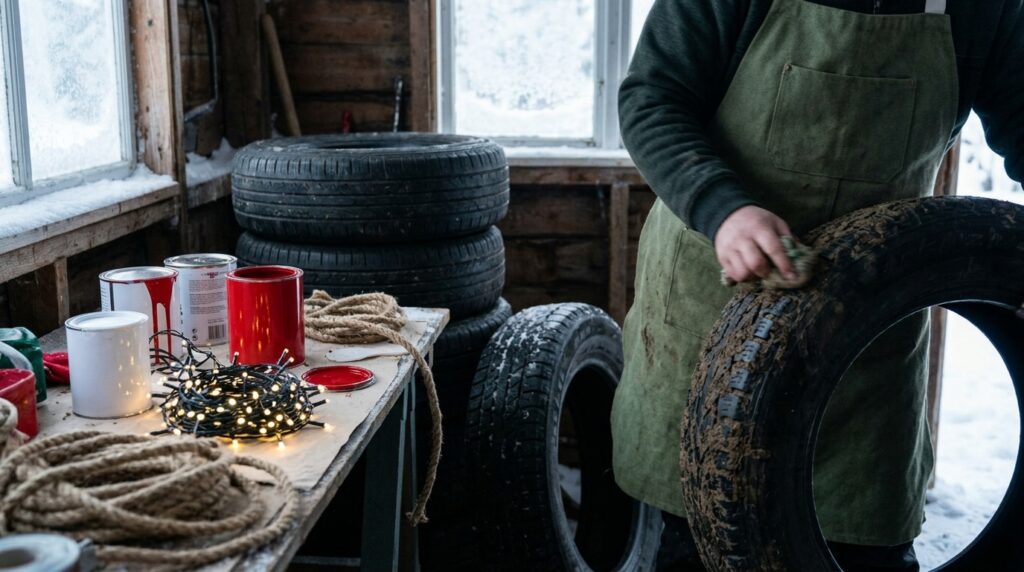
- Old tires can be sourced completely free or for very little cost from local tire fitting centers, garages, scrap yards, and online platforms like Freecycle and Facebook Marketplace — always ask before taking.
- Exterior spray paint and acrylic paint are the key materials for most tire Christmas projects — choose outdoor-rated products for any decorations that will remain outside through winter weather.
- The most impressive tire Christmas displays use layering, lighting, and companion planting to transform single tire crafts into complete seasonal garden vignettes that look professionally designed.
- Safety and preparation are essential — old tires should be cleaned thoroughly, checked for wire protruding from worn treads, and positioned safely away from heat sources including fire pits and chimineas.
1. The Classic Tire Christmas Wreath

Here’s the deal: the tire Christmas wreath is the project that starts most people’s recycled tire decoration journey — and for excellent reason, because it’s immediately achievable, visually spectacular, and produces something that genuinely looks like a premium handmade wreath rather than a repurposed tire.
The technique is straightforward: clean the tire thoroughly, paint it in your chosen base color (glossy white, matte black, deep forest green, or metallic gold all work brilliantly), allow to dry completely, then use hot glue or wire to attach your decorative elements around the tire’s outer face. The tire’s circular form is already the perfect wreath shape — nature did the geometry for you.
Decorative elements that work beautifully on a tire wreath: artificial pine or eucalyptus branches hot-glued around the outer ring, red berry picks and holly sprigs clustered at one side for that classic asymmetric wreath style, pine cones wired in at intervals, a large wired ribbon bow as the focal point, and battery-operated fairy lights threaded through the whole arrangement for evening magic.
💡 Pro Tip: Before painting your tire, degrease it thoroughly with dish soap and a stiff brush, rinse completely, and allow to dry for at least 24 hours. Rubber is naturally oily and paint adheres poorly to an unprepared surface — thorough degreasing is the single most important preparation step and skipping it is the most common reason tire paint peels within weeks.
- Use self-etching spray primer before your top coat for dramatically better paint adhesion on rubber
- Wired ribbon holds its bow shape far better than standard ribbon in outdoor conditions
- Hang using a sturdy picture hook or wreath hanger rated for the tire’s weight — a full car tire weighs 8–12kg
- Battery fairy lights with a timer function mean your wreath glows automatically every evening
Check out our making a tire Christmas wreath — step by step guide for full preparation, painting, and decorating instructions.
A tire Christmas wreath on your front door makes a statement that no shop-bought alternative can match — it’s completely original, completely you, and completely free to make!
2. Stacked Tire Christmas Tree
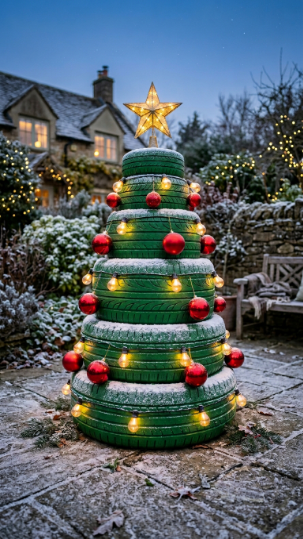
Talk about a game-changer — a stacked tire Christmas tree is the garden focal point that stops traffic, makes children absolutely ecstatic, and proves definitively that recycled tire Christmas decor can be genuinely magnificent at scale.
The construction is wonderfully simple: source four tires in decreasing sizes — a large truck or tractor tire at the base, then progressively smaller car and bicycle tires stacked above, tapering to a single small tire at the top. Secure each tier to the one below using coach bolts through the tire sidewalls or strong exterior adhesive for permanent displays, or simply stack them carefully with the weight of each tier holding the one below for temporary seasonal displays.
Paint the whole stack in vivid Christmas green (exterior spray paint works fastest — use multiple light coats rather than one heavy coat to prevent drips), then dry-brush the tread edges in white for a snow-dusted effect that looks extraordinary. Add large weatherproof Christmas baubles hung between the treads, wrap the whole tree in outdoor-rated fairy lights, and crown with a large gold star.
💡 Pro Tip: Fill the central holes of each tire with expanding foam insulation before painting — it creates a flat surface that makes attaching decorations far easier, prevents the hollow interior from collecting rainwater (which can become stagnant), and gives the finished tree a more solid, sculptural appearance rather than showing the hollow tire interior through the top of each tier.
Explore our building a stacked tire Christmas tree — construction and decoration guide for sizing, securing methods, and lighting recommendations.
A stacked tire Christmas tree in your garden is the neighbourhood Christmas decoration that everyone talks about — bold, brilliant, and made from materials most people throw away!
3. Tire Christmas Planter with Poinsettia Display
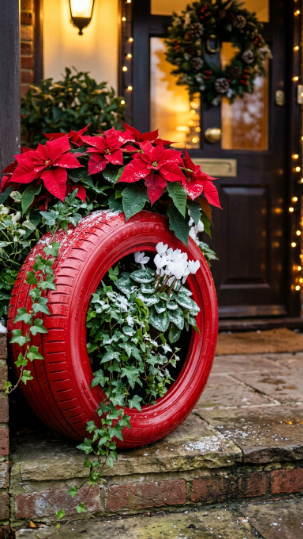
Tire planters are the most versatile base form in the recycled tire craft world — and decorated and planted for Christmas, a single tire planter on your doorstep can be more beautiful and more impactful than any bought seasonal decoration you could find.
The Christmas tire planter formula: paint your tire in a bold festive color — pillar-box red and glossy white are the two most striking choices for Christmas. Fill the center with a quality multipurpose compost, then plant a thriller-filler-spiller combination of seasonal plants. Poinsettia (if the planter is sheltered from rain and frost) makes the most vivid red thriller. Winter-flowering white Cyclamen provides the filler color contrast. Trailing dark ivy provides the spiller element that cascades over the red tire edge for a spectacular finished effect.
For a fully frost-proof outdoor version that doesn’t rely on tender Poinsettia, substitute ornamental red-twigged Dogwood (Cornus alba ‘Sibirica’) as the thriller, vivid red Gaultheria for berry interest, and trailing variegated ivy as the spiller — all completely frost-hardy and looking genuinely spectacular.
💡 Pro Tip: Drill 4–6 drainage holes in the base of the tire planter before filling with compost — rubber holds water completely and without drainage holes your planting medium will become waterlogged and anaerobic within a week of rain. A 20–25mm drill bit and a cordless drill makes quick work of even thick tire rubber.
Read our tire planter Christmas decoration guide — painting, planting and positioning for full planting combinations and weatherproofing advice.
A beautifully planted Christmas tire planter on your doorstep says “this home is decorated with creativity and care” — and it genuinely shows!
4. Tire Christmas Reindeer

Tire reindeer are the recycled Christmas craft project that children absolutely love and adults discover they enjoy making far more than they expected — they’re sculptural, characterful, and when arranged in a group of two or three on a front lawn, they create a genuinely magical festive garden scene.
The basic tire reindeer construction: a large car tire forms the body (laid flat or angled for a more dynamic pose). A smaller tire (bicycle or motorcycle) forms the head, mounted upright on a timber or metal post extending from the body tire. Bent metal rebar or thick wire forms four legs pushed into the ground at appropriate angles, with each leg tipped with a small section of rubber for ‘hooves’. Flat plywood antlers cut with a jigsaw, painted brown and mounted between the ears give your reindeer its essential character.
Painting and detailing is where the magic happens — warm golden-brown exterior paint on the head and body tires, googly craft eyes (the largest size available — oversized eyes make tire animals look brilliantly characterful), a red painted nose or a large red rubber ball fixed to the snout, and a jingle bell collar made from ribbon and craft bells around the neck.
💡 Pro Tip: Create Rudolph with an LED red nose — drill a hole in the front tire (the head), insert a red LED bulb connected to a battery pack hidden inside the body tire, and you have a reindeer nose that glows on winter evenings. It’s a simple addition that transforms a charming daytime decoration into a magical evening one that children find completely irresistible.
Explore our making tire Christmas reindeer — step-by-step construction guide for body proportions, leg fixing methods, and painting techniques.
Tire reindeer on your front lawn create the kind of Christmas garden display that makes people slow their cars down for a second look — pure festive joy in recycled rubber!
5. Giant Tire Christmas Bauble
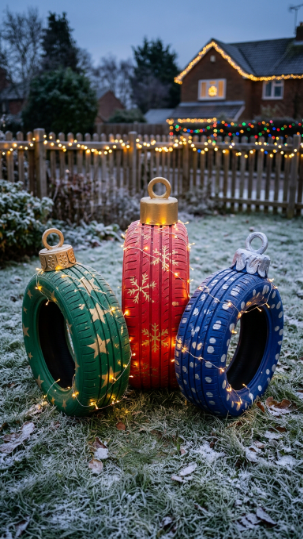
Here’s the thing: giant Christmas bauble tires are the most immediately recognizable and most visually striking of all tire Christmas decorations — because even from a distance, across a garden or seen from a passing car, a tire painted and detailed as a giant Christmas bauble reads instantly and joyfully as what it is.
The technique is brilliantly simple but the results are extraordinary. Paint the whole tire in your bauble color — rich red, royal blue, emerald green, or gold all work spectacularly. Once dry, paint the central hole in metallic gold or silver to represent the bauble cap, and add a painted loop at the top. Then add your surface decoration — polka dots in contrasting metallic paint, snowflake stencils, star patterns, or horizontal stripe bands all create different bauble personalities.
Group three tires together as a cluster of baubles in complementary colors — one red, one blue, one green — for a display that looks like a composition rather than a single object. Wrap outdoor fairy lights loosely around the group and the whole arrangement glows beautifully after dark.
💡 Pro Tip: Use stencils cut from cardboard for repeating patterns on your bauble tires — snowflakes, stars, dots, and stripes all look far more professional and precise when spray-painted through a stencil than when painted freehand. Cut your stencil once, use it repeatedly across all tires in your group, and the consistency of the patterning makes the whole display look genuinely designed.
Read our painting tire Christmas baubles — technique, colors and grouping guide for paint products, stencil designs, and display arrangements.
Giant tire baubles on your garden lawn are one of those Christmas decorating ideas that are simultaneously obvious in retrospect and completely unexpected in practice — pure festive brilliance!
6. Tire Christmas Candy Cane Edging

Tire candy cane path edging is one of the most graphic and immediately impactful recycled tire Christmas projects — it transforms an ordinary garden path into a festive walkway that makes every approach to your front door genuinely magical, and it’s achievable in a single afternoon with a handful of tires and two colors of exterior paint.
The technique: cut or slice your tires in half using a sharp utility knife or jigsaw (the sidewall is the easiest cut — follow the circular form). Paint each half-tire in brilliant white as the base coat, allow to dry, then mask and paint diagonal red stripes to create the classic candy cane pattern. Once fully dry, set the curved half-tires into the soil along both sides of your path with the curved arch facing upward — they’re self-supporting when the base is pushed firmly into soil.
Alternate the stripe angle on consecutive tires (one set of stripes going left-to-right, the next right-to-left) for the classic candy cane visual rhythm. Space them evenly — approximately 30–40cm between each tire — for the most graphic, regular effect.
For a softer, more naturalistic version, fill the arch interior of each half-tire with winter-flowering heather, Cyclamen, or trailing ivy for a candy cane path edging that combines graphic color with living planting.
💡 Pro Tip: Use proper masking tape (not standard tape) when painting your candy cane stripes — low-tack painter’s masking tape produces crisp, clean stripe edges on rubber surfaces, while standard tape either tears the base coat when removed or allows paint to bleed beneath it. Apply the tape firmly, paint, allow to dry for at least an hour, then remove the tape while the paint is still slightly tacky for the cleanest possible stripe edge.
Explore our tire candy cane path edging — cutting, painting and installation guide for cutting safety advice, paint recommendations, and spacing templates.
Candy cane tire path edging creates the most festive garden entrance imaginable — it’s bold, graphic, completely original, and guaranteed to make every visitor smile!
7. Tire Snowman Display

A tire snowman is the Christmas garden decoration that gets the most delighted reactions from visitors of every age — because the leap from “old tires” to “perfect snowman” is just unexpected enough to be genuinely charming, and the result is so classically festive that nobody is thinking about rubber once they see it.
The construction: stack three tires in decreasing sizes — large truck tire at the base, standard car tire in the middle, small car or large motorcycle tire for the head. Secure each tier with coach bolts through the sidewalls for a permanent display, or use heavy-duty exterior adhesive. Paint the entire stack in brilliant white exterior paint with a slightly textured finish (mixing a small amount of fine sand into the paint creates a snow-like surface texture that looks extraordinary).
The character details make or break a tire snowman: black painted circles for coal buttons down the front, round black shapes for the eyes, an elongated orange triangle painted on the head tire for the carrot nose. A real fabric scarf wound around the join between middle and top tire. Real twig arms inserted through drilled holes in the middle tire sides. A painted bucket or foam top hat as the final crowning touch.
💡 Pro Tip: Add battery LED candles or a string of warm fairy lights inside the top tire (the head) — drill small holes around the face area and let light glow through them on winter evenings, giving your snowman a warm, luminous quality after dark that makes it look genuinely magical from across the garden. It’s a simple addition that transforms your snowman from a daytime decoration to an all-hours Christmas feature.
Read our building a tire snowman — stacking, painting and detailing guide for sizing, securing methods, and all-weather finishing techniques.
A tire snowman in your garden is the Christmas decoration children will remember for years — joyful, inventive, and made with your own hands from materials that cost nothing!
8. Tire Christmas Star Decoration

Here’s the deal: a tire Christmas star mounted on your garden fence or exterior wall is one of the most architecturally striking recycled tire Christmas projects — it reads as a deliberate, designed piece of garden art rather than a craft project, and the metallic gold version outlined in fairy lights is genuinely stunning after dark.
The construction technique: cut five equal sections from tire sidewalls — each section should be approximately the same length and curved in the same degree to produce consistent star points. Arrange them in a five-pointed star formation on a flat surface, overlapping the ends of adjacent sections to create the classic star geometry. Fix each join with heavy-duty exterior adhesive reinforced with cable ties or wire through drilled holes for structural security.
Painting: metallic gold is the most spectacular choice for a Christmas star — use metallic exterior spray paint in multiple thin coats, turning the star to ensure full coverage of all surfaces including the curved interior faces. Metallic silver creates a cool, contemporary alternative. Vivid red with gold outlined edges is the most festive color combination.
Mounting: attach two or three heavy-duty picture hooks or large screw eyes to the back face of the star, and hang from corresponding hooks on your fence or wall. Outline the star with battery fairy lights cable-tied to the outer edges.
💡 Pro Tip: Make your star from bicycle tire sections rather than car tire sections if you want a more finely detailed, filigree effect — bicycle tire rubber is thinner and more flexible, producing star points with a lighter, more elegant character than the thick sections of a car tire. A gold-painted bicycle tire star outlined in micro LED fairy lights is one of the most beautiful recycled tire Christmas decorations possible.
Explore our making a tire Christmas star — construction and mounting guide for cutting templates, joining methods, and hanging hardware.
A gold tire Christmas star on your garden fence is the outdoor decoration that makes people look twice and then ask immediately how you made it — pure, handcrafted festive brilliance!
9. Tire Christmas Sleigh Planter

A tire Christmas sleigh planter is arguably the most ambitious and most jaw-droppingly impressive project in this entire article — and while it requires slightly more construction than a simple painted tire, the result is a completely unique, completely original Christmas garden centerpiece that no neighbor will have and no shop sells.
The construction approach: the two tire runners are created by cutting car tires in half lengthwise and cutting each half to a curved runner shape at front and back. A treated timber platform (scaffold board width works perfectly) is fixed between the two runners at an elevated height — the runners should give the appearance of the sleigh hovering above the ground on its curved blades. Paint the entire structure in glossy red with gold detailing on the runner edges.
Planting the sleigh: fill the platform bed with rich compost and plant as you would a large container display — pine branches and conifers for structural height, red-berried Gaultheria and Skimmia for festive berry color, ornamental kale for dramatic foliage texture, golden Carex grass for warmth and movement. Add battery fairy lights woven through the planting and faux gift boxes stacked beside the sleigh for the complete Christmas tableau.
💡 Pro Tip: Weatherproof all timber components with two coats of exterior wood stain before assembly — the platform and any timber joining elements need full weather protection before the structure goes outside permanently. Painted rubber is water-resistant by nature, but untreated timber in contact with wet compost will rot within a single season without proper treatment.
Read our building a tire Christmas sleigh planter — construction and planting guide for full construction drawings, timber specifications, and planting combinations.
A tire Christmas sleigh in your garden is the decoration that becomes a neighbourhood landmark — genuinely magnificent, completely handmade, and absolutely, unmistakably yours!
10. Tire Christmas Gnome or Santa

Tire Santa and gnome figures bring an irresistible charm and personality to recycled tire Christmas decor — they’re sculptural, character-filled, and work equally well as front door guardians, garden path figures, or centerpiece displays, and children are completely enchanted by them every single time.
Tire Santa construction: two tires stacked — large tire as body, smaller tire as head. Paint the body tire in vivid Christmas red with a wide white belt painted around the equator and a large black painted buckle at the front. Paint the head tire in a flesh tone, add a wide white beard painted across the lower half of the face tire, rosy round cheeks, a red nose, and simple dot eyes. Create the hat from a cone of red craft foam or fabric fixed to the top of the head tire with exterior adhesive.
Tire Gnome construction: similar two-tire construction but with a dramatically oversized pointed cone hat (the gnome’s defining feature) made from foam board or rolled cardboard painted in rich jewel colors — deep red, forest green, or royal blue. Add a long white beard made from thick white rope or fabric fringing fixed to the face tire with hot glue.
💡 Pro Tip: Give your Santa or gnome weighted feet by filling the base tire with a layer of concrete or packed sand before sealing — this dramatically improves stability in winter winds and prevents your carefully crafted figure from toppling in a storm. A 5–10cm layer of concrete in the base tire, allowed to cure completely before painting, makes the whole structure solid and wind-resistant.
Explore our making tire Santa and gnome figures — character painting and construction guide for proportions, hat construction, and character painting techniques.
Tire Santa or gnome figures outside your front door create exactly the kind of Christmas welcome that makes people smile before they even knock — festive craftsmanship at its most charming!
11. Tire Christmas Lantern Tower
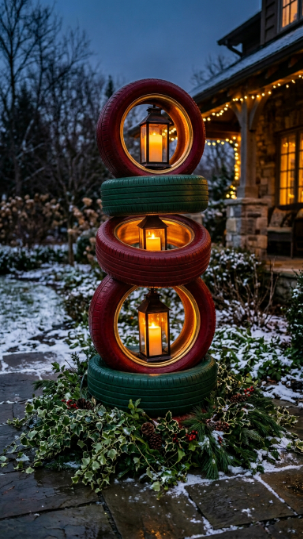
A tire lantern tower is the recycled tire Christmas project that looks most like a deliberately designed garden feature rather than a craft project — it’s architectural, warm, and on a winter evening with all four lanterns glowing, it’s one of the most beautiful things you’ll ever create for your outdoor space.
The construction: stack four tires vertically, offsetting each one by approximately 30° from the one below to create a gentle spiral twist effect that makes the tower look dynamic and intentional. Secure each tier with heavy-duty exterior adhesive or coach bolts. Paint alternate tires in complementary Christmas colors — deep red and forest green create the most festive combination. Paint the interior walls of each tire in metallic gold — when the lanterns glow inside, the gold reflects and amplifies the warm light beautifully.
Place a large storm lantern with a pillar candle in the center of each tire — the circular tire holds the lantern perfectly and protects the candle flame from wind on all sides. Alternatively, use large battery LED candles for a completely safe, unattended outdoor display.
Dress the base of the tower with trailing ivy, pine branches, and Gaultheria berry plants to integrate it into the garden setting.
💡 Pro Tip: For the safest and most practical version of this project, use large battery-operated LED flameless candles with remote controls in each tier — you can light all four simultaneously from inside the house, the warm flicker effect is genuinely convincing from a distance, and there’s zero fire risk with a structure that includes rubber components.
Read our building a tire Christmas lantern tower — stacking, painting and lighting guide for construction, color combinations, and lantern sizing.
A glowing tire lantern tower on your patio on a winter evening is the kind of atmospheric feature that makes your garden genuinely magical — pure warm light in a beautifully crafted structure!
12. Tire Christmas Elf Boots

Tire elf boots are the most whimsical and playful project in this collection — they bring an irrepressible sense of festive fun to any doorstep, garden step, or patio corner, and the curled pointed toe detail that makes them immediately recognizable as elf boots is achievable with a simple cut and reshape of the tire sidewall.
Creating the boot shape: the toe of the boot is formed by cutting a curved section from the tire sidewall and curving it upward into the characteristic elf curl, secured with a cable tie or short length of wire through drilled holes to hold the curl shape. The rest of the boot is the tire itself, standing on its tread base. The cut sidewall section that would have been the top of the boot can be curved outward slightly to suggest the boot’s open top.
Painting: vivid red with white trim details is the most classic elf boot color combination. Paint the main boot body in glossy Christmas red, add a white painted band around the top opening of the boot, and paint the tread base in black to suggest the boot sole. Add gold jingle bells fixed to the curled toe tip with strong wire.
Styling on the doorstep: place your elf boot pair filled with trailing pine branches, red-berried Gaultheria, and winter Cyclamen — the boot becomes a planter that’s simultaneously decorative and planted, looking even more spectacular than a purely decorative version.
💡 Pro Tip: Cut both tires identically before painting either one — lay both tires side by side, mark the cut lines on both simultaneously using chalk, and cut both in a single session. This ensures both boots are truly matching in shape and size, which makes the finished pair look far more deliberately crafted than two boots cut at different times with slightly different dimensions.
Explore our making tire Christmas elf boots — cutting, shaping and decorating guide for cutting techniques and boot planting combinations.
Tire elf boots on your doorstep announce to every visitor that this home does Christmas with creativity, humor, and genuine craftsmanship — festive fun at its absolute best!
13. Tire Christmas Angel

A tire Christmas angel mounted on a garden fence or wall is one of the most striking large-format recycled tire Christmas decorations — at scale, the spread wings and circular body create a genuinely impressive silhouette that looks extraordinary both in daytime and outlined in fairy lights after dark.
The construction: the body is a single car tire, painted white and mounted on the fence with the tread face forward. The wings are created from two tire sidewall sections cut to an elongated oval shape, bent gently into a curved wing form, and fixed to the left and right of the body tire using bolts through the fence and tire sidewalls. The head is a smaller tire (or a large plastic ball painted white) fixed above the body. The halo is a circle of thick garden wire or a metallic ribbon ring fixed above the head.
Painting: all-over brilliant white creates the most angelic effect. Gold metallic paint on the halo, wing tips, and facial features adds the celestial quality. A painted face on the head tire — simple dot eyes, a curved smile, and painted rosy cheeks — gives your angel personality.
Lighting: outline the wings with battery fairy lights cable-tied to the wing edges — the illuminated wing silhouette after dark is genuinely beautiful and makes the angel visible from a considerable distance.
💡 Pro Tip: Mount your tire angel at above-eye height on the fence — an angel figure placed at ground level reads as awkward and earthbound. Mounting it at 1.5–2m above ground (so the head is at or above the viewer’s eye level) gives it the elevated, celestial quality that makes the whole composition work. Height is everything with this particular project.
Read our making a tire Christmas angel — construction, painting and mounting guide for wing shaping, mounting hardware, and lighting installation.
A tire Christmas angel on your garden fence is the decoration that makes the whole garden feel touched with something magical — and that’s exactly what the best Christmas decorating does!
14. Tire Christmas Nativity Scene

Here’s the deal: a tire nativity scene is the most meaningful and personal of all the recycled tire Christmas projects — it’s the one that says something beyond just decoration, and when crafted thoughtfully with well-painted, characterful figures, it creates an outdoor display of genuine beauty and significance.
The figure construction approach: each figure is built from one or two stacked tires of appropriate sizes, painted with the characteristic robes, faces, and attributes of each nativity character. Mary: blue-painted robe, white head covering, serene painted face. Joseph: brown robe, dark staff of a garden cane. The Christ child: a small tire or half-tire painted as a manger with yellow painted straw interior and a warm LED candle glow inside. The Star of Bethlehem: a five-pointed tire star (as per project 8) mounted on a tall stake above the scene.
The staging: arrange your figures on a bed of real straw with rustic wooden elements — a few fence posts as the stable framework, some rough-cut timber as the stable walls — to create a complete scene that grounds the tire figures in a contextual setting.
💡 Pro Tip: Use acrylic artist’s paint for the detailed face and costume painting on nativity figures rather than standard exterior paint — acrylic gives you far better control for fine detail work, dries to a water-resistant finish suitable for outdoor use, and is available in a vast color range for accurate costume colors. Seal all detail painting with exterior varnish once complete for full weather protection.
Explore our creating a tire outdoor nativity scene — figure construction and painting guide for scale relationships, character details, and staging advice.
A tire nativity scene in your garden brings the deepest meaning of Christmas to your outdoor space in a form that’s completely, personally handcrafted — there’s nothing else quite like it!
15. Tire Christmas Countdown Calendar
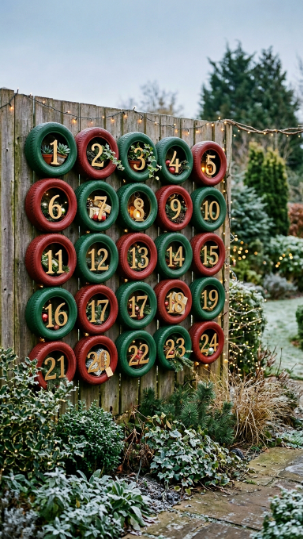
A tire Christmas countdown calendar is the most interactive and family-friendly of all the recycled tire Christmas garden projects — it turns your garden fence into an advent calendar that children check every single morning through December, and the combination of living plants, small gifts, and glowing lanterns creates a December garden display of extraordinary personality.
The construction: collect 24 small tires — bicycle tires work beautifully at this scale, or use consistently-sized small car tires for a more substantial display. Mount them in a 4×6 grid on your garden fence using large coach screws through the tire and into the fence posts. Paint each tire individually in alternating red and green, then paint a bold gold number (1 through 24) on the face of each tire.
The contents: fill each numbered tire with a different element — small potted Cyclamen plants, miniature lanterns with LED tea lights, wrapped mini gift packages (weatherproofed in clear wrap), small pine cone bundles, or battery fairy light coils that light up when the date is reached. Reveal a new tire’s contents on each day of advent.
💡 Pro Tip: Photograph your completed countdown calendar before December 1st and share it with family members who don’t live nearby — it becomes a shared daily advent experience that connects family across distances, with the child in the garden updating distant grandparents on which number was opened today. The calendar becomes a family story as well as a garden decoration.
Read our making a tire Christmas countdown calendar — mounting, painting and filling guide for fence mounting hardware, number painting templates, and content ideas for all 24 tires.
A tire advent calendar on your garden fence turns December itself into the decoration — it brings joy every single morning for 24 days and makes your garden the most exciting place in the neighbourhood throughout the whole month!
16. Tire Christmas Topiary Frames
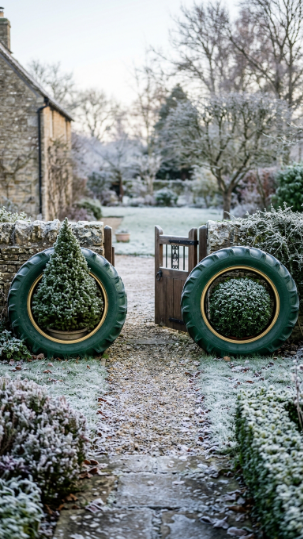
Tire Christmas topiary frames are the most unexpectedly sophisticated project in this collection — they use the circular geometry of a tire as a deliberate design element, creating a formal, almost classical garden structure that frames living plants in a way that looks genuinely purposeful and beautifully considered.
The concept: a tire, painted in a deep garden color and positioned vertically, becomes a circular frame through which a topiary plant (clipped conifer, box ball, or standard bay tree) is placed — the tire’s circle frames the plant like a picture frame, turning an ordinary container plant into a deliberate garden statement.
Construction: paint your tires in deep forest green or charcoal grey (colors that recede visually and make the framed plant the visual focus). Paint the inner rim of the tire in gold or copper to create a warm, decorative border effect. Position the tire vertically (standing on its tread edge) and stable it with a short length of rebar pushed through the tire hole into the ground. Position your chosen topiary plant directly behind the tire so it appears centered in the frame.
For Christmas: dress the tire frame itself with a wreath of artificial pine, red berries, and a bow around its outer circumference — the tire becomes a living plant frame decorated as a wreath simultaneously.
💡 Pro Tip: Use matching tires, matching paint, and matching plants for your topiary frame pair — the formal elegance of this display depends entirely on perfect symmetry. Two identical tires, identically painted, framing two identical plants in identical containers, placed at identical heights and distances from the door center: the precision IS the design.
Explore our tire Christmas topiary frames — construction, painting and styling guide for stability methods, plant selection, and seasonal dressing ideas.
Tire topiary frames turn the most ordinary entrance into something with genuine garden design authority — unexpected, elegant, and completely original!
17. Tire Fairy Light Wreath Cluster

Here’s the thing: the tire fairy light cluster is the most contemporary and the most purely beautiful of all the recycled tire Christmas projects — and it’s the one that works exclusively after dark, creating a display of warm light circles on a dark fence that looks more like installation art than garden decoration. It’s genuinely breathtaking.
The technique is almost embarrassingly simple for results this spectacular: paint a group of five tires in matte black (the dark surface ensures all visual attention goes to the light, not the tire). Coil a generous length of warm white LED fairy lights densely into the interior of each tire, filling the whole cavity with light. Mount the tires on your fence at varied heights and positions — some overlapping, some touching, some separate — for a composition that looks deliberately designed.
After dark, the glowing circles of warm white light against the black tires and dark fence create an effect that looks like illuminated porthole windows — warm, inviting, and completely unlike any other Christmas garden decoration.
💡 Pro Tip: Use connectable fairy light sets that allow multiple strings to be chained together from a single power socket — this means all five tires in your cluster can be powered from one outdoor socket on a single timer, switching on and off simultaneously for a perfectly synchronized display. Avoid having visible cable runs between tires by routing cables along the back face of the fence.
Read our tire fairy light wreath cluster — construction and lighting guide for tire sizing, light quantity, and mounting arrangements.
After dark on a winter evening, a tire fairy light cluster on your garden fence is one of the most beautiful things your outdoor space can display — pure warm light in a perfectly composed arrangement!
18. Tire Christmas Village Scene
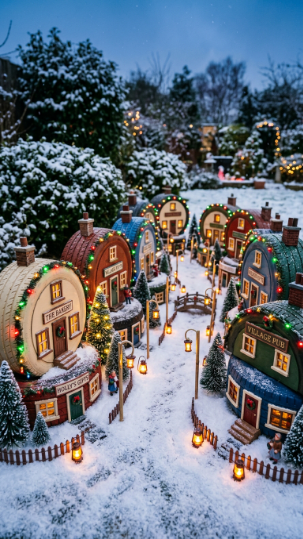
A tire Christmas village scene is the most ambitious and most enchanting large-scale project in this collection — it’s the kind of display that becomes a neighborhood destination through December, that children want to visit repeatedly, and that creates the most genuinely magical outdoor Christmas experience possible from recycled materials.
The village construction: use tires of different sizes as building bases — stood upright or on their sides, with painted fronts depicting cottage windows, doors, and architectural details. A large tire becomes a grand town hall or church; medium tires become cottages and shops; small tires become garden walls and fences. Use painted hardboard or plywood panels attached to the tire faces for the building fronts if painting directly on the rubber proves difficult.
Village dressing: miniature street lamps made from garden canes topped with small battery lanterns, artificial snow (spray or sheet) covering the ground between buildings, small mirror pieces as frozen ponds, a tiny Christmas market with matchstick-scale stalls, and battery fairy lights throughout the whole scene at ground level creating warm glow between the buildings.
💡 Pro Tip: Start small and expand annually — begin with three or four tire buildings in year one, add four or five more each subsequent Christmas. Over three or four years, your tire village grows into a genuinely large-scale installation that has accumulated character and history, and the annual addition of new buildings becomes a beloved family tradition in itself.
Explore our building a tire Christmas village scene — design, construction and dressing guide for building proportions, painting techniques, and village layout planning.
A tire Christmas village is the ultimate recycled tire Christmas project — a labour of love that becomes more beautiful and more beloved every single year!
19. Tire Christmas Garden Border Display

A tire Christmas border display combines the visual impact of painted tires with the natural beauty of winter planting to create a garden border that’s simultaneously a Christmas decoration and a genuinely beautiful winter planting scheme — the best of both worlds in one continuous display.
The concept: arrange 5–9 tires of varying sizes along your garden border edge or path edge, in a casual, slightly irregular spacing that looks naturally placed rather than mechanically spaced. Paint each tire in a complementary color palette — forest green, deep burgundy, antique gold, and matte black all work beautifully together. Plant each tire with a different winter plant, creating a living patchwork of color and texture along your border.
The planting palette for maximum color through winter: vivid pink or white Cyclamen for flower color from October through March, winter heather in magenta, pink, or white for long-lasting flowers, ornamental kale in deep purple or cream for dramatic foliage texture, Gaultheria for vivid berry color, and trailing ivy in any variety as the connecting thread that links each tire visually to the next.
Christmas dressing: add battery fairy lights draped loosely between the tires and a small wooden sign reading “Season’s Greetings” or “Happy Christmas” at one end of the display for the explicitly seasonal element.
💡 Pro Tip: Vary the tire heights in your border display by partially burying some tires and raising others on flat stones or bricks — a display where all tires sit at exactly the same height looks mechanical and planted. Varied heights create a naturalistic rhythm that makes the whole display look like it evolved organically rather than being placed in an afternoon.
Read our tire Christmas border display — painting, planting and spacing guide for color palette combinations, plant quantities, and border length planning.
A tire Christmas border display is the project that makes your whole garden feel festive rather than just your front door — a continuous celebration of creativity, color, and the season running the full length of your garden!
20. Tire Outdoor Christmas Gift Stack

A tire gift stack is one of the most graphically brilliant and most immediately understood recycled tire Christmas projects — the moment people see a stack of tires painted as wrapped gifts with bows, the delight is instantaneous and universal.
The construction: stack three tires in slightly decreasing sizes, offset by approximately 15° from each other as if casually placed rather than perfectly aligned — the slight misalignment makes the stack look far more like a real casual gift pile than a perfectly vertical column. Paint each tire in a different gift-wrap pattern: one in vivid red with white polka dots, one in gold with red diagonal stripes, one in forest green with gold star stencils. Paint a ribbon band (a thick cross of contrasting paint) across the tread face of each tire, and paint an oversized bow at the ribbon cross intersection.
Finishing touches: wrap outdoor battery fairy lights loosely around the whole stack and add a large wired ribbon bow on the very top tire for a three-dimensional detail that photographs beautifully.
💡 Pro Tip: Use a compass or round template to create perfect polka dots on your gift-wrap pattern tires — dot-painting freehand on a large curved surface inevitably produces irregular shapes. A circle cut from cardboard used as a stencil, loaded with a sponge, produces perfect circles of absolutely consistent size every time and elevates the finished paint quality dramatically.
Explore our tire Christmas gift stack — painting patterns, stacking and lighting guide for all three paint pattern templates and stacking stability techniques.
A tire gift stack in your garden is pure Christmas joy in painted rubber — graphic, bold, unmistakably festive, and made for absolutely nothing from materials most people throw away!
21. The Complete Tire Christmas Garden Vignette

We’re finishing with the complete picture — the full, ambitious, neighbourhood-stopping tire Christmas garden vignette that brings everything in this article together into one cohesive, spectacular outdoor Christmas display. This is the goal: not just individual tire decorations but a complete, composed seasonal garden scene that tells a story and creates an experience.
The composition formula for a complete tire Christmas vignette:
The centrepiece (the tallest, most dominant element): your stacked tire Christmas tree — this is the element that reads from the greatest distance and around which everything else organizes.
The flanking elements (symmetrical pairs on each side of the centrepiece): tire reindeer on each side create the classic sleigh-and-tree narrative, or tire lantern towers flanking the tree create a more formal, architectural composition.
The foreground elements (low-level interest at the viewer’s feet): tire gift stacks clustered in front of the tree, tire baubles nestled in the grass, half-tire candy cane edging along the path leading to the scene.
The background elements (fence-mounted, wall-mounted): tire fairy light clusters, tire Christmas stars, or the tire angel mounted above the scene on the fence behind, completing the vertical composition.
The atmosphere: warm festoon lights overhead creating the ceiling of your Christmas garden room, with storm lanterns at ground level for warmth and intimacy.
💡 Pro Tip: Choose a single color palette across all your tire decorations — a red, green, and gold palette used consistently across every tire element in your vignette creates a cohesive, designed display. Mixing too many different color combinations across different tire elements creates visual chaos. Decide your palette before painting anything and stick to it rigorously — the coherence it creates makes the whole display look professionally conceived.
| Vignette Element | Position | Color Role |
| Stacked tire tree | Centre back | Primary green |
| Tire reindeer pair | Left and right flanking | Natural with red accents |
| Tire gift stacks | Centre foreground | Red, gold, green patterns |
| Tire fairy lights | Fence background | Warm white glow |
| Candy cane edging | Path edges | Red and white graphic |
| Festoon lights | Overhead canopy | Warm amber atmosphere |
Read our creating a complete tire Christmas garden vignette — design and composition guide for layout planning, scale relationships, and the complete execution checklist. Instructables has brilliant tire craft inspiration at instructables.com.
The complete tire Christmas vignette is the outdoor decoration that makes your home the landmark of the neighbourhood through December — a testament to creativity, craftsmanship, and the extraordinary things that become possible when you look at a pile of old tires and think “what could this become?” Now go make it happen! 🎄
Frequently Asked Questions
Where can I find old tires for Christmas decorations for free or cheap?
Your best sources in order of likelihood: local tire fitting centers and garages (they pay for disposal so are often delighted to give tires away — just call ahead and ask), Facebook Marketplace and Freecycle (search “free tires” in your local area), scrap yards and recycling centers (sometimes charge a small fee), and neighbours or friends replacing car tires. Agricultural tires (much larger than car tires) are often available free from farms. Always check tires for protruding wire from worn treads before handling, and wear gloves when collecting and cleaning.
What paint works best on rubber tires for outdoor Christmas decorations?
The most reliable painting approach for outdoor tire decorations is a three-stage process: clean and degrease thoroughly with dish soap and a stiff brush, apply a coat of self-etching spray primer (designed to bond to rubber and plastic surfaces), then apply two or more coats of exterior spray paint or exterior acrylic in your chosen color. For detailed painted designs (faces, patterns, numbers), use acrylic craft paint over your primed and base-coated tire, then seal all detail painting with exterior varnish. Avoid standard interior paint or chalk paint for any tire decoration that will be outside in wet weather.
Are old tires safe to use as garden planters for edible plants?
This is a topic of ongoing debate in the gardening community. Old tires can leach compounds including zinc, benzothiazole, and other chemicals from the rubber into the surrounding soil, particularly as they degrade. For decorative Christmas planters with non-edible plants (heather, Cyclamen, ornamental kale, ivy), this concern is essentially irrelevant. For edible plant growing, the current precautionary guidance from most horticultural authorities is to avoid using tires as planters for food crops — the risk may be low but hasn’t been comprehensively studied, and using alternative containers for edibles is the prudent approach.
How do I make painted tire decorations last through wet and cold winter weather?
Weather durability starts with proper preparation — degreasing, priming, and using exterior-rated paint products. After painting, seal all surfaces with two coats of exterior clear varnish (gloss or satin finish) for maximum weather protection. Store delicate decorative additions (ribbons, paper elements, non-weatherproof baubles) indoors between displays and re-attach for the display period. For permanent outdoor displays, UV-stable exterior paint prevents color fading through multiple seasons. Most well-prepared and varnished tire decorations will look excellent for 2–3 seasons before needing a repainting refresh.
How do I attach decorations securely to painted tire surfaces?
The most reliable adhesive for attaching decorations to painted rubber is construction adhesive (such as Gorilla Glue or similar polyurethane adhesive) for heavy items like wooden elements, metal hardware, and large decorative pieces. Hot glue works well for lightweight items like artificial foliage, ribbon, and small decorations but doesn’t hold in very cold temperatures (below about 5°C the bond weakens significantly). For any decoration that needs to be genuinely secure through winter weather and wind, reinforce adhesive joints with cable ties, wire, or screws through drilled holes — adhesive alone is rarely sufficient for heavy or exposed outdoor elements.
A Few Final Thoughts
Recycled tire Christmas decor is one of those creative ideas that proves beyond any doubt that the best garden decorations aren’t bought — they’re made, with intention, resourcefulness, and the genuine pleasure of transforming something unwanted into something extraordinary. Whether you start with a single painted tire wreath on your front door or go all-in on the complete Christmas garden vignette, every project in this article is an act of creative sustainability that takes waste rubber out of the disposal chain and turns it into something beautiful, seasonal, and completely personal. The creative confidence you build making your first tire Christmas decoration — realising that old rubber and a tin of paint can produce something genuinely spectacular — is the gift that keeps giving into every creative project that follows. Your most impressive Christmas garden display is waiting in a pile of old tires somewhere nearby. Now go find them, and go make it happen! 🎄🌿