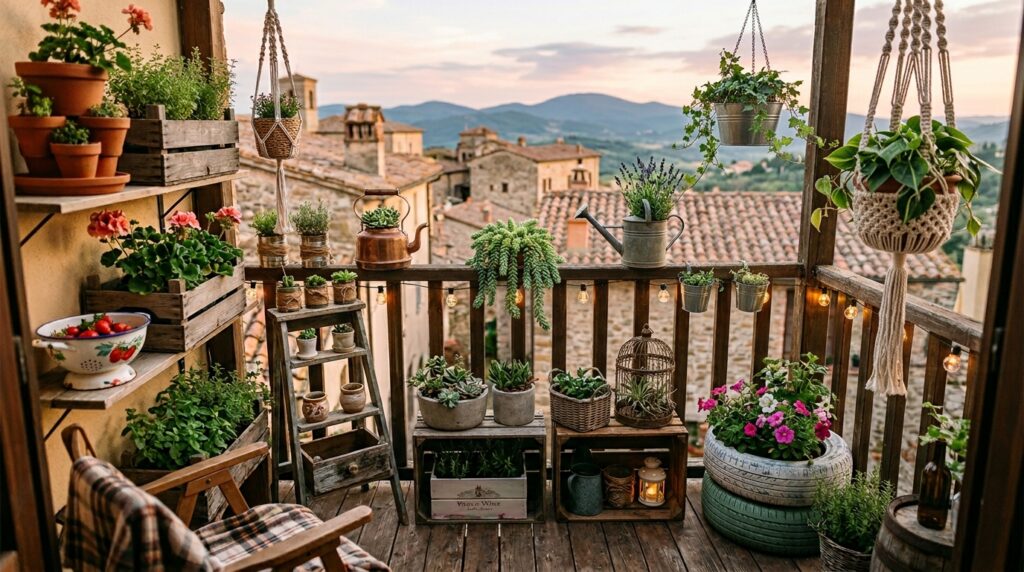
There’s a particular warmth that only a rustic balcony garden can deliver — the kind that makes you want to wrap your hands around a mug of tea and never go back inside. Raw timber, aged terracotta, woven textures, and the unhurried charm of imperfect, handmade things create an atmosphere that polished, store-bought planters simply cannot replicate. The good news is that the most beautiful rustic DIY planters for a cozy balcony cost almost nothing to build and require no specialist skills whatsoever — just a little time and the willingness to see potential in old, overlooked objects. From hollowed logs and weathered wine crates to painted tin buckets and rope-wrapped bottles, all 23 ideas ahead are genuinely achievable this weekend. Ready? Let’s explore all 23 of them.
Why Rustic DIY Planters for a Cozy Balcony Are Worth Your Time
Building rustic planters by hand gives you something that mass-produced containers fundamentally cannot: complete control over character. Every scuff, grain, and imperfection in a reclaimed timber planter tells a story that makes your balcony feel lived-in and genuine rather than showroom-ready. That quality of warmth and authenticity is precisely what the rustic aesthetic is about — and it translates directly into a balcony that feels like an extension of your home rather than a decorative afterthought.
From a practical standpoint, rustic DIY planters are extraordinarily affordable. A wooden wine crate costs £2–£5 at a local market. A bundle of tin cans is free. A salvaged pallet is often available at no cost from hardware stores. The most striking rustic balcony gardens are frequently built on budgets that would embarrass a single garden centre planter.
Here’s a fact that surprises many gardeners: natural, porous materials like unfinished timber and terracotta actively support plant health. Wood breathes in a way that solid plastic cannot, allowing excess moisture to evaporate from the sides of the planter and reducing the root rot risk that claims so many balcony container plants. Rustic isn’t just aesthetically superior for this style — it’s functionally beneficial.
This approach suits beginners, renters, and anyone who finds sterile, matching garden furniture soulless. If you believe your balcony should feel like a place to truly rest, this is exactly the right gardening style for you.
At a Glance
- A hollowed log planter filled with Sempervivum requires zero watering in normal rainfall and lasts a decade outdoors without treatment.
- Rope-wrapped terracotta pots can be made in under 20 minutes and transform a plain clay pot into something that looks genuinely artisan-crafted.
- Old wooden ladder shelves hold up to eight individual planters in a floor space of just 50cm × 80cm — the most space-efficient rustic display on this list.
- Painting tin cans with exterior chalk paint in a two-tone matte palette creates a farmhouse herb garden wall that costs under £10 to build.
- A whisky barrel half planted with lavender and trailing rosemary releases fragrance every time the breeze moves through it — purely from the combination of barrel wood aroma and herb oils.
1. Hollowed Log Succulent Planter
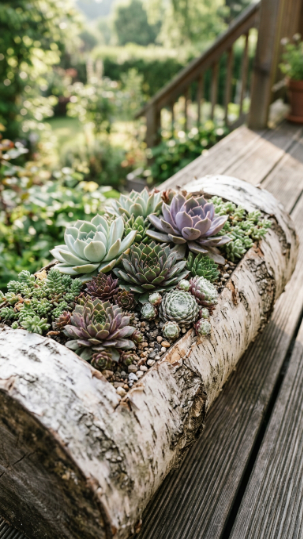
A hollowed log is one of the most naturally beautiful rustic DIY planters you can place on a cozy balcony — it looks as if the plants grew there entirely of their own accord.
Source a section of birch, oak, or ash log with a minimum 20cm diameter — timber yards, fallen garden trees, and firewood suppliers are all good sources. Use a chisel and mallet to hollow out the centre to a depth of at least 15cm, leaving a 3–4cm wall thickness. Drill three to four drainage holes through the base using a 12mm flat wood bit. Fill with a 50/50 mix of cactus compost and coarse horticultural grit — succulents are the ideal tenants because they tolerate the free-draining, nutrient-light conditions a log provides naturally.
Plant Sempervivum (houseleeks) as your primary planting — they’re fully frost-hardy, require no supplementary watering once established in a UK climate, and produce offsets that gradually fill every available gap in the log. Add one or two small Sedum or Echeveria for colour contrast. Top-dress with a layer of fine gravel or grit around the plants to keep the wood dry at the crown of each rosette, preventing rot at the soil surface.
💡 Pro Tip: Treat the exterior of the log with a single coat of raw linseed oil — this preserves the timber for an extra two to three seasons without changing its natural colour or texture, and it dries completely clear within 48 hours.
Explore hollowed log planter ideas for balcony succulent displays and learn how to grow Sempervivum in containers outdoors from the RHS.
A hollowed log planted with Sempervivum is one of the few balcony displays that genuinely improves every season with zero intervention.
2. Reclaimed Pallet Herb Planter Box
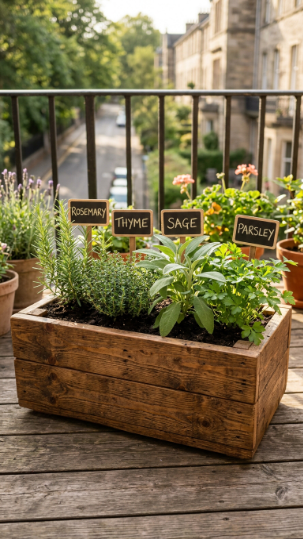
Pallet timber has exactly the right weathered grain and character for rustic DIY planters — and cutting one down into a freestanding box creates a deep, generous herb garden that looks entirely intentional.
Use a heat-treated (HT-stamped) pallet only — never MB-treated timber, which contains harmful pesticide residue. Cut the pallet into four side panels and one base using a circular saw or jigsaw, assemble with exterior wood screws, and line the interior with heavy-duty pond liner stapled to the frame. Drill a row of drainage holes every 10cm along the base of the liner. Stain the exterior with a water-based exterior wood stain in a dark walnut or oak finish — this takes 30 minutes and transforms raw pallet timber into something that looks genuinely crafted.
Fill with John Innes No. 2 compost mixed with 25% horticultural grit for the drainage that Mediterranean herbs demand. Plant one herb per 15cm of box length, positioning taller varieties (rosemary, sage) at the back and lower compact herbs (thyme, chives) at the front for visual layering. Add small slate or chalkboard plant markers for the farmhouse aesthetic that completes this display.
Best herbs for a rustic pallet box planter:
- Rosemary ‘Miss Jessopp’s Upright’ — structural, strongly aromatic
- Sage ‘Purpurascens’ — purple-grey leaves, beautiful texture
- Thyme ‘Silver Queen’ — variegated foliage, low-growing
- Flat-leaf parsley — productive, rich green contrast
Browse pallet herb planter ideas for balconies and patios and read how to choose and prepare timber for outdoor planters via Gardeners’ World.
Stained and planted, a pallet herb box looks like something from a country kitchen garden transplanted to your balcony.
3. Rope-Wrapped Terracotta Pot Collection
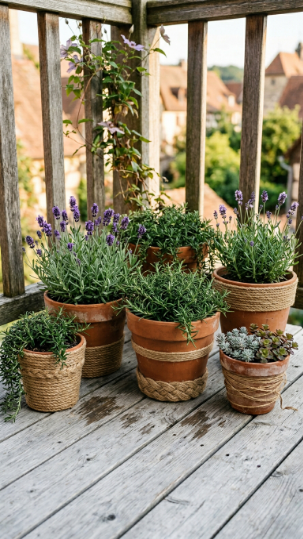
Wrapping terracotta pots in natural jute or sisal rope is the fastest rustic transformation in this entire list — 20 minutes per pot, no tools, no mess, and the result looks genuinely artisan rather than DIY.
You need standard terracotta pots (any size), natural jute twine or sisal rope (3–5mm thickness works best), and a hot glue gun. Begin at the base of the pot, apply a line of hot glue, and press the rope firmly — wrapping continuously upward in tight coils. Work slowly in 5cm sections so the glue doesn’t set before the rope is pressed into position. Cover either the entire pot surface or create a mid-band pattern, leaving terracotta exposed at the rim and base for a layered look.
Choose pot sizes in three distinct diameters — 12cm, 18cm, and 25cm — and group them in an odd-numbered cluster of five. Vary the rope coverage on each pot so no two look identical. Terracotta breathes through its walls even when wrapped in rope, as long as the rope isn’t sealed with waterproofing products. This moisture-wicking characteristic is what makes terracotta superior to plastic for most outdoor balcony plants, as it helps regulate soil moisture naturally.
💡 Pro Tip: Seal the completed rope wrapping with a light mist of exterior clear coat spray — this prevents the jute from darkening and becoming mouldy over a wet winter without affecting the natural texture at all.
Discover rope-wrapped planter ideas for rustic balcony gardens and explore growing lavender in terracotta containers outdoors from The Old Farmer’s Almanac.
A cluster of five rope-wrapped terracottas planted with herbs and lavender is the easiest rustic upgrade your balcony will ever receive.
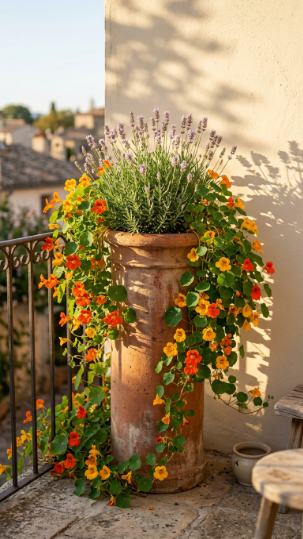
4. Whisky Barrel Half Planter
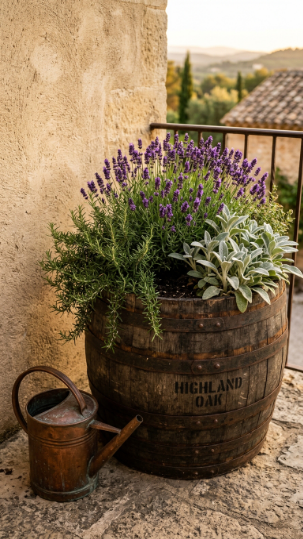
A genuine oak whisky barrel half is the single most impactful rustic DIY planter you can place on a balcony — it carries weight, history, and fragrance, and it’s large enough to support a genuinely substantial planting.
Authentic barrel halves are available from garden centres, online suppliers, and occasionally from distilleries directly — expect to pay £25–£50 for a genuine used oak barrel, significantly less than an equivalent-sized stone or fibreglass trough. Drill five to six 20mm drainage holes through the base before filling — this is critical, as barrel halves hold a substantial volume of water after rain. Place the barrel on terracotta feet or timber risers to elevate the base and allow water to drain freely rather than pooling beneath.
Fill with a mix of two-thirds John Innes No. 3 compost (its loam base holds nutrients and structure long-term in this large container) and one-third horticultural grit. Lavender (Lavandula angustifolia ‘Hidcote’) is the quintessential barrel plant — its root system suits the depth, it loves the free-draining mix, and in a warm, sheltered balcony position it will flower from June through September. Pair with trailing rosemary cascading over the barrel edge and silvery Stachys byzantina as a textural underplanting.
The barrel’s oak interior gradually releases subtle tannins into the soil — these have a mild acidifying effect that suits lavender, rosemary, and most Mediterranean herbs very well over time.
Browse whisky barrel planter ideas for balconies and patios and discover how to plant and maintain lavender in large containers from the RHS.
Once a whisky barrel is planted and positioned, it becomes the permanent centrepiece that every other element on your balcony organises itself around.
5. Weathered Wooden Wine Crate Planter
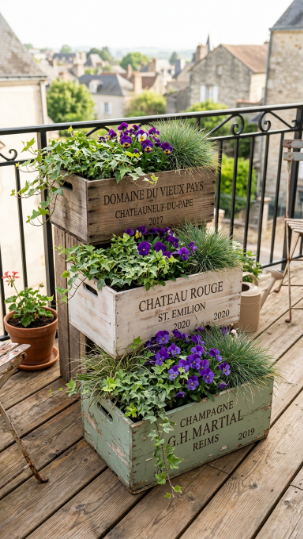
Wine crates offer a generous planting depth, beautiful natural timber character, and a wine-country charm that looks effortlessly rustic on any cozy balcony — and they require almost no preparation to use as planters.
Line the interior with heavy-duty plastic sheeting or pond liner, piercing several drainage holes in the base. Wine crates typically have 8–12cm natural gaps between the base slats — this is actually ideal drainage, but needs the liner to prevent compost from washing straight through. Fill with a quality multi-purpose compost enriched with a slow-release granular fertiliser, which will sustain plants for 12–16 weeks without additional feeding.
For a stepped three-crate display, stack one crate on a brick or timber riser, place one directly on the floor, and position the third at mid-height on a short stool or thick plank. Vary the plant palettes across the three crates — one with trailing ivy and Viola, one with compact ornamental grass and winter pansies, one with herbs. This variation across a uniform container type is what creates the collected, curated look that characterises the best rustic balcony gardens.
💡 Pro Tip: Rub the exterior of each crate with a block of beeswax furniture polish — it deepens the natural wood grain beautifully, provides gentle weatherproofing, and gives the timber a warm sheen that chalk paint simply cannot replicate.
Explore wine crate planter ideas for cozy balcony gardens and learn about the best compost for wooden container planters via Gardeners’ World.
Three wine crates at staggered heights make a display that looks designed, not assembled.
6. Galvanised Milk Churn Planter
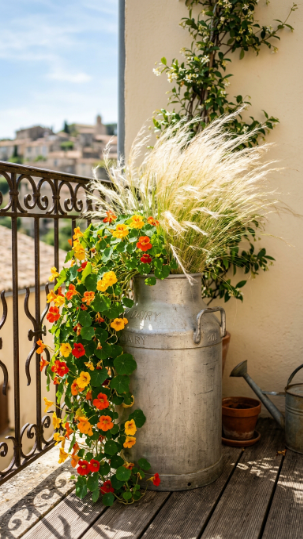
A galvanised milk churn is one of the most characterful rustic DIY planters available — its tall, narrow silhouette creates instant vertical interest on a balcony where floor space is limited, and the worn metal patina develops beautifully over seasons.
New galvanised churns are available from farm supply stores and online retailers at reasonable cost; genuinely aged ones from antiques markets carry an authenticity that makes them worth the premium. Drill or punch five drainage holes in the base using a metal drill bit (use cutting oil to prevent the bit from overheating). The narrow neck of a milk churn constrains which plants can be used — but this limitation is actually an aesthetic advantage, directing focus to dramatic architectural plants like Stipa tenuissima or single trailing specimens like nasturtiums.
Fill the lower two-thirds of the churn with lightweight expanded clay aggregate (Leca) or broken polystyrene to reduce weight and improve drainage, then top with good-quality compost. Stipa tenuissima (feather grass) is a superb choice for the full planting depth — it reaches 60–75cm in height, moves gracefully in the slightest breeze, and the golden tones in its foliage complement galvanised metal perfectly. Nasturtiums cascading from the neck add a second season of colour from early summer through the first frosts.
Discover galvanised metal planter ideas for rustic balcony gardens and read how to grow Stipa tenuissima in containers from Missouri Botanical Garden.
A milk churn planted with feather grass turns even the narrowest balcony corner into something quietly cinematic.
7. Vintage Colander Herb Planter
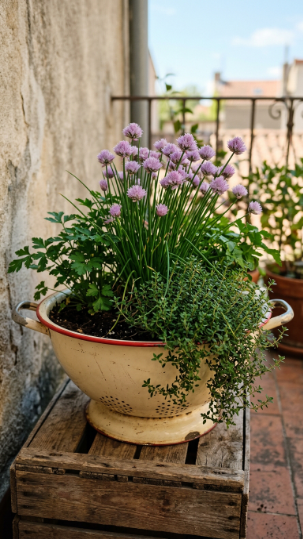
A vintage enamel colander is one of the most charming rustic planters possible — its pre-existing holes make it drainage-perfect, its kitchen provenance fits the herb garden theme naturally, and the worn enamel surface develops genuine character with every season outdoors.
Source old colanders from charity shops, car boot sales, or online marketplaces — cream with red or blue trim is the classic farmhouse enamel palette. No preparation is needed beyond a rinse; the colander’s existing holes provide ideal drainage that most DIY planters require drilling to achieve. Fill with a 60/40 mix of multi-purpose compost and perlite to keep the growing medium light and free-draining — heavy soils compact in small containers and suffocate herb roots quickly.
Chives are the single best herb for a colander planter: they grow prolifically in confined spaces, produce beautiful lilac pom-pom flowers that are fully edible, and can be snipped back hard every four to six weeks to regenerate fresh growth. Add trailing thyme spilling over the sides and compact flat-leaf parsley at the centre. Position in a minimum of 5 hours of direct sunlight — herbs grown in insufficient light produce thin, flavourless growth regardless of how carefully you water or feed them.
Best herbs for enamel colander planters:
- Chives — flowers, regrows readily, compact
- Greek oregano — small leaf, intense flavour, drought-tolerant
- Trailing thyme ‘Silver Queen’ — variegated, cascades beautifully
- Dwarf basil ‘Minette’ — bushy, intensely fragrant, perfect scale
Browse vintage kitchen colander planter ideas for rustic gardens and learn about growing herbs in small containers on balconies from Penn State Extension.
There’s a quiet delight in using something intended for the kitchen to grow the very ingredients that belong in it.
8. Wooden Crate Strawberry Tower
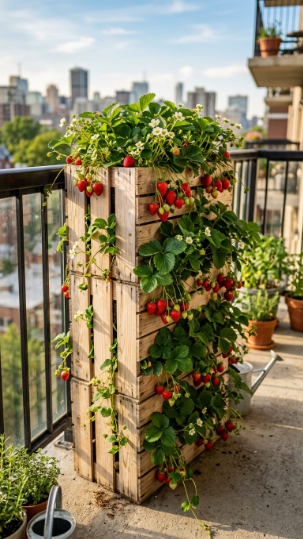
Stacking wooden fruit crates and planting strawberries through the slats creates one of the most productive and visually rewarding rustic DIY planters — a small footprint that yields a surprising quantity of fruit through the entire summer.
Use two to three sturdy wooden fruit crates (the type used for apples or oranges at markets) and stack them vertically, securing with two or three exterior wood screws driven through the rear of each crate into the one below for stability. Line the interior with landscape fabric — it retains compost but allows drainage, and prevents strawberry roots from escaping through the slat gaps. Fill with a specialist strawberry or soft fruit compost (higher potassium content than standard multi-purpose) mixed with 20% perlite.
Plant strawberry runners through each horizontal slat gap, spacing them 15–20cm apart around the perimeter of each crate level. Everbearing varieties are essential for maximum season-long production: ‘Flamenco’ and ‘Mara des Bois’ both produce continuously from June through to the first frosts rather than flushing once in June and finishing. Water daily in warm weather — strawberry roots in containers dry rapidly and drought stress reduces fruit size and quantity more dramatically than any other environmental factor.
💡 Pro Tip: Tuck a small square of horticultural fleece under each developing berry cluster to prevent the fruit from sitting directly on damp timber, which causes botrytis (grey mould) that ruins fruit before it ripens.
Explore wooden crate strawberry tower projects for balconies and read expert strawberry container growing advice from the RHS.
Few things on a balcony generate as much genuine daily excitement as watching your own strawberries ripen.
9. Driftwood Planter Trough
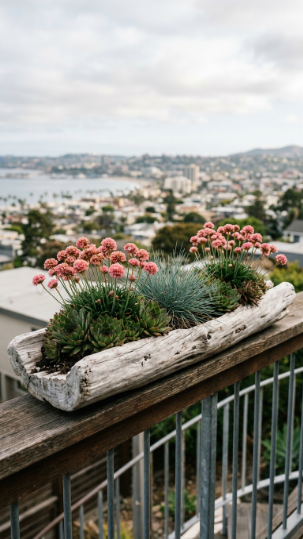
A driftwood trough brings a piece of coastal landscape to your balcony — the bleached, silver-grey timber looks like something the tide delivered, and paired with drought-tolerant coastal plants, it creates a genuinely evocative display.
Collect several large pieces of driftwood and arrange them into a shallow trough shape, binding the pieces together with galvanised wire or exterior wood screws at the joints. Line the base with a double layer of hessian sacking (biodegradable, breathable, and perfectly adequate for a season or two) and fill with a free-draining sandy compost — 50% multi-purpose compost and 50% sharp sand or coarse grit. This lean, gritty mix mimics coastal soil conditions that suit drought-adapted plants perfectly.
Armeria maritima (thrift, sea pink) is the quintessential plant for a driftwood trough — it grows naturally in coastal rock crevices, produces cheerful pink pompom flowers through spring and early summer, and requires virtually no care once established. Pair with blue Festuca glauca for contrasting texture and colour, and fill remaining gaps with Sempervivum rosettes. This combination is fully frost-hardy, requires no supplementary feeding, and needs watering only during extended dry spells.
Discover driftwood planter and coastal garden display ideas and learn how to grow Armeria maritima in containers via Gardeners’ World.
A driftwood trough is one of those rare DIY planters that looks more beautiful in its second and third year than the day you built it.
10. Painted Tin Can Herb Wall

A grid of painted tin cans mounted on reclaimed timber is the most budget-friendly rustic DIY planter project on this list — the entire wall display costs under £10 to build and creates a farmhouse herb feature that takes up zero floor space.
Collect cans of varying sizes over several weeks — large catering tins, standard canned vegetable tins, small tomato paste tins create an organic size variation. Punch five drainage holes in each base with a hammer and large nail, then paint the exterior with exterior-grade chalk paint. Two coordinating matte colours work better than many: cream and olive, slate and terracotta, or navy and white all produce cohesive results. Apply two thin coats rather than one thick coat to prevent dripping on the curved surface.
Mount cans to a reclaimed timber board using U-shaped pipe clips (jubilee clips) screwed through the can’s exterior. Fix the board to the balcony wall using heavy-duty masonry anchors rated to the total weight. Fill each can with a 50/50 mix of multi-purpose compost and perlite — the small volume of a tin can dries faster than any larger container, so the perlite component is non-negotiable for moisture management. Plant one herb per can only — overcrowding causes nutrient competition that weakens both plants.
Browse tin can herb wall ideas for cozy balcony gardens and learn how to grow herbs in small containers with limited space from The Old Farmer’s Almanac.
This project turns something you’d otherwise throw away into the most-admired feature on your balcony wall.
11. Moss-Lined Wire Basket Planter
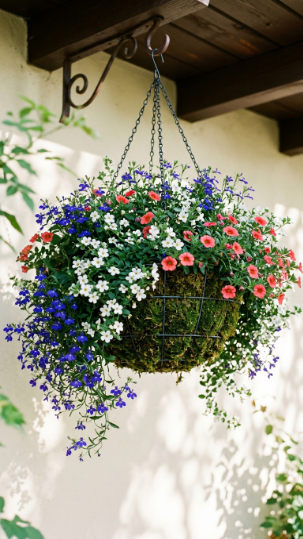
A moss-lined wire basket is one of the oldest and most effective rustic container designs — the thick sphagnum lining retains moisture while breathing naturally, creating growing conditions that produce hanging baskets of a quality that plastic-lined versions simply cannot match.
Use a 35–40cm diameter wire basket and a full block of sphagnum moss (available from florists and garden centres). Soak the moss in water for 10 minutes before use. Press it firmly against the inside of the wire frame in a layer at least 4–5cm thick — gaps in the moss lining allow compost to wash out and create dry spots that stress plant roots. Fill the centre with hanging basket compost formulated with water-retaining gel crystals.
Plant through the moss sides as well as across the top surface. Push plug plants (not large root balls — they damage the moss lining) through the wire and into position in the lower hemisphere of the basket. This “planting all around” technique produces the full, spherical effect that makes the most spectacular hanging baskets. Use trailing lobelia, bacopa, and Calibrachoa for continuous flowering from late May through September, deadheading spent flowers every five to seven days.
💡 Pro Tip: Before filling, fold a saucer-sized piece of moss into a shallow cup shape and press it into the very bottom centre of the basket — this creates a natural water reservoir that slows drainage from the base and extends the time between waterings by 30–40%.
Explore moss-lined hanging basket ideas for rustic balcony gardens and read expert advice on planting and maintaining hanging baskets via Gardeners’ World.
A well-planted moss basket in full bloom is a piece of living artwork that costs a fraction of a florist arrangement.
12. Birch Log Slice Pot Risers With Herb Display
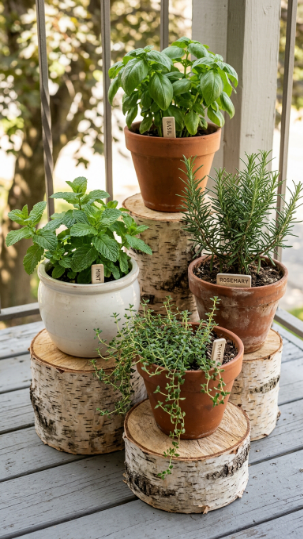
Sliced birch logs used as pot risers beneath a herb display solve the common problem of flat, uninteresting balcony plant arrangements — by creating instant, natural-looking height variation without buying a single additional pot or stand.
Source a birch log (80–100mm diameter) and slice it into rounds of varying thickness using a handsaw or mitre saw: 5cm, 8cm, 12cm, and 18cm thick slices create a good range. Birch has a naturally beautiful cross-section — the dark ring pattern in pale cream wood is genuinely decorative and requires no finishing treatment. Apply one coat of raw linseed oil to each cut face to slow the timber from checking (cracking) as it dries outdoors, but otherwise leave completely natural.
Position the log slices under individual pots to create a staggered height arrangement — tall rosemary at the back on a high riser, medium basil on a mid-height slice, trailing thyme at floor level in front. This layering technique is what gardening designers use to create the sense of depth and abundance in plant displays, and birch risers achieve it for the price of a single log. Use only pots with drainage holes and ensure water can drain freely over the log slice — standing water pools above a flat surface and gradually rots the timber.
Discover natural wood pot riser ideas for balcony plant displays and read how to create layered plant displays in small garden spaces from Better Homes & Gardens.
Birch log slices under your pots cost almost nothing and give your balcony arrangement the depth and dimension of a professional styling job.
13. Upcycled Welly Boot Herb Planters
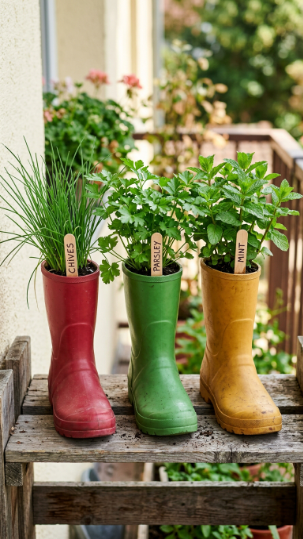
Old rubber boots are one of the most joyfully eccentric rustic DIY planters — they’re immediately recognisable, genuinely cheerful, and because rubber is waterproof, they function as self-contained growing vessels the moment you pierce a few drainage holes in the sole.
Pierce five to six drainage holes in the sole of each boot using a thick nail, awl, or drill. Place a 3cm layer of pea gravel at the base of each boot before adding compost — the narrow ankle of a welly restricts drainage and the gravel layer ensures water can escape freely rather than pooling at the base where roots will suffocate. Fill with a 50/50 mix of multi-purpose compost and perlite. The rubber boot walls insulate the root zone very effectively, which is actually a disadvantage in full sun — position welly boot planters in a partially shaded spot where the compost temperature stays manageable for roots.
Mint is the perfect boot plant — its vigorous, invasive spreading habit is completely contained within the boot’s walls, and it genuinely thrives in the restricted space. Chives and flat-leaf parsley also do well. Plant one herb per boot, labelling each with a wooden lolly stick and chalk pen or garden marker. Display three boots at different heights on a rustic wooden shelf or step ladder for a cohesive, styled display.
Browse upcycled boot and wellies planter ideas for balcony gardens and explore growing mint in containers to prevent spreading from The Old Farmer’s Almanac.
Welly boot planters are one of those ideas that makes every person who sees your balcony smile without exception.
14. Reclaimed Drawer Succulent Garden
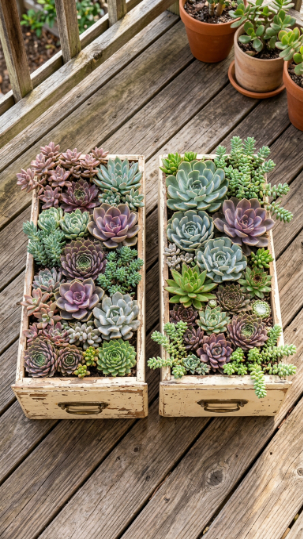
Repurposed dresser drawers lying flat and planted as succulent troughs combine the depth and generosity of a raised bed with the immediate vintage charm of an antique — and the distressed, chipped paint surface is exactly the kind of imperfection that makes rustic DIY planters look genuinely beautiful.
Line the interior of each drawer with heavy-duty pond liner, secured with a staple gun and sealed at the corners. Pierce a row of drainage holes through the liner and drawer base every 10cm. The generous surface area of a standard dresser drawer makes it ideal for the tapestry planting style — filling the entire surface with tightly grouped succulent rosettes of contrasting colour and form. Use a 50/50 cactus compost and horticultural grit mix, filled to within 2cm of the drawer rim.
Plant densely — 8–12 succulents per standard drawer, mixing Echeveria rosettes, spreading Sedum, mat-forming Sempervivum, and trailing Sedum spurium. Group complementary colours in natural drifts rather than alternating individual plants in a grid. This naturalistic planting approach takes 20 minutes but looks as if it grew organically over years. Top-dress between plants with fine black grit or crushed slate for a clean, gallery-quality finish that also reflects heat away from the succulent crowns.
💡 Pro Tip: Sand the paint surface of the drawer lightly with coarse sandpaper before planting — this enhances the distressed look and exposes natural timber grain beneath the paint, giving the drawer a layered vintage depth that looks genuinely aged rather than artificially distressed.
Explore reclaimed drawer succulent garden ideas for balconies and learn how to create a succulent tapestry planting in containers at Missouri Botanical Garden.
A succulent-filled drawer flat on your balcony floor looks like a museum exhibit and requires almost no ongoing care.
15. Willow Woven Basket Planter
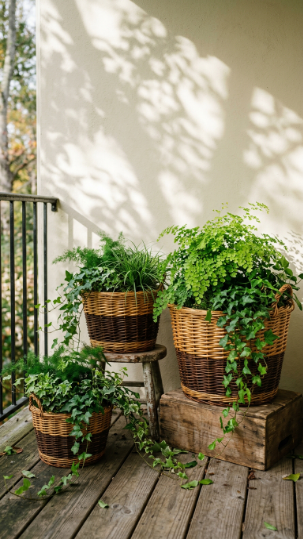
Woven willow baskets are the most organically beautiful rustic containers available — each one is genuinely unique, the natural weave texture pairs magnificently with ferns and trailing foliage, and the warm honey-to-chocolate colour range of willow develops a gorgeous silver-grey patina after one season outdoors.
Line each basket fully with a double layer of heavy-duty black polythene, secured at the rim with waterproof tape or staples. Pierce five drainage holes in the liner base. This lining is non-negotiable — unlined wicker deteriorates within a single wet season, but a well-lined basket lasts five to seven years outdoors with minimal weathering. Fill with a moisture-retentive compost blended with 20% ericaceous mix for the slightly acidic conditions that ferns prefer.
Boston fern (Nephrolepis exaltata) and maidenhair fern (Adiantum) are natural choices for woven basket planters in partial shade — their lush, arching fronds contrast beautifully with the structured weave pattern of the basket. Trailing Hedera (ivy) planted at the basket edges fills in around the ferns and eventually softens the basket walls themselves. Position in a spot receiving 2–4 hours of indirect light — full shade produces leggy, pale fronds, while direct sun scorches fern foliage within days.
Discover wicker and willow basket planter ideas for shade-loving balcony plants and read comprehensive fern container care guidance from the University of Florida Extension.
Willow baskets and ferns together create the feeling of a woodland garden transported entirely to your balcony floor.
16. Stacked Terracotta Chimney Pot Planter
A reclaimed terracotta chimney pot brings extraordinary architectural drama to a balcony plant display — its tall, cylindrical form creates immediate vertical interest, and its vintage provenance makes it the quintessential rustic container find.
Chimney pots are available from architectural salvage yards, reclamation centres, and online auction sites — genuine clay chimney pots often cost less than contemporary garden urns and carry far more character. Before planting, fill the lower two-thirds of the pot with crumbled polystyrene or expanded clay aggregate (Leca) to reduce the significant weight of a fully compost-filled chimney pot while maintaining drainage. Top with 30–40cm of quality loam-based compost for the planted zone.
Nasturtiums are perfectly suited to the chimney pot’s tall, narrow profile — their trailing varieties (Nasturtium ‘Jewel Mix’ or ‘Trailing Mixed’) cascade 60–90cm down the sides by midsummer, creating a dramatic waterfall of flower and foliage. Plant five to seven seeds or plug plants around the rim in May, thinning to the strongest four. Nasturtiums flower most prolifically in poor soil — resist the urge to feed them, as rich compost encourages excessive leaf growth at the expense of flowers.
Beginner vs. Advanced approach:
- Beginner: Plant nasturtium seeds directly in May — they’re foolproof, germinate in 10 days, and require no prior gardening experience
- Advanced: Underplant the rim with Lobularia maritima (sweet alyssum) for fragrance, and train one stem of black-eyed Susan vine (Thunbergia) up a bamboo cane inserted into the chimney pot centre
Browse chimney pot planter ideas for rustic balcony gardens and learn how to grow nasturtiums in containers via Gardeners’ World.
A chimney pot in full trailing bloom is one of the most dramatic balcony statements imaginable — and one of the easiest to achieve.
17. Corrugated Iron Trough Planter
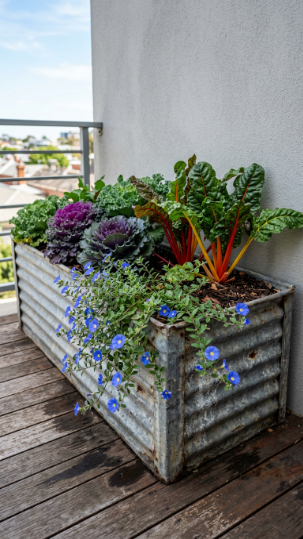
Corrugated iron troughs bring an industrial edge to rustic balcony gardening — the ridged texture, the natural rust patina that develops over seasons, and the generous rectangular form creates a planter that works equally well as a feature piece and a productive vegetable trough.
Corrugated iron can be purchased as roofing sheets from builders’ merchants and formed into a trough by bending around a timber frame, or pre-formed troughs are available from farm supply and rural lifestyle retailers. Drill a row of 12mm drainage holes along the base at 15cm intervals. Line the inside base with a strip of weed-suppressing fabric before adding compost — this prevents fine compost particles from washing through the drainage holes while maintaining free drainage.
Corrugated iron conducts heat very efficiently in full sun, which can stress root systems in summer. Mitigate this by painting the exterior face with exterior-grade matte black or dark olive paint — counterintuitively, a dark exterior colour radiates absorbed heat back into the environment faster than bare metal, reducing internal temperature spikes. Fill with vegetable compost for productive planting, or a loam-based mix for ornamentals. Ornamental kale (Brassica oleracea) and Swiss chard are ideal — both are visually spectacular, edible, and productive from late summer through winter.
💡 Pro Tip: Allow the exterior of your corrugated iron trough to rust naturally — the warm orange-brown patina that develops is genuinely beautiful against green foliage, and the rust layer actually slows further corrosion rather than accelerating it.
Explore corrugated metal trough planter ideas for modern rustic balconies and discover growing ornamental vegetables in balcony containers from Penn State Extension.
A corrugated iron trough planted with colourful chard and kale is a feature that’s beautiful and edible simultaneously.
18. Hessian Sack Potato Planter
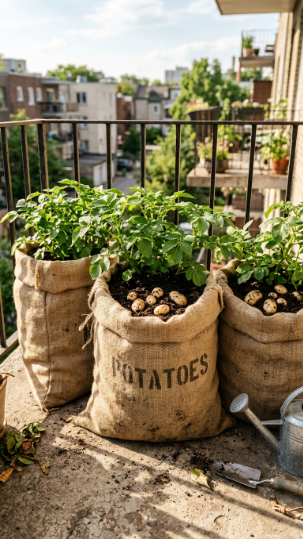
Hessian sacks are one of the most authentically rustic potato-growing containers available — the natural burlap fibre breathes perfectly, the biodegradable material will eventually compost back into the garden, and the whole thing looks like it belongs on a working farm.
Use 30–40 litre hessian potato sacks (widely available online or from farm suppliers). Roll the sides down to half-height at planting time in April — this keeps the initial container shallow and allows you to add compost progressively as the plant grows (the “earthing up” technique that significantly increases yield). Fill the base with 15cm of potato-specific compost or vegetable compost mixed with well-rotted manure. Place two to three seed potatoes (chitted — sprouting) on top of this base layer and cover with another 10cm of compost.
As the potato plant grows and reaches 20cm in height, add more compost to cover the lower stems, leaving only the top 5cm of foliage exposed. Repeat until the sack is full. This progressive filling technique produces tubers along the entire buried stem length, dramatically increasing the total harvest from a container this size. Water consistently — potatoes are sensitive to irregular moisture, which causes hollow heart disorder in developing tubers (where the potato develops an internal cavity rather than solid flesh).
Discover hessian sack potato growing ideas for balconies and read how to grow potatoes in containers step by step from the RHS.
Tipping a hessian sack of home-grown new potatoes onto your balcony table on a summer evening is one of gardening’s most satisfying moments.
19. Clay Pot Mosaic Planter
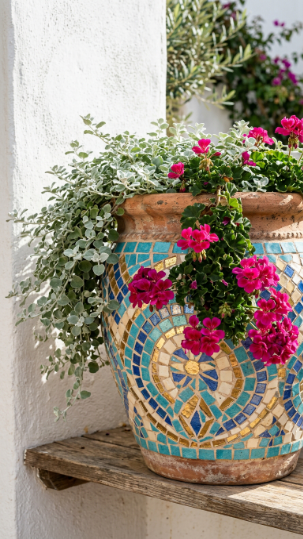
Decorating a plain terracotta pot with mosaic tiles transforms it from a functional container into a genuine piece of garden art — and the combination of handmade mosaic and living plants creates a display with a warmth and personality that no purchased planter can replicate.
Use terracotta cement adhesive (not standard tile grout — it degrades in frost) to fix small mosaic tiles, broken crockery pieces, or glass pebbles to the exterior of a large terracotta pot (minimum 30cm diameter). Work in small sections, pressing each tile firmly and allowing each section to set for 30 minutes before moving to the next area. Once the adhesive is fully cured (24–48 hours), apply exterior-grade tile grout, working it into the gaps between tiles with a damp sponge. Wipe away excess grout within 20 minutes before it hardens.
The finished mosaic pot must be stored under cover or brought indoors in hard frost conditions — the tile adhesive bonds well but repeated freeze-thaw cycles over years will eventually dislodge tiles. In mild climates, outdoor storage year-round is generally fine. Plant trailing Pelargonium (geranium) for summer-long flowering that works beautifully against bold mosaic patterns, or Helichrysum petiolare for silver foliage contrast that showcases the tile colours.
💡 Pro Tip: Use broken vintage crockery rather than new tiles for the most authentically rustic mosaic effect — charity shops and car boot sales are excellent sources, and broken plates with floral or blue-and-white patterns create the most beautiful results.
Browse mosaic terracotta pot ideas and tutorials for balcony gardens and explore creative container garden decorating techniques from Better Homes & Gardens.
A mosaic pot is the kind of DIY project you’ll look at every single morning with genuine satisfaction.
20. Wooden Shutter Window Box
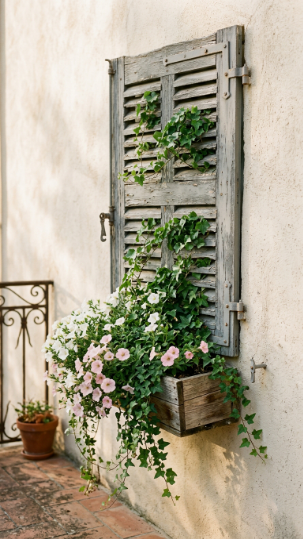
A reclaimed wooden shutter mounted on the balcony wall creates an instant trellis, a backdrop, and a rustic display structure in one piece — and a window box fixed to its base plants the display and grounds the whole composition.
Source an old timber window shutter from an architectural reclaimer, estate sale, or online marketplace. Mount it vertically on the balcony wall using heavy-duty mirror plates and masonry anchors, leaving a 5cm gap between the shutter and wall for stem growth. Fix a window box to the base using L-brackets, aligning its length with the shutter width. The shutter’s natural louvred or panelled surface becomes a trellis through which climbing and scrambling plants weave organically.
Fill the window box with a free-draining compost mix and plant trailing petunias and Hedera ivy along the front edge, with a climbing Thunbergia or sweet pea planted at the back to grow upward through the shutter slats. Within six to eight weeks, the ivy and climbers will have woven through the slats naturally, creating a layered, French farmhouse effect that takes absolutely no artistic direction — the plants do all the compositional work themselves.
Discover shutter and window box display ideas for rustic balcony walls and learn how to grow trailing petunias in balcony containers via Gardeners’ World.
A shutter window box display photographs beautifully from every angle and looks as if it belongs on a Provençal farmhouse.
21. Aged Terracotta Strawberry Planter
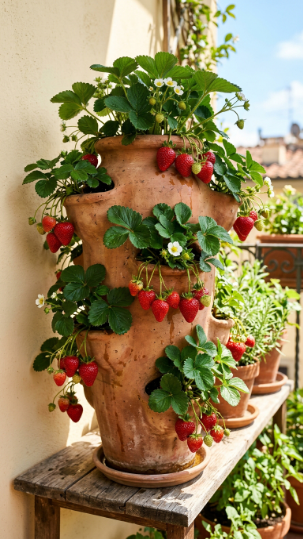
The traditional terracotta strawberry tower planter — with its characteristic side pockets — is one of the most enduringly popular rustic DIY planters for good reason: it combines attractive form with excellent horticultural function, producing more strawberries per square centimetre of balcony than almost any other container type.
Aged terracotta strawberry planters are available at garden centres, but genuinely aged ones with the characteristic salt deposits, moss staining, and patina that develop over years carry far more rustic character. To artificially age a new terracotta planter, brush the exterior with a diluted yogurt solution (50% natural live yogurt, 50% water) and leave outdoors in a damp spot for three to four weeks — beneficial bacteria colonise the surface and produce the green-grey moss patina of a decades-old pot within a single season.
Place a central drainage column of gravel-filled pipe (a simple 40mm diameter perforated pipe works perfectly) through the centre before filling, to ensure water reaches the lower pockets rather than draining entirely from the upper section. Fill with strawberry compost and plant one runner per pocket. Water the central column daily in summer — thirst is the primary yield-limiting factor for strawberries in tower planters, and insufficient moisture causes small, hollow fruit.
Browse terracotta strawberry planter tips and growing guides for balconies and read expert guidance on growing strawberries in containers from the RHS.
An aged terracotta strawberry tower in full fruit is one of the most joyful sights in the whole of balcony gardening.
22. Stacked Stone Effect Planter With Sedum
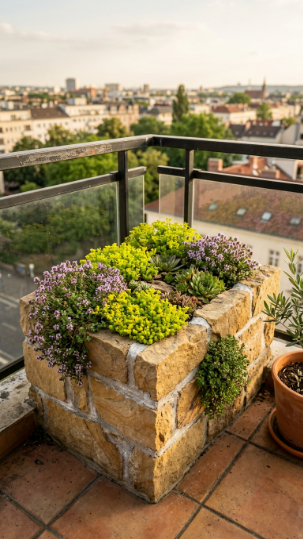
A dry-stack or mortared stone planter is the most permanent and genuinely timeless rustic container you can build on a balcony — it looks as if it grew there along with the building, and the planting opportunities within the stone joints themselves expand the display beyond the top surface.
For balcony use, weight is the primary concern with stone construction — verify your balcony’s structural load capacity before building, as filled stone planters are significantly heavier than timber or metal equivalents. A compact 60cm × 30cm × 25cm sandstone planter, filled and planted, weighs approximately 80–100kg and should be positioned over a structural load-bearing point. Use reconstituted stone blocks rather than natural stone to reduce weight by 30–40% while maintaining the aesthetic.
Mortar alternate courses with a sand-cement mix in a 4:1 ratio, leaving deliberate planting gaps every two to three courses — these gaps are filled with a lean soil-grit mix and planted with mat-forming Sedum acre, creeping thyme (Thymus serpyllum), and Sempervivum. These plants thrive in the free-draining, mineral conditions of stone wall joints and will spread naturally into the surrounding mortar crevices over one to two seasons, giving the planter a genuinely ancient-looking character.
💡 Pro Tip: Seal the interior faces of the stone planter with two coats of waterproof stone sealer before filling — this prevents moisture from wicking through the stone and mortared joints during heavy rain, which gradually weakens the mortar over freeze-thaw winter cycles.
Explore stone trough and dry-stack planter ideas for balcony gardens and learn how to grow Sedum and Sempervivum in stone troughs from the RHS.
A stone planter is the one rustic DIY project that your balcony will still be showing off in twenty years.
23. Copper Watering Can Planter Display
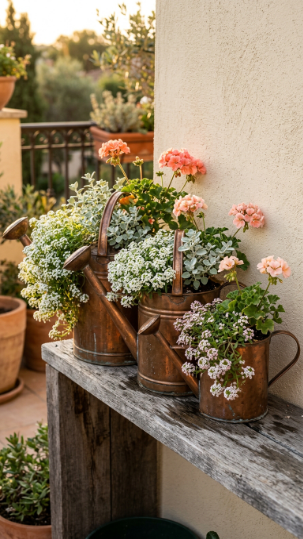
Copper watering cans repurposed as planters bring a warmth and refinement to rustic balcony displays that few other containers can match — the burnished metal develops a beautiful verdigris patina outdoors, and grouped in three sizes, they create a display that looks as if it belongs in a country house kitchen garden.
Genuine copper watering cans develop a natural blue-green patina (verdigris) when left outdoors — this oxidation process is entirely safe for plants and is actually the aesthetic goal for a rustic display. Pierce drainage holes in the base using a metal punch or drill with a metal bit. Fill with a free-draining compost mix; the narrower neck of a watering can means roots stay relatively compact, so lightweight compost with a high perlite component prevents compaction in the restricted space.
Lobularia maritima (sweet alyssum) is an exceptional choice for watering can planters — it flowers continuously from June through October, releases a honey fragrance that intensifies in warm afternoon sunshine, and its small-flowered, softly spreading form suits the scale of the container beautifully. Pair with trailing Helichrysum petiolare for silver foliage contrast and a compact trailing Pelargonium for height and warmth of colour at the centre. Deadhead alyssum once monthly by running your fingers through the plant to shear off spent flowers — this takes 60 seconds and triggers a fresh flush of bloom.
Discover copper and metal watering can planter ideas for cozy balcony displays and learn how to grow Lobularia maritima in containers outdoors from The Old Farmer’s Almanac.
Three copper watering cans in a row, each brimming with soft white alyssum, are the kind of detail that makes a balcony feel genuinely loved.
Getting Started With Rustic DIY Planters for a Cozy Balcony
The absolute easiest first step is to find a single old object in your home that could hold soil — a tin can, a colander, an old wooden box — and turn it into a planter this afternoon. Punch or drill drainage holes, fill with multi-purpose compost and a handful of perlite, plant three herb plugs or a small trailing plant, and place it somewhere you’ll see it every day. That’s your rustic balcony garden begun. Not planned, not researched to exhaustion — begun.
The most common mistake beginners make with rustic DIY planters is forgetting drainage. Every container, regardless of how charming it looks, must have drainage holes in the base — without them, compost becomes waterlogged within a week, roots suffocate, and plants die in ways that feel mysterious but are entirely preventable. Before you plant anything in anything, check for holes, and if they’re not there, make them.
For your first proper purchase: one bag of multi-purpose compost with perlite mixed in, one 25cm terracotta pot, and a rope-wrap project using jute twine and a hot glue gun. Total cost under £12. Plant one trailing Pelargonium from a garden centre for immediate summer colour.
Expect to see your rustic display really come together within four to six weeks of planting. The initial few days can look sparse — give the plants time to establish, and resist the urge to overwater while they settle. By week six, the character of a genuinely cozy, rustic balcony will be unmistakeable.
Frequently Asked Questions
What are the best plants for rustic DIY planters on a balcony?
The best plants depend entirely on your balcony’s light exposure. For sunny south or west-facing balconies, Mediterranean herbs (rosemary, thyme, lavender, sage), Pelargoniums, nasturtiums, and trailing Calibrachoa thrive in rustic containers. For shadier north or east-facing positions, ferns, hostas, trailing ivy, begonias, and impatiens are far better choices. In almost all balcony conditions, Sempervivum is a reliable year-round option — fully frost-hardy, drought-tolerant, and genuinely beautiful in any rustic container from a hollowed log to a stone trough.
How do I stop wooden rustic DIY planters from rotting?
Line the interior with heavy-duty pond liner before planting — this prevents direct contact between moist compost and the timber, which is the primary cause of rot. Treat the exterior with a water-based exterior wood stain, oil, or deck sealer before use. Elevate wooden planters on terracotta feet or timber risers so water drains freely from the base rather than pooling beneath the wood. With these three measures, a well-made timber planter will last five to eight years outdoors before requiring significant repair.
Can I make rustic DIY planters for a balcony without spending much money?
Many of the best rustic planters in this article are made from free or near-free materials. Tin cans, wine crates (free or £2–£5 at markets), reclaimed pallets (often available free from hardware stores), old colanders (charity shops, 50p–£2), driftwood (coastal areas, free), and old timber drawers (skip finds, free) all produce genuinely beautiful results. The only unavoidable cost is compost and plants — a single bag of multi-purpose compost and three to five plug plants from a garden centre is all you need to begin a display, typically for under £15.
How often should I water plants in rustic DIY planters on a balcony?
Watering frequency depends on container material, plant type, and weather conditions. In general, during summer: terracotta and timber planters need checking daily, as both materials allow moisture to evaporate from the container walls as well as the soil surface; metal and glazed containers retain moisture longer and may only need watering every two to three days. Always check by pressing your finger 3–4cm into the compost — water when it feels dry at that depth, not before. Succulents in rustic planters should dry out completely between waterings; herbs and flowering annuals prefer consistently moist (not wet) compost.
Why are my balcony plants in rustic planters not thriving despite regular care?
The three most frequent culprits are insufficient light, incorrect compost type, and blocked drainage. First, honestly assess how many hours of direct sun your balcony receives — most flowering plants need 5–6 hours minimum, and herbs need at least 4 hours. Second, check that you’re using the right compost for the plant type — succulents in moisture-retentive hanging basket compost, or herbs in poor sandy mix without nutrients, will both underperform significantly. Third, verify that drainage holes are genuinely unobstructed — place your finger over each hole to confirm water flows freely after watering.
A Few Final Thoughts
These 23 rustic DIY planters for a cozy balcony represent something more than a list of projects — they’re an invitation to build a space that genuinely reflects your personality rather than a catalogue page. The beauty of rustic gardening is that imperfection is not a problem to overcome but the actual aesthetic goal: the more weathered, layered, and handmade your balcony feels, the more welcoming it becomes. You don’t need all 23 ideas, or even five — start with one container that calls to you, one plant you love, and the willingness to leave something outside to weather and age into character. Rustic DIY planters for a cozy balcony reward patience more than any other gardening style, because they only get better with time, rain, and seasons. Your cozy balcony garden isn’t a weekend project that ends — it’s a space that grows with you, one handmade planter at a time.
Published on Greenbotanicalgarden.com | Category: Balcony & Outdoor Container Gardening | DIY Plant Projects