Your balcony deserves more than a couple of sad plastic pots from the garden center. With a little creativity and some DIY spirit, even the most compact outdoor space can become a lush, personal garden that genuinely turns heads. The best part? Most of these ideas cost almost nothing — they repurpose materials you already own or can find for free. Whether you have a sun-soaked south-facing terrace or a shaded urban nook, there’s a handmade planter here that will work beautifully for you. Get ready to transform your balcony — here are 24 unique DIY planters that are as functional as they are stunning. Ready? Let’s explore all 24 of them.
Why DIY Planters for Your Balcony Are Worth Your Time
Building your own planters isn’t just about saving money — although a homemade wooden trough costs a fraction of what garden centers charge for the equivalent. It’s about creating something that fits your balcony perfectly: the exact dimensions, the right drainage, the ideal depth for the roots of whatever you’re planting. Commercial pots are designed for the average gardener; DIY planters are designed for you.
There’s also a surprisingly satisfying horticultural benefit. When you build a planter yourself, you control every variable — the drainage layer, the soil mix, the container material’s heat retention. Terracotta alternatives made from wood, for instance, insulate roots better during temperature swings than thin plastic ever could, which matters enormously on exposed balconies where temperatures shift 10–15°C between day and night.
Here’s a lesser-known fact many balcony gardeners discover too late: container weight matters more than aesthetics. Standard ceramic pots can push a balcony well beyond its safe load rating — most residential balconies are rated for 150–300 kg/m². Lightweight DIY planters made from fabric, pallets, or foam-lined crates solve this problem elegantly.
This guide is ideal for apartment dwellers, renters who can’t drill permanent fixtures, beginner gardeners on a budget, and anyone who wants a balcony garden that feels genuinely personal rather than catalog-purchased.
At a Glance
- A repurposed wooden ladder becomes a vertical planter that holds six pots in under two square feet of balcony floor space.
- Old rain boots, colanders, and toolboxes make surprisingly excellent drainage-ready containers — and your neighbors won’t have seen one before.
- Fabric grow bags sewn from burlap cost pennies to make, weigh almost nothing, and actually improve root health through air-pruning.
- A pallet herb wall can grow 12+ herbs in one vertical structure using less than 90cm of wall space.
- Upcycled tin cans painted in a unified color palette create a cohesive, magazine-worthy display for just a few dollars in exterior paint.
1. Wooden Pallet Vertical Herb Wall
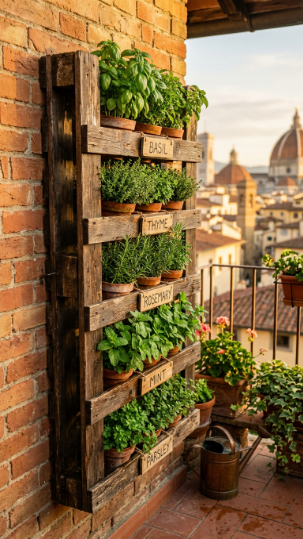
A single standard pallet transforms an empty balcony wall into a 12-slot herb garden — and it requires nothing more than landscape fabric, a staple gun, and an afternoon.
Source a heat-treated (not chemically treated) pallet — look for the “HT” stamp on the wood. Line the back and bottom of each horizontal slat-gap with heavy-duty landscape fabric, stapling it firmly into place to create planting pockets. Fill each pocket with a well-draining mix of 60% potting compost and 40% perlite — herbs hate sitting in wet soil and this ratio prevents compaction beautifully.
Mount the pallet flat against the wall using two heavy-duty hook-and-eye bolts rated to 20+ kg. Plant the bottom rows first while the pallet lies horizontal, letting roots establish for 2 weeks before standing it upright. This prevents everything from sliding out before the roots grip the compost.
💡 Pro Tip: Water herb pallet walls slowly and from the top — use a watering can with a long narrow spout to reach each pocket individually. A quick overhead spray means the top herbs get drenched while the bottom ones stay bone dry.
Explore more creative vertical herb gardens for small balconies
How to identify safely treated pallets for gardening
Grow what you cook with, and this pallet will earn back its small investment every single week.
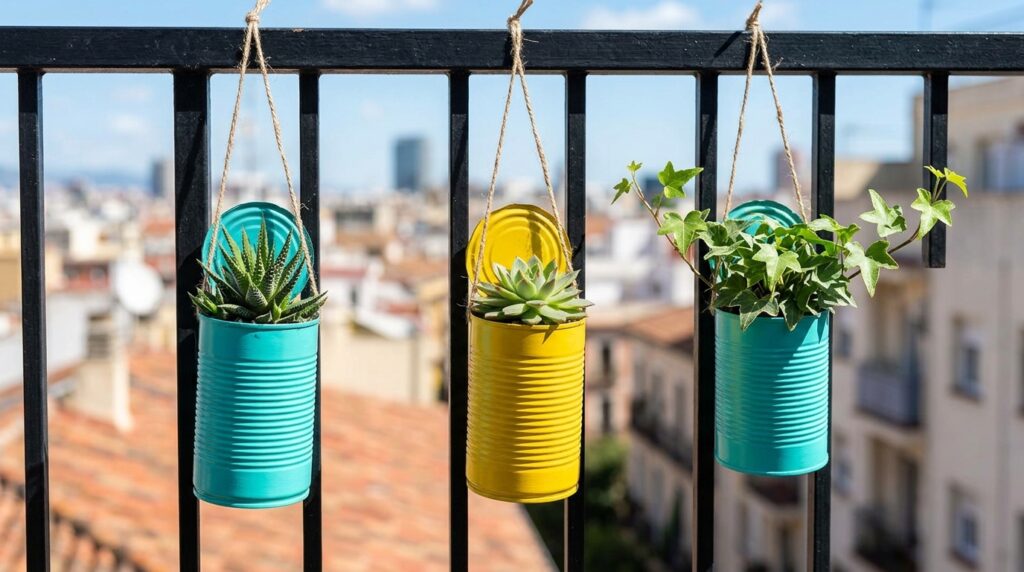
2. Painted Tin Can Planter Collection
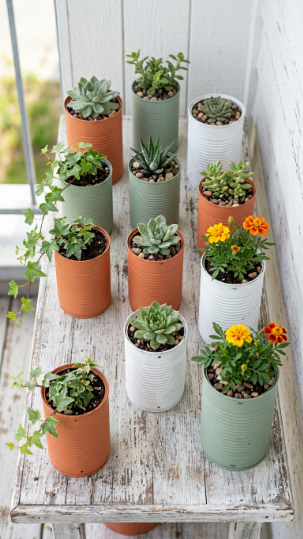
Tin cans — tuna tins, tomato tins, coffee cans — are the most underrated free planting containers available to any apartment gardener.
Collect cans of 3–4 different sizes over a few weeks. Use a hammer and thick nail to punch 5–7 drainage holes in the base of each one. Sand any sharp rim edges with medium-grit sandpaper. Apply one coat of rust-inhibiting metal primer, let it dry fully (minimum 2 hours), then finish with exterior-grade chalk paint in your chosen palette — a unified 2-color scheme creates a far more intentional display than random colors.
Plant small succulents like Echeveria elegans or Sedum rubrotinctum in the smallest tins, trailing Lobularia maritima (sweet alyssum) in mid-size ones, and bushy Pelargonium (geraniums) in coffee tins. Group odd numbers of cans together on a shelf or step riser for the strongest visual effect.
Best plants for tin can planters:
- Echeveria species (small rosette succulents)
- Sedum morganianum (burro’s tail — trailing)
- Pelargonium (compact geranium varieties)
- Thymus vulgaris (common thyme)
Discover the best compact plants for container balcony gardens
Expert container planting advice from the RHS
A row of matched tins costs nothing to make and looks like something from a boutique plant shop.
3. Upcycled Colander Hanging Planter
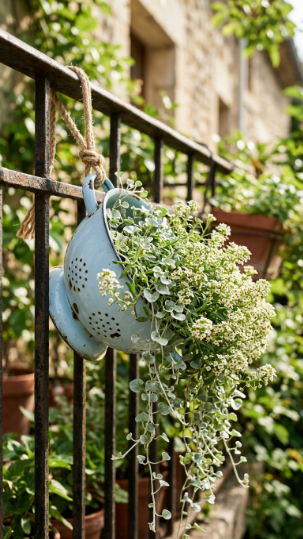
A metal colander is essentially a pre-drilled hanging basket — the perforations provide drainage that most purpose-built planters can’t match.
Choose a colander with a sturdy rim and handles — enamel, stainless steel, or aluminum all work well. Line it with coir liner (cut to fit from a sheet, available cheaply online) to retain soil while still allowing airflow through the holes. Fill with a moisture-retentive mix of 70% multi-purpose compost and 30% vermiculite — the airflow through the sides means it dries out faster than a solid pot, so this mix compensates.
Thread three equal lengths of jute rope (each 60cm) through the handles and base, knotting firmly underneath. Hang from a balcony beam or railing hook rated to at least 5 kg. Plant trailing varieties: Dichondra argentea (silver falls), Bacopa (sutera), or Petunia trailing hybrids cascade beautifully through and over the colander’s edges.
💡 Pro Tip: Water colander planters every other day in summer — the generous drainage that makes them so healthy also means they dry out faster than closed containers. Stick your finger 2cm into the compost; if it’s dry, water thoroughly until it runs freely through the holes.
Find the best trailing plants for balcony hanging planters
RHS guidance on watering hanging baskets correctly
Once this is hanging and trailing, every visitor to your balcony will want to know where you bought it.
4. Stacked Cinder Block Planter Wall
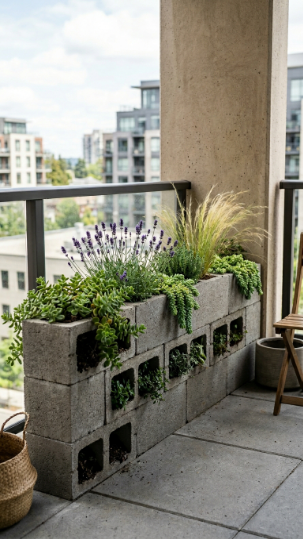
Cinder blocks are heavy, yes — but stacked two rows high along a balcony wall, they create individual planting cells that are genuinely brilliant for drought-tolerant alpines and succulents.
Before committing to cinder blocks, check your balcony’s load rating with your building manager — a single block weighs approximately 10–12 kg, so plan a small installation (6–8 blocks maximum for most balconies). Stack in a staggered pattern for stability, aligning cavities upward to form planting pockets roughly 15cm deep and 20cm wide.
Fill cavities with a gritty, free-draining mix: equal parts horticultural grit, coarse sand, and loam-based compost. This is ideal for Mediterranean herbs (Thymus, Origanum vulgare), alpine plants (Sempervivum, Aubrieta), and ornamental grasses (Festuca glauca). The block material naturally moderates soil temperature — staying cooler in summer heat than dark plastic pots.
Paint the exterior blocks with exterior masonry paint to coordinate with your balcony color scheme — it takes one tin and completely transforms the industrial look.
Build the perfect low-maintenance succulent balcony garden
Alpine and rock garden planting advice from Missouri Botanical Garden
Functional, sculptural, and virtually indestructible — this is the planter you’ll still be using in ten years.
5. Rope-Wrapped Plastic Pot Upcycle
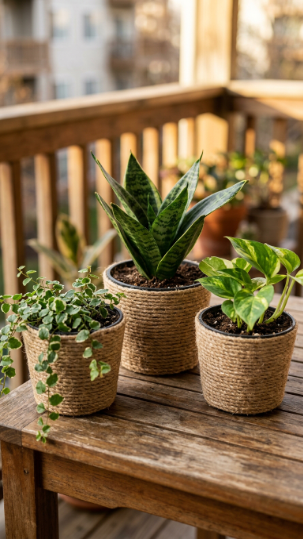
Those thin plastic nursery pots you accumulate every time you buy a plant? A ball of jute rope and a hot glue gun turn them into attractive textural containers in under 20 minutes.
Use 4mm natural jute rope — it’s UV-resistant enough to last 2–3 seasons outdoors. Starting at the base of the pot, apply a line of hot glue and press the rope firmly into place, working in tight horizontal rows upward. For a cleaner finish, wrap the base separately before doing the sides. The whole process takes about 15–20 minutes per medium pot and costs roughly £2–3 in rope.
The practical benefit beyond aesthetics: jute wrapping insulates the pot wall, moderating root temperature by several degrees — meaningful for tropical houseplants like Monstera cuttings or Ficus pumila that suffer when roots overheat on a sun-exposed balcony.
💡 Pro Tip: Seal the finished jute with a light spray of exterior varnish — this extends outdoor life from one season to three. Untreated jute rots within one wet summer.
Upcycle your nursery pots into beautiful balcony planters
Creative container gardening techniques from Gardeners’ World
Once wrapped, these pots look so deliberate and polished that no one will guess they cost nothing to make.
6. Wooden Wine Crate Planter Box
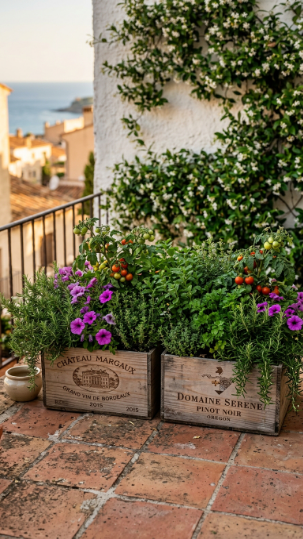
Wine crates are the ideal depth for deep-rooted vegetables and herbs — at 20–25cm internal depth, they accommodate tomato roots, dwarf pepper plants, and rosemary far better than most shallow planters.
Collect wine crates from local wine shops or delis — most give them away or sell them for £1–2. Line the interior completely with heavy-duty plastic sheeting or a purpose-cut pond liner, stapling it to the sides and base. Drill 6–8 drainage holes through both the liner and the base slats — critical, as without drainage these will become root-rot traps.
Fill with a nutrient-rich mix of 60% tomato/vegetable compost, 30% perlite, and 10% horticultural grit. This suits both herbs and compact vegetables perfectly. For a mixed ornamental planting, substitute general multipurpose compost.
Beginner vs. Advanced approach:
- Beginner: Plant with trailing Petunia and Lobularia — forgiving, long-flowering, easy
- Advanced: Grow a dwarf tomato variety like ‘Tumbling Tom’ alongside basil for companion planting on the balcony
Grow vegetables in containers on your balcony this season
Companion planting in containers — advice from The Old Farmer’s Almanac
There’s something deeply satisfying about eating a tomato that grew in a wine crate on your own balcony.
7. Ladder Shelf Tiered Planter Display

A leaning ladder creates four to six planting tiers in a footprint of less than 50cm × 80cm — the most space-efficient DIY planter structure you can build for a small balcony.
Use an old wooden stepladder or build a simple A-frame from 2×4 lumber. Sand thoroughly and apply two coats of exterior wood paint — white or grey both work beautifully against any balcony wall color. For safety on a balcony, anchor the top of the ladder to the wall with two L-brackets and screws rated for outdoor use.
Place the heaviest pots on the lowest rungs — this lowers the center of gravity and prevents toppling in wind. Vary pot sizes deliberately: largest at the bottom (20cm pots), medium in the middle (15cm), smallest at the top (10cm). This creates visual balance while distributing weight intelligently.
💡 Pro Tip: Line the back of each rung level with a thin piece of cut wood or dowel — this stops round pots from rolling off during wind or accidental bumps, without any additional fixing.
Design a vertical garden display for your apartment balcony
How to arrange container plants for maximum visual impact
This display takes one weekend to build and will be the first thing anyone notices when they step onto your balcony.
8. Burlap Fabric Grow Bag
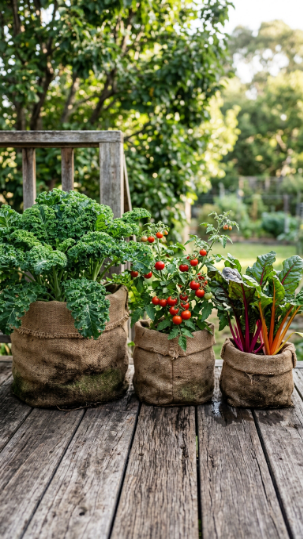
Fabric grow bags air-prune roots — when roots reach the bag wall and contact air, they naturally stop elongating and branch instead, creating a denser, healthier root system that outperforms pot-grown equivalents.
Sew your own from heavy-weight burlap (at least 340 gsm weight) — cut a rectangle, fold in half, and sew up the two open sides with outdoor-rated thread. Turn out, fold the base flat and sew across the corners to create a self-standing base. Make bags in three sizes: roughly 20L, 30L, and 45L (measured by volume when filled) for different plant sizes.
Fill with a quality peat-free potting mix — burlap bags biodegrade within 2–3 seasons outdoors, so there’s no long-term waste concern. Vegetables thrive here: dwarf courgettes, bush beans, and kale all perform remarkably well in 30L+ bags on a balcony that receives 6+ hours of direct sun.
Grow your own vegetables in fabric containers on a balcony
Root health and container growing explained by Penn State Extension
Once you grow in fabric bags, the difference in root quality — and harvest yields — genuinely convinces you never to go back to rigid plastic.
9. Copper Pipe Hanging Planter Frame
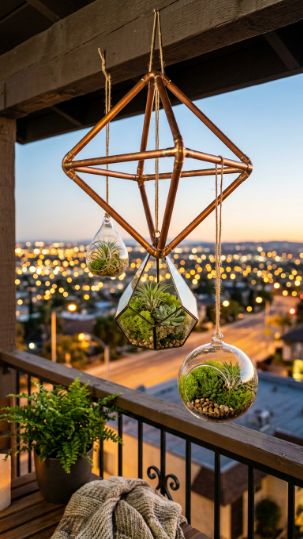
Copper pipe is easy to cut, requires no welding, and assembles with simple push-fit connectors — making it one of the most achievable metalwork DIY planter projects for beginner crafters.
You’ll need: 15mm copper pipe (2–3 meters total), push-fit T-connectors and elbows, a pipe cutter (around £10 from hardware stores), and strong picture wire. Design a simple rectangular or triangular frame by sketching the shape first, then cutting pipe lengths accordingly. Push-fit connectors hold without soldering for indoor-adjacent outdoor use, though a dab of epoxy at each joint adds weather security.
Suspend three glass globe terrariums or simple glass jars at different heights using picture wire looped through the frame. Plant Tillandsia air plants (which need no soil and only a weekly mist) or compact Echeveria rosettes in the jars with a layer of decorative gravel.
💡 Pro Tip: Copper naturally develops a gorgeous verdigris patina over time outdoors — embrace it. If you prefer the bright copper look, apply a clear lacquer spray before installation and reapply annually.
Create a stunning copper planter installation for your balcony
Air plant care and display ideas from The Sill
This frame takes a Sunday afternoon to build and becomes a permanent, evolving art piece for your balcony.
10. Repurposed Rain Boot Planter
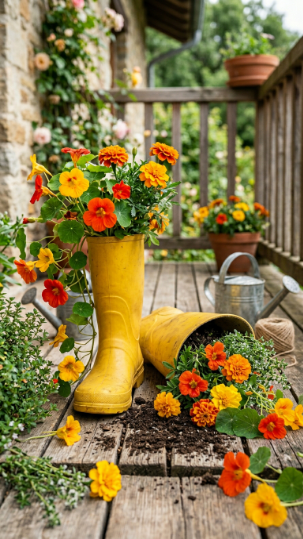
Old rain boots make surprisingly effective planters — the rubber holds moisture longer than terracotta, benefiting thirsty annuals, while the quirky shape adds unmistakable personality to any balcony.
Use boots that have genuine cracks or holes — or drill 5–6 holes through the sole with a 10mm drill bit to create drainage. Fill with general multipurpose compost mixed with 20% water-retentive crystals (these balance the extra moisture retention of rubber). Boots work best for shallow-rooted annuals and trailing plants that don’t need deep soil: Tropaeolum majus (nasturtiums), Tagetes (marigolds), or creeping Thymus serpyllum.
For the strongest visual impact, group three boots of different heights and colors together — or mount a single boot directly to a wooden panel on a balcony wall using a single coach bolt through the sole and back heel.
What works vs. What to avoid:
- ✅ Trailing annuals, herbs, marigolds, nasturtiums
- ✅ Mounting on walls for vertical interest
- ❌ Deep-rooted plants (tomatoes, peppers — not enough depth)
- ❌ Leaving sealed with no drainage — roots will rot within weeks
Quirky upcycled planter ideas that actually work for balcony gardens
Creative container planting combinations from Better Homes & Gardens
A pair of rain boots transforms a plain balcony corner into a conversation piece that costs absolutely nothing to create.
11. PVC Pipe Strawberry Tower
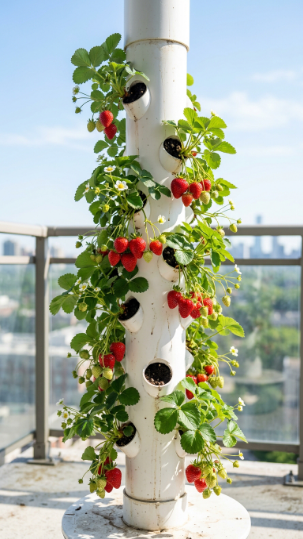
A vertical PVC pipe tower grows 20–30 strawberry plants in a 20cm floor footprint — genuinely one of the highest-yield DIY planters per square centimeter available to balcony gardeners.
Use a 150mm (6-inch) diameter PVC pipe, cut to 90–120cm height. Mark staggered holes at 20cm intervals around the circumference — drill each hole with a hole saw attachment (50mm diameter) to create outward-angled pockets. Smooth edges with sandpaper. Cap the base with an end cap with drainage holes drilled in; leave the top open for filling.
Fill in layers around a central PVC irrigation pipe (25mm, with small holes drilled along its length) — this delivers water directly to roots at every level rather than just the top. Use a mix of 60% quality strawberry compost and 40% perlite. Plant Fragaria × ananassa ‘Mara des Bois’ (everbearing) or ‘Albion’ varieties — both produce continuously from May through October with 6+ hours of direct sun.
💡 Pro Tip: Feed your strawberry tower with a high-potassium liquid fertilizer (tomato feed works perfectly) every 10 days once flowering begins — potassium drives fruit development and dramatically increases yield in container-grown strawberries.
Build a productive fruit tower for your balcony this season
Strawberry growing in containers — University of Florida IFAS Extension
There’s nothing quite like picking fresh strawberries off your own balcony tower on a summer morning.
12. Woven Wicker Basket Liner Planter
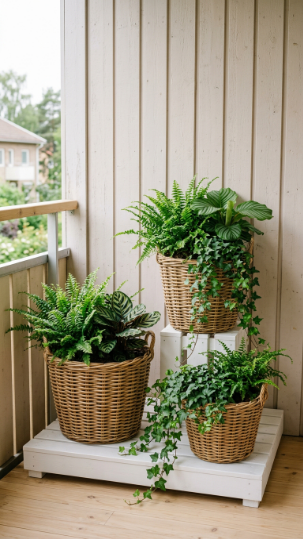
Wicker baskets give a balcony the kind of layered, organic texture that no mass-produced planter can replicate — and they cost almost nothing at charity shops and estate sales.
The key to making wicker work outdoors is proper lining. Use heavy-gauge plastic sheeting (minimum 200-micron thickness) cut to fit, or repurpose thick bin bags doubled over. Press the liner firmly into every curve of the basket interior and staple to the rim with a staple gun — this creates a watertight reservoir that the basket itself cannot provide. Drill or poke 6–8 drainage holes through the base of the liner.
Shade-tolerant ferns like Dryopteris erythrosora (autumn fern) and Asplenium scolopendrium (hart’s tongue fern) are perfect for wicker basket planters on partially shaded balconies — they appreciate the slightly higher humidity the basket walls create through mild air restriction. Add trailing Hedera helix to spill over the edges for a lush, forest-floor aesthetic.
Choose the right ferns and shade plants for balcony containers
Fern care and selection guide from Gardeners’ World
Wicker baskets bring warmth and natural texture to balcony gardens that polished plastic pots simply never will.
13. Concrete Hypertufa Trough
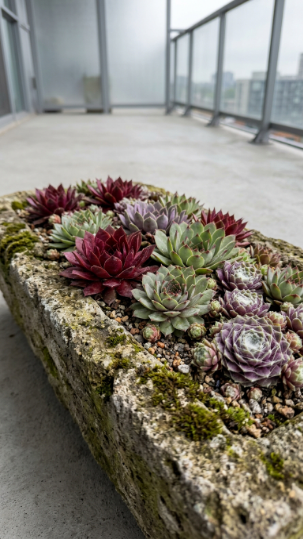
Hypertufa is a DIY concrete-peat mixture that mimics the look of aged stone at a fraction of the weight — a 40cm trough weighs just 3–4 kg versus 15+ kg for the equivalent real stone.
Mix hypertufa using: 1 part Portland cement, 1.5 parts peat moss (or coir as a sustainable alternative), and 1.5 parts perlite, with water added gradually until the mixture holds its shape like firm clay. Press the mixture into a mold (a cardboard box, a plastic container, even a piled-up plastic bag) to your desired shape, working to a minimum 5cm wall thickness. Press a smaller inner mold into the center to create the planting cavity — remove after 24 hours.
Allow to cure under damp sacking for at least 48 hours, then remove the outer mold and allow to dry fully for 3–4 weeks. Before planting, soak in water for a week, changing daily, to leach excess lime that would otherwise damage plant roots.
💡 Pro Tip: Brush the finished trough with diluted natural yogurt (50/50 with water) and place in a shaded outdoor spot — the lactic acid encourages moss and lichen growth, giving it an instantly aged appearance within 4–6 weeks.
Make your own hypertufa trough for a balcony alpine garden
Step-by-step hypertufa making guide from The Old Farmer’s Almanac
Patience is the only real skill this project demands — the result is a planter that genuinely looks like a centuries-old stone artifact.
14. Wall-Mounted Pegboard Planter Grid
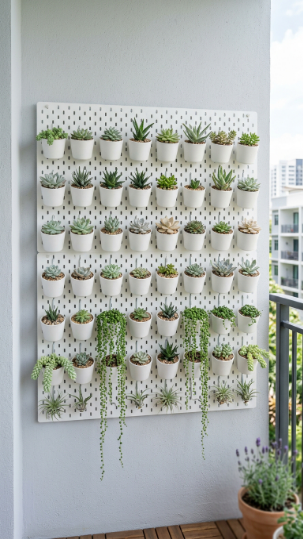
A painted pegboard converts an empty balcony wall into a modular, fully rearrangeable plant gallery — every hook is removable, so the entire display can evolve as your collection grows.
Use exterior-grade MDF or proper pegboard (with standard 6mm holes at 25mm spacing). Cut to size and apply 2–3 coats of exterior paint on both faces — the back face matters as much as the front for weather protection. Mount 5cm away from the wall on timber spacers to allow essential air circulation behind the board, preventing moisture build-up and rot.
Use standard 50mm pegboard hooks to hold pots directly, or attach small wooden shelves across two hooks for larger containers. For the cleanest look, use matching white ceramic 9cm pots throughout — the consistency makes even a random collection of plants look curated. Senecio rowleyanus (string of pearls) trailing down from upper hooks creates a particularly dramatic effect.
Create a modular pegboard plant display for your balcony wall
Container gardening wall display ideas from Better Homes & Gardens
The real joy of a pegboard planter is that it’s never truly finished — you can keep adding and rearranging forever.
15. Terracotta Pot Mosaic Upcycle
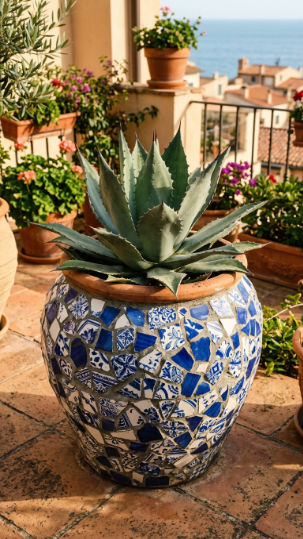
A broken-tile mosaic transforms a cracked or plain terracotta pot into a one-of-a-kind garden art piece — and broken tiles are usually free from kitchen renovations or builder skips.
Collect broken ceramic tiles — blue-and-white combinations have a classic Moroccan or Portuguese feel that works beautifully with terracotta. Use tile nippers to shape pieces as needed (wear eye protection). Apply each piece to the clean pot surface using exterior-grade tile adhesive, leaving consistent 3–5mm grout gaps. Allow the adhesive to cure for 24 hours, then apply unsanded exterior grout in grey or white, pressing into all gaps with a float.
Wipe excess grout with a damp cloth in circular motions before it fully sets — this stage requires speed and confidence. Seal the finished mosaic with a clear outdoor tile sealer spray for weatherproofing. Plant bold, architectural specimens that complement the strong visual: Agave, Cordyline australis, or large Aloe vera work excellently.
Best plants to pair with mosaic pots:
- Agave americana (bold architectural form)
- Cordyline australis (spiky dramatic height)
- Aloe vera (low maintenance, visually strong)
- Phormium tenax (bronze-toned flax)
Transform plain pots into garden art with these DIY techniques
Mosaic garden craft techniques and plant pairings from SFGATE
Every mosaic pot tells its own story — made by hand, from salvaged pieces, it’s garden art that cost almost nothing.
16. Repurposed Toolbox Herb Planter
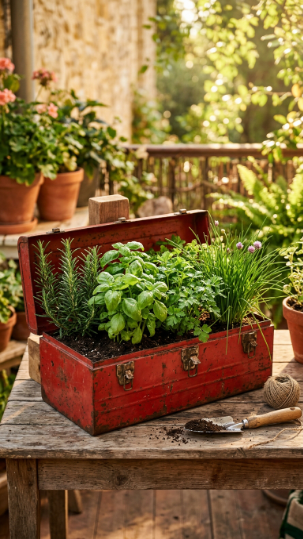
A vintage metal toolbox is the perfect depth and length for growing a full kitchen herb selection — the divided interior of many toolboxes naturally segments different herb varieties, which is genuinely useful.
Source old metal toolboxes from charity shops, car boot sales, or online marketplaces for £3–8. Sand any rust spots with medium-grit paper and seal with rust-inhibiting primer before painting with exterior metal paint in your choice of color. Drill 8–10 drainage holes through the base with a metal drill bit.
Line the base with a 3cm layer of coarse horticultural grit before adding compost — metal toolboxes heat up considerably in direct sun, and this drainage layer prevents cooking roots during summer. Plant herbs at their natural spacing: basil needs 20cm between plants, thyme and rosemary can be closer at 15cm, and chives can be planted fairly densely at 10cm intervals.
💡 Pro Tip: Never plant mint directly in a shared herb planter — mint spreads aggressively and will outcompete everything else within one season. Grow mint separately in its own container, then cut sprigs to use as needed.
Grow a complete kitchen herb garden in one balcony container
Herb growing in containers — practical advice from Gardeners’ World
A toolbox herb planter on your balcony table means fresh herbs are literally arm’s reach from your kitchen door — it doesn’t get more convenient than that.
17. Hanging Macramé Plant Cradle
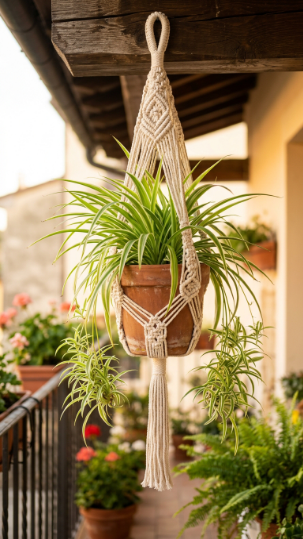
Macramé cradles take pots off surfaces entirely — freeing up every centimeter of your balcony floor and railing while adding a handcrafted, artisan quality that no purchased hanger achieves.
Use 5mm natural cotton macramé cord — a single hanger requires approximately 8–10 meters. Cut four equal lengths, fold in half, and attach to a wooden ring or metal loop using lark’s head knots. Work a series of square knots down each pair of strands, then bring all strands together at the base with a gathering knot to form the cradle — hundreds of free beginner tutorials online demonstrate the exact sequence visually in under 10 minutes.
The practical benefit: macramé cord allows excellent airflow around the pot, which matters for plants like Chlorophytum comosum (spider plant), Tradescantia, and Epipremnum aureum (pothos) that appreciate the slight humidity fluctuation. These are all genuinely forgiving plants that handle the temperature swings of an outdoor balcony better than most.
Learn macramé planter making for beautiful balcony plant displays
Houseplant hanging and display ideas from The Sill
There’s something meditative about knotting a macramé hanger by hand — and deeply satisfying about watching a plant thrive in something you made yourself.
18. Upcycled Wooden Drawer Planter
Old dresser drawers are essentially ready-made rectangular planter troughs — the right depth, the right proportions, and entirely free if you watch local freecycle groups.
Prepare drawers by sanding rough edges and applying two coats of exterior wood paint — the worn, layered paint look actually photographs beautifully, so you don’t need a perfect finish. Drill a row of 10mm drainage holes across the base at 10cm intervals. Line with landscape fabric to prevent soil washing through the holes while keeping drainage free.
Depth matters: drawers under 10cm deep work for alpines, succulents, and shallow-rooted herbs only. Drawers 15cm+ deep can accommodate trailing Petunia, nasturtium, and even compact Viola (pansy) for seasonal color. Stack at different heights and slight angles using reclaimed bricks as supports for maximum visual interest.
💡 Pro Tip: If your drawer’s base looks likely to rot quickly outdoors, line the base with a cut piece of fine wire mesh before the landscape fabric — this supports the soil if the wood softens, preventing a compost avalanche.
Use reclaimed wood furniture to create stunning balcony planters
Container and raised bed gardening tips from Missouri Botanical Garden
Old drawers are everywhere for free — the challenge is stopping yourself from filling every one of them.
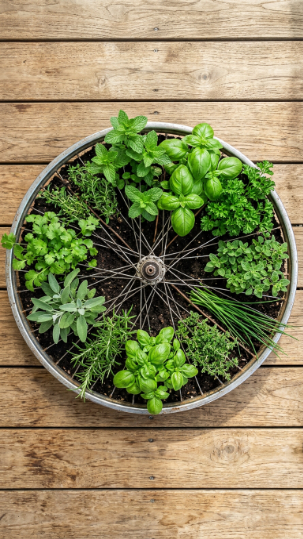
19. Bicycle Wheel Herb Circle Planter

A bicycle wheel naturally divides into 8–12 individual growing segments — making it the perfect frame for a wheel herb garden where every herb stays neatly contained in its own section.
Source an old bicycle wheel from a bike repair shop or scrap metal dealer — most give them away. Clean thoroughly and apply a coat of clear metal lacquer to prevent rust. Lay it flat on the balcony and line the interior of the entire wheel (spokes and all) with a cut circle of landscape fabric, pushing it down between spokes to create individual pockets. Fill each segment with a different potting mix if needed — some herbs prefer it drier (rosemary, thyme) while others prefer moisture (basil, mint in its own sealed segment).
The wheel’s circular form creates a natural focal point on a balcony floor, and the spoke divisions physically prevent invasive herbs from spreading into neighboring sections — a genuine practical advantage over a single mixed herb container.
Grow a complete wheel herb garden on your balcony this summer
Herb combination growing and spacing guide from The Old Farmer’s Almanac
Once planted, your herb wheel becomes both a working kitchen garden and a genuinely striking piece of garden art.
20. Bamboo Trough Planter
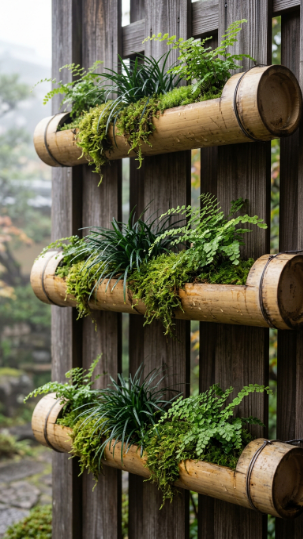
Bamboo culms (the thick stems) cut lengthwise into half-pipe shapes make remarkably beautiful, naturally hollow troughs that suit Japanese-inspired or minimalist balcony garden aesthetics perfectly.
Source thick bamboo poles (minimum 8cm diameter) from garden centers, bamboo suppliers, or Asian food markets that stock bamboo for cooking. Use a sharp handsaw and split each culm lengthwise, then scrape out the interior node membranes with a chisel to create a continuous cavity. Leave the bottom of alternate node sections intact — these act as natural dividers and soil supporters.
Fill each section with a lean mix of 50% potting compost, 30% coarse grit, and 20% moss-peat. Plant with shade-adapted Ophiopogon japonicus (black mondo grass), delicate Helxine soleirolii (mind-your-own-business), or moss transplanted from damp garden areas. Bamboo troughs are naturally antibacterial and last 2–3 seasons outdoors before needing replacement.
Best plants for bamboo trough planters:
- Ophiopogon japonicus (mondo grass)
- Festuca glauca (blue fescue grass)
- Helxine soleirolii (mind-your-own-business)
- Selaginella (spikemoss — shade-loving)
Create a Japanese-inspired Zen balcony garden with container plants
Bamboo in garden design — design guidance from the RHS
There’s a quiet elegance to bamboo troughs that brings genuine calm to even the most urban balcony space.
21. Repurposed Wooden Cable Reel Planter
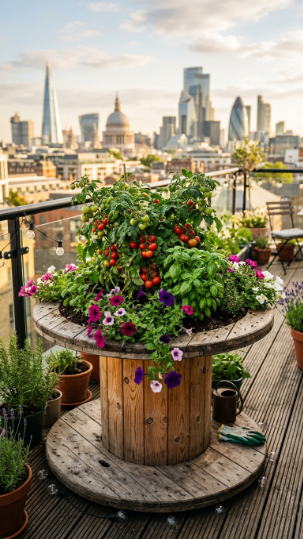
Industrial cable reels — given away free by electricians and construction companies — make the best raised balcony planters of any upcycled material, with a 60–90cm central cavity deep enough for almost any plant.
Cable reels (also called cable drums) are available free from electrical contractors, telecoms engineers, and construction site skips — a quick post on Freecycle or a call to a local electrician usually gets one within days. The central drum is deep (typically 50–80cm) and wide (often 60–90cm diameter) — perfect for growing tomatoes, dwarf fruit trees, or large ornamental grasses. Drill 8–10 drainage holes through the base.
Fill the base with a 10cm drainage layer of broken terracotta pot pieces, then build up with a quality loam-based compost — John Innes No.3 is ideal for the deep-rooted vegetables and larger plants this container suits. The height of the drum means it’s also genuinely ergonomic to tend on a balcony — no bending required.
💡 Pro Tip: Sand and seal cable reel wood thoroughly before use — many have been treated with industrial chemicals. Apply two coats of exterior wood preservative and allow to fully offgas (minimum 2 weeks outside, open air) before filling with compost.
Build a raised balcony planter from upcycled industrial materials
Raised container growing and deep-rooted vegetables — advice from Penn State Extension
A cable reel planter on a rooftop balcony is a genuine statement piece — and the story of how you got it for free makes it even better.
22. Hanging Gutter Planter System
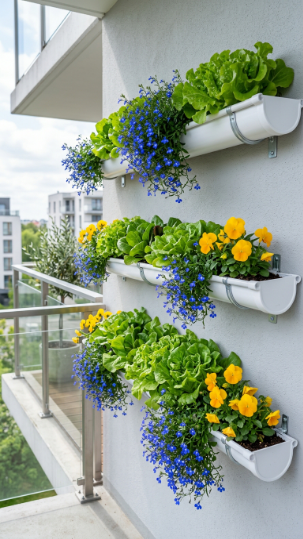
Plastic guttering costs approximately £3–5 per meter, holds soil in a flat trough profile ideal for salad leaves and flowers, and mounts directly to balcony walls or railings without specialist tools.
Cut guttering sections to your desired length (a hacksaw cuts through plastic cleanly in under a minute). Seal both ends with guttering end caps — either glued or clipped depending on the guttering system. Drill drainage holes at 15cm intervals along the base — guttering has very little depth (typically 7–10cm) so drainage is essential to prevent waterlogging. Mount using standard guttering brackets screwed directly into timber balcony framework or attached with heavy-duty cable ties to metal railings.
This system excels for cut-and-come-again salad leaves: Lactuca (loose-leaf lettuce), Eruca vesicaria (rocket/arugula), and Spinacia oleracea (spinach) all mature in 4–6 weeks from seed in guttering systems. Stagger planting every 2 weeks for a continuous harvest from spring through autumn.
Grow salad leaves in guttering on your balcony wall year-round
Grow salad crops in small spaces — practical guide from Gardeners’ World
From seed to salad in under six weeks — this is genuinely the fastest-reward food growing project available to a balcony gardener.
23. Recycled Plastic Bottle Vertical Planter
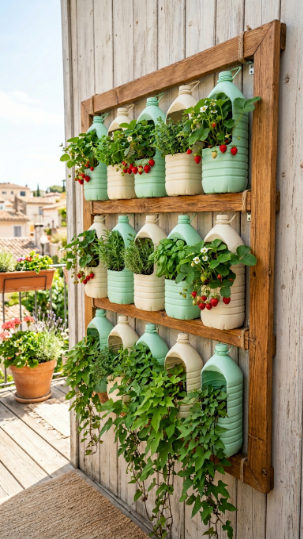
Two-liter plastic bottles create a vertical planter wall that costs literally nothing in container costs — and painting them in a unified palette transforms what could look chaotic into a genuinely attractive installation.
Collect 2-liter plastic bottles over several weeks — or ask friends and local coffee shops. Cut a rectangular window on one side (leaving 3–4cm of bottle wall on each side), then pierce 5–6 drainage holes on the opposite face (which becomes the bottom when mounted horizontally). Paint with exterior spray paint in your chosen palette — two colors across alternating bottles looks intentional and clean.
Mount on a wooden frame or directly to timber battens using cable ties or wire through holes drilled near the bottle necks and bases. Fill with a lightweight compost mix — weight matters on a balcony wall, so use 60% peat-free compost and 40% perlite. Strawberries, trailing herbs, and compact lettuces all perform excellently in this system.
Build a plastic bottle vertical garden wall for your balcony
Vertical gardening ideas for small spaces from the RHS
This project is proof that the most environmentally conscious choice — reuse what you already have — also produces brilliant garden results.
24. Stacked Terracotta Pot Tower Planter
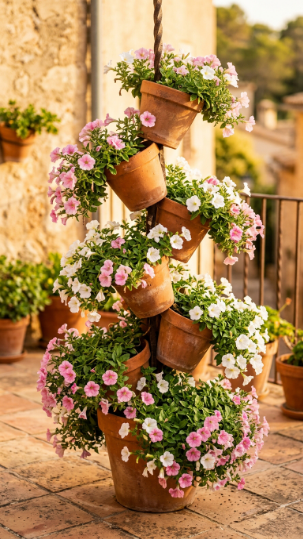
A stacked terracotta tower creates a three-dimensional planting sculpture that grows in height rather than footprint — fitting 5 pots into the floor space of one, while creating a genuinely dramatic display.
Thread a central threaded metal rod (10–12mm diameter, 100cm long with a nut at the base) through the drainage hole of each pot. Stack pots at offset 45-degree angles from each other — each pot sits on a mound of compost placed inside the pot below, which supports it at an angle while also serving as planting medium. Use pots in descending sizes from bottom (30cm) to top (15cm) for the most stable, visually tapered result.
Plant each pot with cascading annuals — Petunia trailing hybrids, Lobularia maritima, or Bacopa — so they spill downward and cover the pot sides completely. Within 4–6 weeks of planting, the tower disappears into a column of living flowers. Water at the top only — gravity distributes moisture downward through each pot’s overflow.
Best varieties for a stacked pot tower:
- Petunia ‘Easy Wave’ (trailing, continuous bloom)
- Lobularia maritima (sweet alyssum — fragrant cascade)
- Bacopa sutera (delicate white flowers)
- Calibrachoa (million bells — long flowering)
Create a stunning stacked pot tower for your balcony this summer
Creative stacking and tiered container planting techniques from BHG
A terracotta tower in full bloom is one of those balcony displays that makes every passerby stop and look up — and it’s yours to make this weekend.
Getting Started With DIY Planters for Your Balcony
The easiest first step today requires zero building skills: grab three tin cans from your recycling, punch drainage holes in the base, paint them all the same color, and plant them up with a supermarket pot herb each. That’s genuinely it. You’ll have a coordinated balcony herb display by this afternoon and a real sense of what container gardening on a balcony feels like before committing to larger projects.
The most common mistake beginners make is skipping drainage. It seems obvious in theory but in practice — lined with enthusiasm and compost — many first-time DIY planters end up waterlogged. The rule is simple: if water can’t drain freely within 30 seconds of watering, your plant roots will suffer. Every single container in this guide needs drainage holes, full stop.
For your first proper build, invest in one thing: a bag of perlite (around £5–8 for 10 liters). Adding 20–30% perlite to any compost mix instantly improves drainage and aeration in any DIY container — it’s the single most impactful thing a beginner can do to improve plant health without spending on expensive specialist compost.
Expect to see real results within 3–4 weeks of planting most annuals and herbs. Trailing plants like Petunia and Lobularia begin cascading visibly within 2 weeks in good sun. Your balcony will genuinely start to feel transformed from the first planting day — and it only gets better from there.
Frequently Asked Questions
What materials are best for DIY planters on a balcony?
Lightweight materials are the priority for balcony use — most residential balconies are load-rated at 150–300 kg/m², and heavy ceramic or concrete planters consume that capacity quickly. Fabric grow bags, painted tin cans, wooden pallet structures, and plastic-lined wicker baskets are all excellent lightweight options. For a medium-weight choice with great insulating properties, untreated softwood (pine or cedar) sealed with exterior wood preservative is ideal and will last 5–7 years with annual maintenance.
How do I add drainage to DIY planters that don’t have holes?
Drill, punch, or pierce holes in the base of any container — drainage is non-negotiable. For metal containers, use a 10mm metal drill bit. For plastic, a sharp nail and hammer work fine but a drill is cleaner. For wicker and fabric, push a pointed spike through or cut holes manually. Always add a 3–5cm base layer of coarse horticultural grit or broken terracotta pot pieces above the holes before adding compost — this prevents the holes from clogging with fine soil particles.
Can I use DIY planters on a rented balcony without damaging anything?
Absolutely — most of the planters in this guide require no permanent fixing. Freestanding planters (cable reels, wine crates, pallet towers, stacked pot towers), hanging planters suspended from existing beams, and railing-attached guttering using cable ties are all fully removable. For wall-mounted options, use removable adhesive hooks rated to 3–5 kg for lightweight installations, or ask your landlord permission before using a single wall screw — most will agree for one small bracket.
How often should I water plants in DIY balcony planters?
More frequently than you’d water the same plants indoors or in a garden border. Balcony containers are exposed to wind, direct sun, and temperature swings that accelerate moisture loss significantly. In summer, small containers (under 5 liters) may need daily watering; medium containers (10–20 liters) every 2–3 days; large containers (30L+) every 3–4 days. Always check by inserting a finger 2cm into the compost rather than watering on a fixed schedule — in a cool overcast week, containers may retain moisture for 5–6 days even in summer.
What are the best plants for DIY planters for balconies with limited sunlight?
Partially shaded balconies (2–4 hours of direct sun, or bright indirect light throughout the day) are actually quite workable. Excellent plant choices include Fuchsia (trailing varieties flower prolifically in shade), Begonia semperflorens and tuberous types, Impatiens (busy Lizzies), Heuchera (stunning foliage color), Ferns (Dryopteris and Asplenium species), Hedera (ivy) for trailing, and Viola (pansies) for spring and autumn color. Avoid sun-hungry plants like tomatoes, Lavandula, and most succulents on balconies that don’t receive at least 5–6 hours of direct sun daily.
A Few Final Thoughts
All 24 of these unique DIY planters for your balcony began as someone’s throwaway material — a colander from a charity shop, an old boot by the door, wine crates destined for the recycling. What transforms them into something genuinely beautiful is intention: a specific plant, a considered color palette, proper drainage, and the care of someone who knows their space. You don’t need all 24 ideas at once — one well-built, thoughtfully planted DIY container can change how you experience your balcony entirely. Start with what you already have at home today, master that one project, and then let your balcony garden grow from there — one pot, one plant, one sunny afternoon at a time. Your DIY balcony garden adventure is closer than you think — now go make it happen.