
A bare balcony is one of the most underestimated spaces in any home — a few square metres of untapped potential that, with the right DIY projects, can become your favourite place to sit, breathe, and genuinely unwind. Whether you’re working with a narrow urban ledge or a generous apartment terrace, these 25 DIY projects to create a balcony oasis will show you exactly how to transform it, plant by plant and project by project. The ideas range from a single afternoon’s work to weekend builds, from beginner-friendly container gardens to more ambitious vertical structures. Ready? Let’s explore all 25 of them.
Why Creating a Balcony Oasis Is Worth Your Time
A balcony oasis isn’t just about aesthetics — it’s about reclaiming a piece of outdoor space that most apartment dwellers never fully use. Gardeners consistently find that even a modestly planted balcony reduces stress measurably; the act of tending plants outdoors, breathing fresher air, and having greenery in your sightline has documented benefits for mental wellbeing that go far beyond what any indoor display can offer.
The practical upside is equally compelling. A well-designed balcony garden provides shade from afternoon sun, creates a privacy screen from neighbouring buildings, attracts pollinating insects, and — if you include edible plants — delivers genuinely fresh herbs and salad leaves within arm’s reach. None of this requires a large budget: in practice, the most impactful balcony oasis projects often cost under £20 and use materials you already own or can source second-hand.
One lesser-known fact: wind is the most significant challenge for balcony plants, not sun or rain. Balconies above the third floor regularly experience wind speeds that strip moisture from leaves and topple containers — a challenge that most beginner guides ignore entirely. Understanding this shapes everything from your plant choices to your container anchoring strategy.
This article is ideal for apartment dwellers, first-time balcony gardeners, and anyone who wants a beautiful outdoor retreat without a garden or a large renovation budget.
At a Glance
- A DIY pallet sofa with built-in planter boxes turns a bare balcony into a furnished outdoor room in a single weekend for under £40.
- Vertical pallet gardens can hold up to 12 plants in the footprint of a single 80cm-wide pallet — the most space-efficient balcony DIY project available.
- Growing cherry tomatoes in grow bags on a south-facing balcony can yield 2–4kg of fruit per plant through summer with almost no effort.
- A DIY privacy screen planted with climbing jasmine (Jasminum officinale) creates both visual screening and evening fragrance within one growing season.
- Drip irrigation systems for balcony containers can be assembled for under £15 and reduce watering time by 90% — a genuine game-changer for busy plant parents.
1. Vertical Pallet Herb and Salad Garden
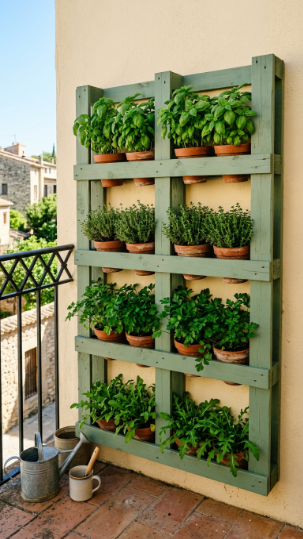
A vertical pallet garden is the single most space-efficient DIY project to create a balcony oasis — it grows 10–12 plants on a footprint smaller than a doormat.
Source an untreated or heat-treated (HT-stamped) pallet — never chemically treated (MB-stamped) pallets, which contain residual methyl bromide, particularly dangerous for edible herbs. Sand lightly, apply a coat of exterior wood paint in your chosen colour, and allow to dry fully. Cut landscape fabric to fit the back of each horizontal section, stapling it firmly to create a soil-holding pocket.
Fill each pocket with a mix of multipurpose compost and 20% perlite. Plant compact herbs: basil (Ocimum basilicum), thyme (Thymus vulgaris), flat-leaf parsley, and rocket (Eruca vesicaria) are all ideal. Stand the pallet against the balcony wall, securing to the wall with two heavy-duty hooks and wire if the balcony is above the second floor.
Water daily in summer — pallet planters dry out faster than pots due to their shallower soil depth and increased air exposure. Feed with a diluted liquid seaweed fertiliser weekly for best herb production.
💡 Pro Tip: Line the inside of each pallet pocket with black polythene sheeting before the landscape fabric — it dramatically reduces moisture evaporation and means you can skip watering for a day longer in hot weather.
Explore vertical pallet garden ideas and herb planting guides for balconies and read window box and vertical gardening advice from the RHS.
A pallet herb garden rewards you every single time you cook — there’s nothing quite like snipping fresh basil two steps from your kitchen.
2. DIY Balcony Privacy Screen with Climbing Jasmine

A planted privacy screen solves two problems at once — unwanted sight lines from neighbouring buildings and a bare, uninviting balcony railing — while creating a living fragrant wall within a single season.
Build a simple wooden trellis from 2.5cm square timber batten in a grid pattern at 20cm intervals, screwed together at each intersection. Fix to the interior face of the balcony railing using cable ties, hooks, or screws (check your tenancy agreement before drilling). Plant Jasminum officinale (common white jasmine) in a large 30–40 litre container at the base, using a loam-based John Innes No. 3 compost for stability and moisture retention.
Train new shoots through the trellis manually every 2–3 weeks, weaving stems horizontally for maximum coverage. Jasmine grows vigorously on a bright west or south-facing balcony, reaching 2m of coverage in its first full season. Water every 2–3 days in summer; feed with a balanced fertiliser every fortnight from April through September.
The summer evening fragrance of jasmine on a balcony is genuinely extraordinary — it carries in warm air up to 10 metres. This is one DIY project to create a balcony oasis that engages all the senses.
Learn about climbing plants for balcony privacy screens and trellis structures and find jasmine growing guidance from Gardeners’ World.
A jasmine screen transforms a balcony from exposed to enclosed — and from ordinary to genuinely memorable.
3. Upcycled Crate Balcony Planter Towers
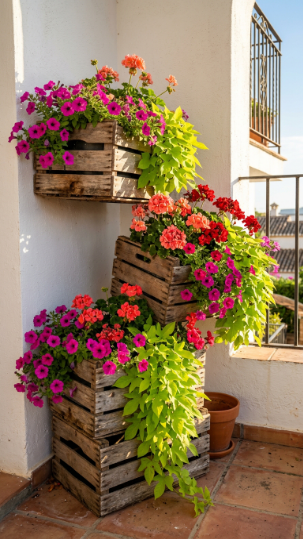
Stacked wooden fruit crates make sculptural, space-efficient planter towers that add real height and drama to a balcony corner for almost zero cost.
Source wooden fruit crates from market stalls, farm shops, or online marketplaces. Sand any rough edges and treat with raw linseed oil for weather resistance — this also gives the wood a beautiful warm amber tone. Stack 3–4 crates in a staggered tower, alternating the direction of each crate for structural stability, and secure adjacent crates with two corner brackets per join.
Line each crate with a double layer of hessian fabric before filling with compost — this retains soil while allowing adequate drainage. Plant trailing varieties that will cascade over the edges: Petunia surfinia, Lobelia erinus (trailing), and Ipomoea batatas (sweet potato vine) in chartreuse or purple create a spectacular cascading effect in full sun.
💡 Pro Tip: Place the crate tower on a heavy paving slab or weight the base crate with a layer of gravel before filling with compost — this lowers the centre of gravity and prevents the tower from toppling in gusty balcony conditions.
Discover upcycled container planting ideas for balconies and outdoor spaces and find container tower planting inspiration at BHG.
Crate towers prove that balcony drama doesn’t require expensive materials — just creative stacking.
4. DIY Drip Irrigation System for Container Plants
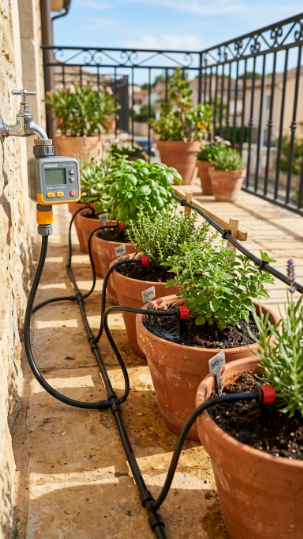
A DIY drip irrigation system is the single most practical upgrade for a balcony oasis — it cuts daily watering time to near zero and prevents the inconsistent watering that kills more balcony plants than any pest or disease.
Purchase a basic drip irrigation kit (widely available for £12–£18) containing a main supply tube (13mm), thinner distribution tubing (4mm), drip emitters, and a programmable tap timer. Connect the main tube to your outdoor tap or balcony water supply; run the 4mm tubing from the main line to each container, pressing a drip emitter into the compost at each pot.
Programme the timer to water for 10–15 minutes each morning, ideally between 6–8am when evaporation rates are lowest. For pots in full sun during summer, set a second short cycle of 5 minutes in early evening. Use a flow regulator to ensure even pressure across all emitters, particularly if your balcony has several pots at different heights.
The most common mistake is routing tubing too close to foliage — water on leaves in hot sun causes scorch. Always direct emitters at soil level, not onto the plant itself.
What works vs. what to avoid:
- Works: Drip emitters at soil level, early morning programming, pressure regulator
- Avoid: Sprinkler heads (too much wind drift), watering at midday (60% evaporation loss), skipping a flow regulator
Read about setting up balcony irrigation systems for container gardens and find container watering advice from Penn State Extension.
Once you’ve installed balcony drip irrigation, you’ll wonder how you ever managed your plants without it.
5. Grow-Bag Cherry Tomato Balcony Garden
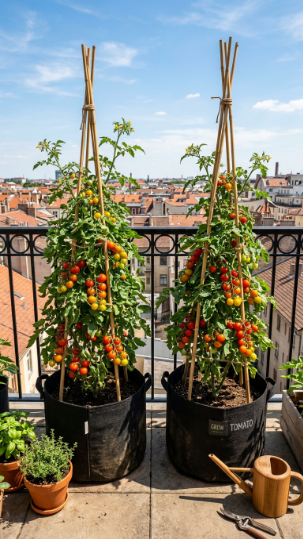
Cherry tomatoes in grow bags are the most productive food-growing project for any balcony oasis — a single south-facing balcony can realistically yield 2–4kg of fruit per plant from June through September.
Use quality 40-litre grow bags filled with a peat-free tomato compost. Choose compact or trailing varieties suited to container growing: Tumbling Tom (trailing, no staking needed), Sweet Million (high-yield cherry), or Gardener’s Delight (classic flavour). Support upright varieties with a bamboo wigwam of three canes tied at the apex, positioned at planting time.
A south-facing balcony with a minimum of 6 hours of direct sun is essential — tomatoes produce poorly and become disease-prone in less than 4 hours of direct sun daily. Water consistently and generously: grow bags dry out quickly and irregular watering causes blossom end rot and fruit splitting. Feed with a high-potassium tomato fertiliser (like Tomorite) every week from first flower formation.
Pinch out sideshoots (the shoots that form in the junction between main stem and leaf stem) on cordon varieties weekly to direct energy into fruit rather than foliage.
💡 Pro Tip: Place a layer of straw or coconut coir on top of the grow bag around the stems — it reduces evaporation by up to 40% in hot weather and keeps fruits cleaner when trailing varieties touch the grow bag surface.
Read about growing tomatoes in containers and grow bags on balconies and find detailed tomato growing guidance at The Old Farmer’s Almanac.
Few things beat the satisfaction of picking sun-warmed cherry tomatoes from your own balcony and eating them on the spot.
6. Reclaimed Timber Balcony Bench with Planter Arms
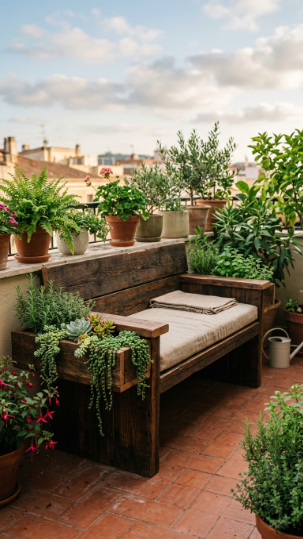
A DIY bench with built-in planter arms turns the seating itself into a gardening feature — it’s one of the most multi-functional DIY projects to create a balcony oasis, combining furniture and garden in one piece.
Build the bench frame from reclaimed scaffold boards or pallet timber, cutting to your balcony’s specific dimensions. The armrests are constructed as shallow open boxes (15cm wide × 10cm deep), lined with waterproof pond liner before filling with a gritty succulent compost. Drill 3–4 drainage holes in the base of each arm box before lining.
Plant the arm boxes with trailing succulents — Sedum spurium, Sedum rupestre ‘Angelina’, or Delosperma groundcover succulents cascade attractively and tolerate the dry conditions of shallow planters in outdoor sun. These require watering only every 10–14 days once established.
Finish the timber with exterior-grade decking oil for weather resistance, reapplying once a year. Add a washable outdoor cushion in a natural linen or canvas fabric for the seat.
Beginner vs. Advanced version:
- Beginner: Simple plank bench with two end planter boxes, basic succulent planting
- Advanced: Mitre-jointed frame, hidden drainage tray under arm boxes, integrated LED lighting strip
Find DIY balcony furniture and built-in planter bench guides and explore outdoor succulent container care at Missouri Botanical Garden.
A bench that also grows plants is the most space-honest piece of furniture a small balcony can have.
7. Hanging Macramé Planter Collection
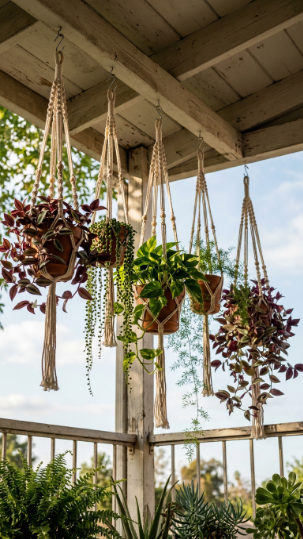
A collection of macramé hanging planters fills vertical balcony space that is almost always completely wasted — and they can be made from a single skein of cotton rope in an afternoon.
Use 5mm single-strand natural cotton rope. The most beginner-friendly knot pattern for a planter: cut eight lengths of rope at 4m each, fold in half, and attach to a wooden ring with a lark’s head knot. Work a series of square knots 30–40cm down, then divide into groups of four for the holding net, finishing with a large gathering knot. Total making time for a beginner: approximately 45–60 minutes per planter.
Choose trailing or cascading plants for maximum visual effect: Tradescantia zebrina, Senecio rowleyanus (string of pearls), and small fern varieties like Nephrolepis cordifolia (sword fern) all work beautifully. In outdoor conditions, confirm your balcony is sheltered from strong wind — hanging planters are significantly more vulnerable to wind damage than floor containers.
Hang from ceiling hooks rated for at least 5kg. Water trailing plants by removing them from hangers, watering thoroughly over a sink, draining completely, then re-hanging — this prevents water damage to the balcony ceiling.
💡 Pro Tip: Spray macramé cotton planters with a water-repellent fabric spray at the start of each season — this dramatically extends their life outdoors by preventing mould and UV degradation in the rope fibres.
Read about macramé planter making and trailing plant care for balconies and find trailing plant care guides at The Sill.
A tiered collection of macramé planters creates the kind of lush, layered balcony atmosphere that photographs look like they took months to achieve.
8. DIY Balcony Herb Wheel in a Large Container
🖼️ IMAGE PROMPT: A realistic top-down photograph of a large round terracotta planter divided into six pie-slice sections by small slate tiles pressed into the soil, each section planted with a different herb — rosemary, thyme, basil, chives, oregano, and mint — seen from directly above.
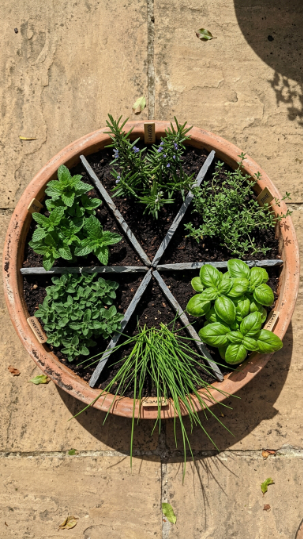
: bright midday direct sun with bold shadows. Color palette: terracotta, grey slate, varied herb greens. Mood: organised, productive, artful. Photography style: top-down flat-lay. Background: warm stone balcony floor. Style tags: photorealistic, 8K, botanical photography, magazine quality, no people.
A herb wheel organises six different herbs into a single large container using decorative dividers — it keeps aggressive spreaders like mint contained while creating a visually striking top-down garden feature.
Use a large round terracotta or glazed ceramic container at least 45cm in diameter and 30cm deep, with multiple drainage holes. Divide the interior into six equal sections using thin pieces of slate, broken terracotta, or small timber offcuts pressed vertically into the compost — this creates visual separation and root barriers between competing herbs.
Plant one herb per section: Rosmarinus officinalis (rosemary), Thymus vulgaris (common thyme), Ocimum basilicum (basil), Allium schoenoprasum (chives), Origanum vulgare (oregano), and Mentha spicata (spearmint). Critically, plant mint in its own pot-within-a-pot: sink a 10cm plastic pot into the mint section and plant into that — mint’s rhizomes will overtake the entire container otherwise.
Place on a south or west-facing balcony with 5–6 hours of direct sun. Water when the top 2–3cm of soil is dry, which is typically every 2 days in summer for terracotta containers.
Learn how to create a balcony herb wheel and manage mixed container herb gardens and explore herb growing in containers from BHG.
A herb wheel is the most organised and beautiful way to grow six herbs in the footprint of a single large pot.
9. Balcony Wildflower Meadow in Raised Troughs
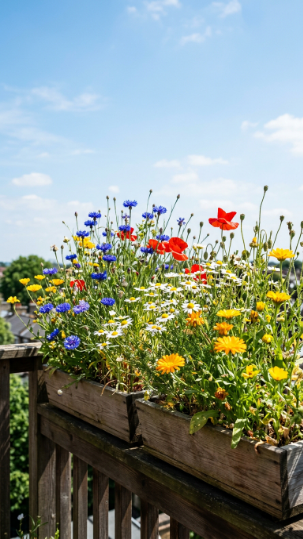
A wildflower trough on a balcony railing brings genuine ecological value to an urban space — a corridor of nectar-rich blooms for bees and butterflies that most city insects desperately need.
Build or source long rectangular wooden troughs 80–100cm in length, 20cm wide, and 20cm deep — sized to sit securely on your balcony railing ledge. Line with polythene pierced with drainage holes, fill with a low-fertility mix of 70% sharp sand and 30% topsoil (wildflowers thrive in poor soil; rich compost produces lush foliage but few flowers).
Sow a native wildflower seed mix in April or September, pressing seeds lightly into the surface — most wildflower seeds need light to germinate and should not be buried more than 3mm. Water gently using a fine rose attachment and keep consistently moist until germination (7–21 days). Thin seedlings to 5–7cm apart once they reach 3cm height.
Cornflowers (Centaurea cyanus), California poppies (Eschscholzia californica), pot marigolds (Calendula officinalis), and ox-eye daisies (Leucanthemum vulgare) are all excellent balcony wildflower performers.
💡 Pro Tip: Deadhead spent flowers every 7–10 days to extend blooming from June all the way through to October — wildflowers that are allowed to set seed redirect all energy from flowers to seed production and stop blooming early.
Find balcony wildflower trough planting guides and native seed mixes and read wildflower growing advice from the RHS.
A wildflower trough on your balcony railing is one of the most ecologically generous things an urban dweller can do.
10. DIY Concrete Hypertufa Planters
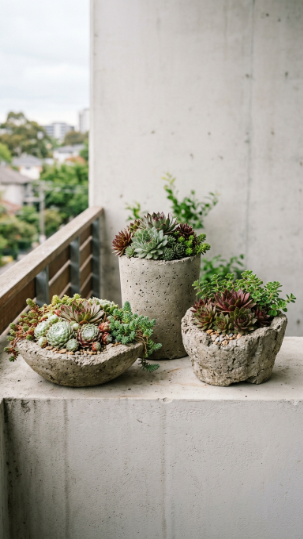
Hypertufa planters — made from perlite, peat-free compost, and Portland cement — look like aged stone but weigh a fraction of concrete, making them ideal for weight-conscious balcony gardens.
Mix hypertufa: two parts Portland cement, three parts horticultural perlite, and three parts peat-free compost. Add water gradually until the mix reaches the consistency of thick cottage cheese — it should clump when squeezed. No mould is required: simply sculpt freeform by hand into your desired shape on a plastic sheet, working quickly before the mix begins to set (30–45 minutes).
Press a drainage hole using a finger or wooden dowel at the base. Leave to cure for 48 hours under a damp cloth, then submerge in water for 24 hours to leach out excess lime — this prevents the alkalinity from damaging plant roots. Once cured, plant with Sempervivum (houseleeks) or Sedum varieties: both thrive in the slightly alkaline, gritty environment hypertufa provides.
Hypertufa planters actually improve aesthetically with age — they develop natural moss and lichen coatings within 6–12 months outdoors, giving them the appearance of centuries-old stone.
Read about making hypertufa and concrete planters for balcony and outdoor gardens and explore container planting and drainage guidance from Missouri Botanical Garden.
Hypertufa planters are a genuine DIY project where the imperfections become the beauty.
11. Balcony Pond in a Half-Barrel
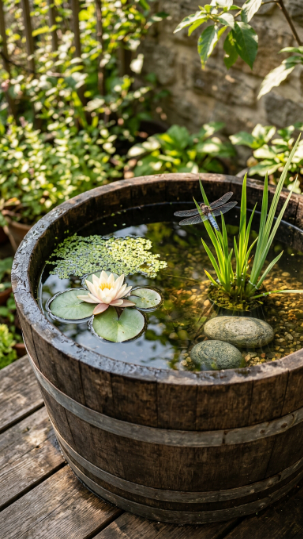
A miniature pond in a half-barrel is perhaps the most surprising DIY project to create a balcony oasis — it introduces an entirely new ecosystem to an urban outdoor space in a single afternoon.
Source a large oak half-barrel (at least 60cm diameter and 40cm deep) from a garden centre. If it’s a genuine wooden barrel, it may already hold water once the wood swells. If not, line with a purpose-cut pond liner, folding the corners neatly and holding in place with a ring of pebbles. Fill with rainwater where possible (tap water can be used but will need 48 hours to off-gas chlorine).
Plant with aquatic plants suited to a container pond: Nymphaea ‘Pygmaea Helvola’ (miniature water lily, covers 30–60cm surface), Iris laevigata (marginal iris, plant on a brick to raise it to the correct depth), and floating duck weed (Lemna minor) as a natural surface cover. Place in a position receiving 4–6 hours of direct sun daily — water lilies require this to bloom.
No pump or filter is needed in a well-planted miniature pond: aquatic plants oxygenate the water naturally, preventing algae and providing habitat for beneficial insects.
💡 Pro Tip: Place a small piece of barley straw in the water — it releases compounds that naturally suppress green algae growth without chemicals, keeping the water clear throughout summer.
Discover how to build a balcony container pond and choose aquatic plants and find miniature pond planting advice from the RHS.
A balcony pond will bring wildlife to an urban space in ways that no other project can — once dragonflies find it, you’ll never question whether it was worth the effort.
12. DIY Bamboo Screen and Planter Combination

A bamboo screen combined with living bamboo plants creates the ultimate private balcony corner — a natural, textural, sound-dampening solution that feels genuinely like a different world.
Fix bamboo roll fencing (available in 1m and 1.8m heights) to the inner face of your balcony railing using cable ties or wire loops every 30cm. This provides immediate privacy while the living plants establish. Plant clumping bamboo (Fargesia murielae or Fargesia nitida) — critically, clumping varieties rather than running varieties (Phyllostachys), which would escape the container aggressively — in 40-litre containers using a loam-based John Innes No. 3 compost.
Clumping bamboo grows 15–30cm per year, reaching a mature height of 1.5–2.5m in large containers. Water generously every 2–3 days in summer — bamboo is one of the most water-demanding container plants. Feed with a high-nitrogen fertiliser monthly through the growing season for best cane development.
The bamboo screen’s secondary benefit: the combination of natural bamboo fencing and live bamboo plants reduces the impact of wind on other balcony containers by an estimated 30–40% — a meaningful protection for more delicate plants.
Explore bamboo privacy screens and clumping bamboo container care for balconies and find bamboo growing and containment guidance from Gardeners’ World.
A bamboo screen creates that rare balcony feeling: genuinely enclosed, genuinely peaceful, genuinely yours.
13. Tiered Strawberry Planter Tower
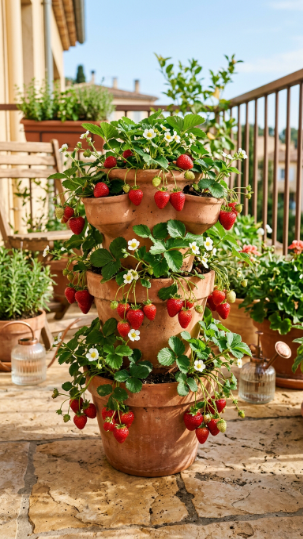
A tiered strawberry tower packs 15–20 strawberry plants into the footprint of a single 30cm base — one of the most productive and visually charming DIY projects to create a balcony oasis.
Purchase or build a three-tiered terracotta strawberry tower (available as kits for around £15, or buildable from standard terracotta pots in graduating sizes: 30cm, 22cm, and 15cm, stacked concentrically). Fill with a moisture-retentive strawberry compost — standard potting compost mixed with 10% water-retaining gel crystals works excellently in the shallow planting pockets.
Plant Fragaria × ananassa ‘Elsanta’ (high-yield, excellent flavour) or ‘Mara des Bois’ (everbearing variety for continuous cropping from June through October) in each pocket and at the top. Plant with the crown — the central growing point — just at soil level; burying the crown causes rot.
Water daily during fruiting — strawberries in tiered towers require more frequent irrigation than ground-grown plants because the upper tiers dry out particularly fast in sun. Feed weekly with a high-potassium tomato fertiliser once flowers appear.
💡 Pro Tip: Place the tower on a lazy Susan or rotating plant stand and turn it a quarter rotation every two days — this ensures even sun exposure to all sides and produces significantly more uniform fruit development across all planting pockets.
Read about growing strawberries in towers and containers on balconies and find strawberry growing guidance from The Old Farmer’s Almanac.
There is no DIY balcony project that earns more gasps from visitors than a fully loaded strawberry tower in June.
14. Painted Terracotta Pot Cluster Display
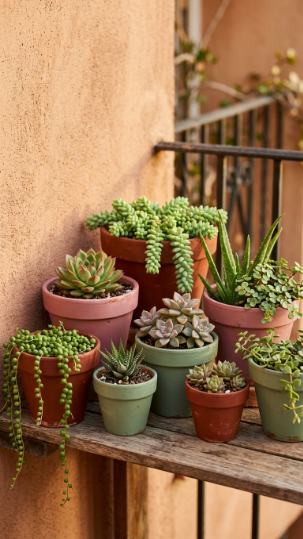
A cluster of hand-painted terracotta pots in a coordinated palette costs under £10 to create and transforms a random collection of containers into a deliberate, gallery-quality display.
Sand terracotta pots lightly and wipe clean. Apply two coats of chalk paint in your chosen colours — chalk paint adheres to terracotta without primer and provides a beautiful matte finish that ages gracefully outdoors. A three-colour palette works best: one dominant colour (60% of pots), one secondary (30%), and one accent (10%). Seal with a matte exterior varnish or clear wax for weather resistance.
Arrange pots in an asymmetric cluster: five to eight pots of varying heights and diameters grouped tightly, with the tallest at the back-centre and shorter pots cascading forward. Mix plant types within the cluster for textural contrast: upright Agave, rosette-shaped Echeveria, and trailing Sedum together create a cohesive but varied display.
The pro insight: leave 2–3 pots in the cluster empty or with just gravel — negative space within a plant cluster makes the planted pots read more powerfully, not less.
Find ideas for painted terracotta pot displays and balcony container styling and explore container arrangement and plant pairing ideas at BHG.
A painted pot cluster is the fastest single afternoon project that makes a balcony look genuinely designed.
15. DIY Lettuce and Salad Leaf Window Box
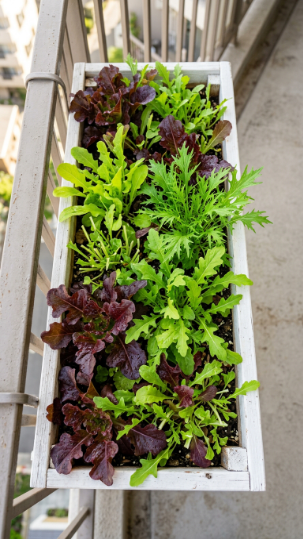
Cut-and-come-again salad leaves in a window box are the most immediately rewarding food-growing project on a balcony — sow today, harvest in 3–4 weeks, and keep cutting for months.
Use a window box at least 60cm long and 15cm deep, attached securely to the inside of your balcony railing with purpose-designed railing brackets. Fill with a moisture-retentive multipurpose compost. Sow a mixed cut-and-come-again seed blend — including red and green oakleaf lettuce (Lactuca sativa), rocket (Eruca vesicaria), mizuna, and mustard leaves — directly onto the surface, covering with a 3mm layer of vermiculite.
Germination occurs in 5–10 days at 15–20°C. Begin harvesting when leaves reach 7–10cm, cutting 2–3cm above the base — the plants regenerate from the base for 3–4 more cuts. Sow a new section every 3 weeks through the growing season for continuous supply.
Salad leaves tolerate partial shade better than most balcony crops — an east or west-facing balcony with 3–4 hours of direct sun produces excellent results. In hot summer weather, provide afternoon shade to prevent bolting (premature flowering and bitter flavour).
💡 Pro Tip: Water salad leaves at soil level rather than overhead — wet leaves in hot weather dramatically increases the risk of damping-off fungal disease. A small watering can with a narrow spout is the most effective tool for this.
Discover how to grow cut-and-come-again salad leaves in balcony window boxes and find lettuce and salad growing guidance from The Old Farmer’s Almanac.
A salad leaf window box makes the act of cooking dinner feel like a genuinely satisfying act of self-sufficiency.
16. Recycled Pallet Sofa with Built-In Planter Shelf
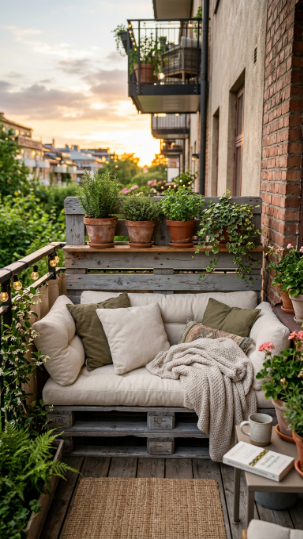
A pallet sofa with a built-in planter shelf is the ultimate multi-functional DIY projects to create a balcony oasis — it provides seating, storage, and a growing surface in the footprint of two pallets.
Use two identical euro pallets (80 × 120cm). Sand all surfaces thoroughly and treat with exterior wood paint or decking oil. Stand one pallet horizontally for the seat base, and one vertically behind it as the back. Secure the two pallets together with four 10cm bolts through pre-drilled holes. Attach a simple wooden shelf across the top of the vertical back pallet using two L-brackets — this becomes your planter shelf.
Add weatherproof outdoor cushions (foam wrapped in UV-resistant outdoor fabric works well as a DIY option). Place terracotta pots or small planters on the back shelf: trailing herbs or compact Chlorophytum comosum (spider plant) varieties look beautiful cascading down the back of the sofa.
Treat the pallet sofa with a fresh coat of exterior wood oil or paint at the start of each season. Bring cushions indoors during extended wet periods to extend their life.
Explore DIY pallet furniture ideas and balcony garden furniture projects and find pallet garden furniture guidance at Gardeners’ World.
A pallet sofa transforms your balcony from a storage space into the outdoor room it was always meant to be.
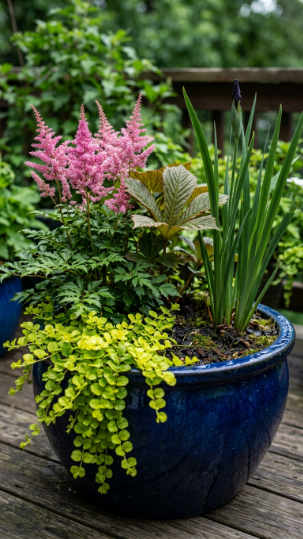
17. Colour-Themed Container Garden in Three Pots
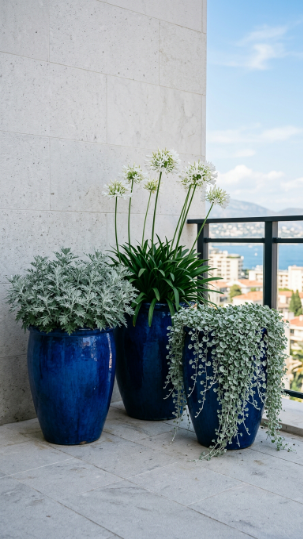
A monochrome or two-tone themed container garden instantly gives a balcony a deliberate, designed quality — it’s the easiest way to elevate what might otherwise look like a random collection of plants.
Choose a colour theme before buying a single plant or pot. Classic balcony combinations that work in practice: deep blue pots with white and silver planting; terracotta pots with warm orange and red flowering plants; pale grey concrete pots with pink and blush tones. The container colour anchors the entire palette — commit to it fully.
Three large matching containers (at least 35cm diameter) create more impact than ten small mismatched ones. Plant each using a consistent thriller-filler-spiller formula: one tall or architectural plant, one mound-forming mid-plant, and one trailing species. For a white and silver theme: Agapanthus africanus ‘White’ (thriller), Artemisia ‘Silver Mound’ (filler), and Dichondra argentea ‘Silver Falls’ (spiller).
Water and feeding requirements vary by plant; however, grouping plants with similar needs in the same pot — drought-tolerant with drought-tolerant, moisture-loving with moisture-loving — simplifies care enormously.
Best container colour and plant pairings for balconies:
- Midnight blue pots + white agapanthus + silver dichondra
- Terracotta + orange marigolds + red calibrachoa
- Matte black + lime euphorbia + deep purple petunia
Read about colour-themed container garden design for balconies and find container colour combination ideas at BHG.
A themed container garden is proof that restraint — fewer colours, more confidence — is always more impactful on a small balcony.
18. Solar-Powered Balcony Lighting with Climbing Plants

Weaving solar fairy lights through climbing plants transforms a balcony at dusk from a pleasant outdoor space to somewhere genuinely magical — without any wiring or electricity cost.
Install a trellis panel (as described in section 2) and train a climbing plant across it throughout the season. Trachelospermum jasminoides (star jasmine) and Clematis varieties are excellent choices for this project — both produce abundant small flowers that catch and diffuse fairy light beautifully. Weave solar fairy lights (warm white, 200 bulb strings minimum) through the climbing stems as the plant grows, attaching every 20–30cm with small cable ties to prevent the string from sagging.
Solar panels charge effectively on a south-facing balcony railing even on moderately cloudy days. Opt for a string with a dusk sensor and auto-off timer to maximise battery life through the night. Warm white (2700K) rather than cool white (6500K) creates a far more atmospheric and flattering light quality on foliage and flowers.
The combined effect of scented climbers and warm evening light creates an ambience that no purchased outdoor lighting product can quite match.
💡 Pro Tip: Thread lights through the plant in early spring before the climbing stems become rigid — re-threading an established dense climber in midsummer is nearly impossible without damaging the plant significantly.
Find solar lighting ideas for balcony gardens and climbing plant displays and explore star jasmine and clematis growing guidance from Gardeners’ World.
Fairy lights in climbing plants is the single after-dark transformation that will make your balcony feel like a different place entirely.
19. DIY Chalkboard Plant Label Pots
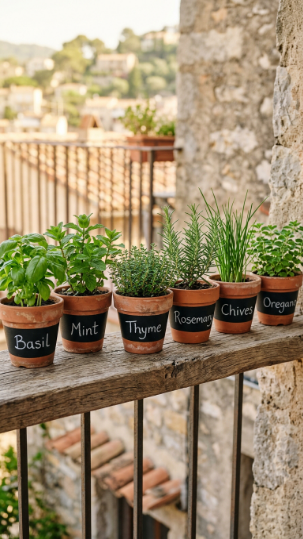
Chalkboard-banded plant label pots are one of the cheapest and most charming DIY projects for a balcony oasis — and they make the most functional difference when you’re managing a collection of 10+ pots.
Apply a 5cm band of chalkboard paint around the middle of each terracotta pot using masking tape as a guide for clean edges. Two coats with a 2-hour dry time between coats gives full coverage. Allow 24 hours before chalking. Condition the chalkboard band by rubbing the flat side of a chalk stick across the entire surface, then wiping away with a damp cloth — this prevents ghosting of the first text you write.
Write plant names in chalk pen (more weather-resistant than standard chalk outdoors) or standard chalk for an erasable label you can update each season. Include not just the plant name but the watering frequency or last feeding date — this level of practical labelling genuinely improves your plant care routine.
Chalkboard paint works on any porous container surface: terracotta, concrete, timber, and even recycled tins. It’s also an excellent way to unify a mismatched pot collection — identical chalkboard bands create visual coherence across different pot sizes and shapes.
Discover DIY plant pot painting and labelling ideas for balcony gardens and find container garden organisation tips from Penn State Extension.
A chalkboard label band makes every pot in your collection feel considered — and means you’ll never again forget what you planted where.
20. Balcony Shade Canopy with Climbing Nasturtiums
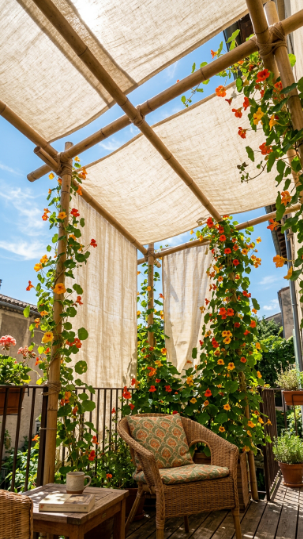
A DIY shade canopy with nasturtium climbers solves the problem of an overly exposed south-facing balcony while growing one of the most beautiful and fully edible ornamental plants available.
Construct a simple overhead frame from four bamboo poles (2m tall, 3cm diameter) secured with jute twine at the corners, attached to the balcony railing at the base and to ceiling hooks above. Stretch a piece of shade cloth or natural linen across the top frame, securing with rope ties. This reduces direct sun by 30–50% — sufficient to make a blazing south-facing balcony comfortable for both plants and people.
Grow Tropaeolum majus (nasturtium) up the bamboo poles. Sow seeds directly at the base of each pole in April (seeds germinate in 7–10 days at 15°C), then train new shoots manually up the poles every few days. Nasturtiums require no fertiliser — in fact, rich soil produces lush leaves at the expense of flowers. They thrive in poor, dry conditions on a sunny balcony.
Every part of the nasturtium is edible: flowers have a peppery flavour excellent in salads, leaves make an unusual pesto, and unripe seeds can be pickled as a caper substitute.
💡 Pro Tip: Sow nasturtium seeds after soaking in warm water for 4–6 hours — this softens the hard seed coat and cuts germination time from 10 days to 5–7 days consistently.
Read about growing edible climbing plants for balcony shade structures and find nasturtium growing guidance from The Old Farmer’s Almanac.
A nasturtium canopy gives you shade, flowers, salad ingredients, and a genuinely beautiful overhead structure — it’s four projects in one.
21. DIY Succulents and Gravel Zen Garden Tray
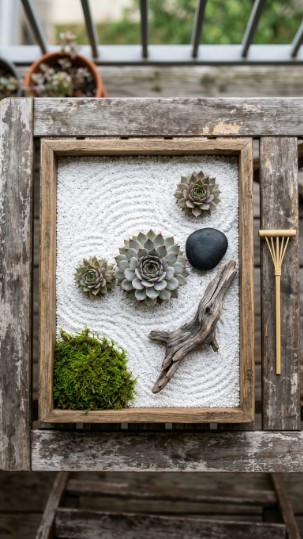
A succulent zen garden tray brings a meditative, Japanese-inspired quality to a balcony table or ledge — and the act of raking the gravel patterns is surprisingly calming.
Build a shallow tray 40–50cm long and 5–6cm deep from untreated timber, or repurpose a wide wooden picture frame backing. Line with a single sheet of polythene and fill with fine white or grey horticultural gravel to a depth of 4cm. Position three Sempervivum rosettes (plant into small pockets of cactus compost pressed into the gravel rather than planting directly into gravel alone), one smooth dark pebble, and a piece of weathered driftwood.
Make a miniature rake from a wooden skewer with three short tines glued at right angles — or purchase a small bamboo garden rake. Rake patterns around the planted elements: circular ripples around each sempervivum, parallel lines across open areas. The formal garden principle applied here is borrowed landscape (shakkei): the raked gravel represents water, the sempervivum islands.
Sempervivum survive extraordinary conditions — frost, drought, poor soil — making them the ideal permanent plants for this type of display. They need watering only monthly, or even less in wet climates.
Explore succulent zen garden tray ideas for balconies and outdoor tables and read sempervivum growing guidance from Missouri Botanical Garden.
A zen garden tray on a balcony table is an invitation to pause — and on a busy day, that’s worth more than any other plant.
22. Repurposed Ladder Plant Display Stand

A repurposed ladder as a plant display stand adds immediate architectural interest to a blank balcony wall and creates four to six planting levels in the footprint of a single ladder.
Source an old wooden ladder from a charity shop, salvage yard, or car boot sale — the more weathered, the better. Sand any rough areas and treat with exterior wood oil or paint. Lean the ladder against the balcony wall at a 70–75° angle, securing to the wall at the top with two cup hooks and a loop of wire for safety.
Space plants on each rung using terracotta pots that fit the rung width: 12–15cm pots sit securely on most standard ladder rungs. Plan plant placement by height: trailing plants on the top rungs (where they cascade attractively downward), bushy mid-height plants in the centre, and a large architectural specimen at the base. Pelargonium (geraniums) at the top, compact herbs in the middle, and a rosemary standard at the base is a classic and reliably beautiful combination.
Water pots on upper rungs first, as water trickling through from above can supplement pots on lower rungs — factor this into your watering schedule to avoid overwatering the lower levels.
💡 Pro Tip: Attach small wooden blocks to the back of each rung using wood glue before placing pots — these prevent pots from rolling forward off the ladder in wind, which is especially important on higher-floor balconies.
Find ladder plant display ideas and vertical balcony garden solutions and explore vertical gardening and display ideas from Gardeners’ World.
A ladder stand is proof that the most characterful balcony displays come from the least expected places.
23. DIY Wind-Resistant Balcony Planting with Ornamental Grasses
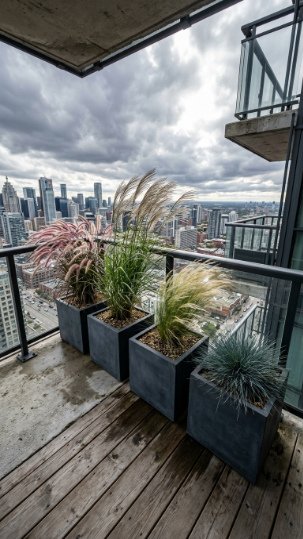
Ornamental grasses are the most wind-tolerant plants for an exposed balcony oasis — and in moving air, they perform better than in still conditions, with their elegant plumes creating constant gentle motion.
A challenge many gardeners face is choosing plants that thrive rather than suffer on a high-floor or exposed balcony. Ornamental grasses are the answer. Choose varieties based on your light level: Festuca glauca (blue fescue) for full sun, Carex morrowii ‘Ice Dance’ for partial shade, Pennisetum alopecuroides for full sun with dramatic autumn plumes, and Stipa tenuissima (feather grass) for the most graceful movement in any breeze.
Plant into large, heavy containers — at least 40cm wide and deep — using a loam-based John Innes No. 2 or 3 compost. The weight is intentional: heavy containers resist the wind that can topple lighter plastic pots. Arrange containers in a staggered group of three to five along the exposed railing, where they create a natural windbreak for other, more vulnerable plants behind them.
Cut grasses back to 10cm in late February before new growth emerges — this annual maintenance is the only significant care they require.
Learn about ornamental grasses for exposed balconies and wind-resistant container plants and find grass growing guidance from Missouri Botanical Garden.
Ornamental grasses are the one balcony plant that genuinely gets better when the wind blows.
24. Balcony Compost Caddy and Worm Tower
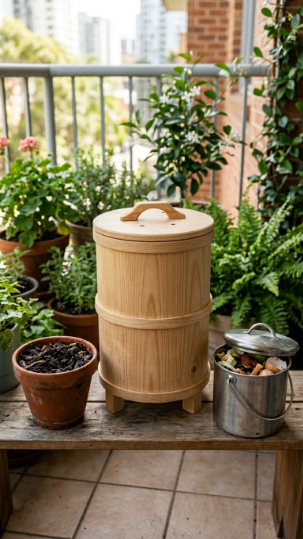
A balcony worm tower converts kitchen scraps into the richest possible compost for your container plants — closing the loop between kitchen waste and garden fertility in a system that fits in a 30cm square.
Build a worm tower from a wooden planter box approximately 30cm square and 40cm tall, fitted with a tight-fitting lid to retain moisture and prevent escape. Drill 1cm ventilation holes in the sides. Alternatively, purpose-built worm composters (like the Can-O-Worms system) work excellently on balconies.
Begin with a base layer of dampened torn cardboard, then add 100–150g of tiger worms (Eisenia fetida — not common earthworms, which require open soil). Feed small amounts of kitchen scraps every 2–3 days: vegetable peelings, coffee grounds, tea bags, fruit scraps, and eggshells are all ideal. Avoid citrus, onion, meat, and dairy, which unbalance the worm environment.
Within 8–12 weeks, the lower section produces worm castings — arguably the most nutrient-dense natural compost amendment available. Mix one part worm castings with four parts standard compost when potting up balcony containers for outstanding plant establishment.
💡 Pro Tip: Dilute the liquid that drains from the base of the worm tower (known as “worm tea”) at 1:10 with water — this liquid fertiliser is extraordinarily rich in plant-available nutrients and is essentially free.
Discover how to set up a balcony worm tower composting system and find vermicomposting guidance from University of Florida Extension.
A worm tower on your balcony is an ecological loop in miniature — kitchen waste becomes the richest possible fuel for everything you grow.
25. DIY Balcony Bog Garden in a Glazed Pot
A balcony bog garden in a sealed glazed pot is one of the most unexpected and lush DIY projects to create a balcony oasis — it allows you to grow the dramatic moisture-loving plants that would struggle in any standard drained container.
Select a large glazed ceramic pot without drainage holes, minimum 45cm diameter. This is deliberate — the sealed base retains moisture, creating a permanently wet environment that bog plants require. Fill with a mix of peat-free multipurpose compost and 30% horticultural grit — this maintains moisture while preventing the anaerobic stagnation of pure compost.
Plant bog-loving species: Astilbe ‘Fanal’ (deep red feathery plumes, 60cm), Lysimachia nummularia ‘Aurea’ (golden creeping Jenny, trails beautifully over the pot edge), Iris ensata (Japanese water iris, architectural foliage and violet flowers), and Rodgersia pinnata ‘Superba’ (bold textured leaves). Water generously every 2–3 days in summer — the goal is consistently moist, never dry, compost.
Place on an east or west-facing balcony; bog plants generally dislike the intense midday heat of a full south-facing exposure in summer, which can dry even a sealed pot faster than you can replenish it.
Explore balcony bog garden planting and sealed container gardening ideas and find bog and moisture-loving plant care from the RHS.
A bog garden on your balcony demonstrates that every microclimate — even a permanently wet pot — can become a deliberate, beautiful ecosystem.
Getting Started With DIY Projects to Create a Balcony Oasis
The easiest place to begin is the vertical pallet herb garden (section 1). A single HT-stamped pallet, a bag of multipurpose compost, and four herb plants from any garden centre is genuinely all you need — and the first evening you snip fresh basil directly from your balcony wall, the investment will feel completely worthwhile.
The most common mistake beginners make with balcony gardens is underestimating wind. A plant that performs beautifully in a sheltered indoor window may collapse within a week on a high-floor balcony. Before buying any plants, spend a day observing your balcony’s actual wind exposure — particularly in the afternoon, when wind speeds typically peak. For exposed balconies above the third floor, start with wind-tolerant species: ornamental grasses, thyme, lavender, and sempervivum.
For your first purchase, keep it focused: one compact tomato or herb plant, one terracotta pot with good drainage holes, and one small bag of appropriate compost. Resist the urge to buy ten plants at once — five thriving plants is dramatically more satisfying than fifteen struggling ones.
Expect your first season balcony oasis to feel genuinely established by midsummer — typically 8–10 weeks after your first plantings. Most container plants settle within 2–3 weeks and begin growing visibly within a month.
Frequently Asked Questions
What are the best plants for a windy balcony oasis?
Wind is the primary challenge for balcony gardening above the second floor. Plants that consistently perform well on exposed balconies include ornamental grasses (Festuca glauca, Stipa tenuissima), lavender (Lavandula angustifolia), thyme (Thymus vulgaris), hardy geraniums (Pelargonium varieties), and Sempervivum. Avoid large-leaved plants like hostas, bananas, and many ferns on exposed balconies — their large leaf surface area makes them particularly vulnerable to wind damage. Always anchor pots to the railing or wall with cable ties or metal brackets on a high-floor balcony.
How often should I water balcony container plants in summer?
In summer, most balcony container plants need watering every 1–2 days, and hanging planters or shallow pallet pockets often need daily watering during hot spells. The golden rule: press a finger 2–3cm into the compost. If it feels dry at that depth, water thoroughly until it drains from the base. Small terracotta pots and hanging planters dry out much faster than large glazed or plastic containers. Installing a drip irrigation timer (section 4) with morning and early evening cycles is the most reliable solution for summer watering on any balcony.
Can I create a DIY balcony oasis on a rented apartment balcony?
Yes — and most of these 25 DIY projects require no permanent fixtures or drilling. Freestanding pallet gardens, container gardens, hanging planters on tension rods, and ladder displays all work on rented balconies without modification to the structure. Where fixings are genuinely needed (such as trellis privacy screens), adhesive heavy-duty hooks rated for outdoor use can often support lightweight structures without leaving permanent marks. Always check your tenancy agreement regarding balcony alterations before installing anything.
Why are my balcony tomatoes not setting fruit?
The most common cause of poor fruit set on balcony tomatoes is insufficient pollination, which is reduced when plants are in a very sheltered position without wind or insect access. Gently shake the flowering truss by hand each day to distribute pollen — this mimics the action of wind and bees and dramatically improves fruit set. Other causes include temperatures above 30°C (which make pollen sterile), inconsistent watering (causing blossom drop), or overfeeding with high-nitrogen fertiliser (which promotes leafy growth at the expense of flowers and fruit).
How do I protect balcony plants in winter?
Container plants are significantly more vulnerable to frost than ground-planted specimens because their roots are exposed on all sides to freezing air. Move frost-sensitive plants (citrus, fuchsia, pelargonium) indoors to a cool bright windowsill when temperatures drop below 5°C. Hardy plants can remain outdoors but benefit from wrapping the pot itself in bubble wrap or hessian to insulate the root ball. Raise pots off the balcony floor on pot feet to prevent waterlogging during winter rain, and reduce watering frequency to once a week or less during cold dormant months.
A Few Final Thoughts
Your balcony is far more capable than it looks on a bare winter’s day. With 25 DIY projects to create a balcony oasis, every square metre of it — walls, railings, ceilings, corners — becomes a potential growing space, seating area, or living display. The truth that every experienced balcony gardener knows is that even a single project changes everything: one planted pallet on a bare wall, one jasmine climbing a trellis, one strawberry tower in a corner transforms the entire feeling of being outside. You don’t need to do all 25 at once — start with the one project that genuinely excites you today and let the rest follow naturally. Your balcony oasis adventure is one afternoon, one pot, and one plant away from beginning. Now go make it happen.