
If you’ve ever found yourself hunched over a patio floor repotting plants, balancing bags of soil on a wobbly side table, or losing trowels and plant labels in the general chaos of your gardening corner — this article is going to make your day. A DIY garden potting bench is the one project that experienced gardeners wish they’d built years earlier, and the best part is it’s completely achievable on a weekend with basic tools and a modest budget. It organizes your entire gardening life, saves your back from endless bending, and honestly? It looks absolutely incredible in any outdoor space. Ready to build yours? Let’s dive in!
At a Glance
- A DIY garden potting bench can be built in a single weekend for $60–$150 in materials — a fraction of the cost of purchased versions that often run $200–$500 or more.
- Cedar and pressure-treated pine are the two best wood choices for outdoor potting benches — both resist moisture, rot, and insect damage far better than standard construction lumber.
- Setting your work surface height at 36 inches matches standard kitchen counter height and eliminates the back strain that comes from bending over a lower surface during extended potting sessions.
- A well-designed potting bench needs at least three functional zones: a primary work surface, lower storage for soil bags and large pots, and upper storage for tools, fertilizers, and small supplies.
- Sealing all wood surfaces with an outdoor-rated stain, paint, or waterproof sealant before assembly — not after — gives dramatically better long-term weather protection and extends your bench’s life by years.
Why Every Gardener Needs a DIY Garden Potting Bench
Here’s the deal: a garden potting bench isn’t a luxury — it’s a fundamental piece of gardening infrastructure that makes every single gardening task faster, easier, and more enjoyable. Once you have one, you’ll genuinely wonder how you managed without it.
Think about your current potting setup. Are you kneeling on a patio, leaning over a low table, or clearing the kitchen counter every time you need to repot something? That chaos costs you time, hurts your back, and makes gardening feel like more work than it should. A dedicated potting station centralizes everything — your tools, your soil, your pots, your labels — in one organized, ergonomic workspace.
The advantages go beyond just organization:
- Ergonomic working height eliminates back and knee strain during extended potting sessions
- A defined work zone keeps soil mess contained to one outdoor area rather than tracked through your home
- Organized tool storage means you stop losing trowels, losing labels, and buying duplicates of things you already own
- Building it yourself means you can customize every dimension and feature to your exact space and workflow
- A beautiful DIY potting bench adds genuine charm and character to any garden, patio, or shed space
💡 Pro Tip: A potting bench also dramatically improves your seed starting and propagation success — having a dedicated, organized workspace means you’re more likely to do things correctly and consistently rather than rushing through a makeshift setup on the kitchen table!
The difference between a frustrating gardening session and a genuinely enjoyable one often comes down to having the right workspace. This is that workspace.
According to The Old Farmer’s Almanac, dedicated potting stations are one of the most consistently recommended productivity upgrades for serious home gardeners at any experience level.
Check out our guide to organizing your gardening tools and supplies to plan what storage your bench will need to accommodate.
Build this once and you’ll use it literally every single time you garden — it pays back immediately!
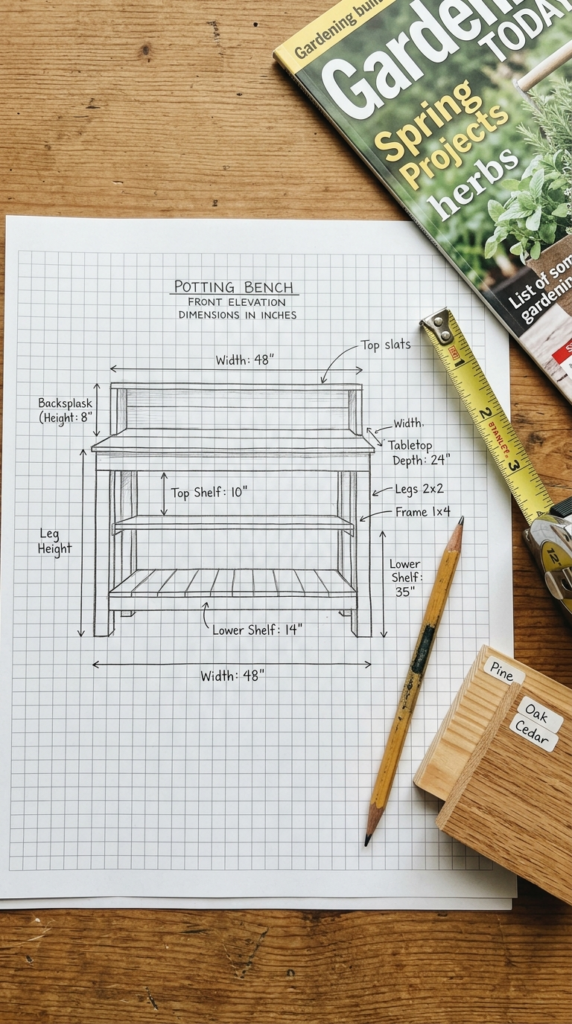
Plan Your Potting Bench Before You Buy a Single Board
Jumping straight to the hardware store without a clear plan is how you end up with a wobbly bench that’s the wrong height, missing the storage you actually needed, and costing twice what it should have. Spend thirty minutes planning first and the entire build goes smoother, faster, and cheaper.
The three critical dimensions to decide before anything else:
Work surface height is the most important measurement for your comfort and health. The standard recommendation is 34–36 inches — matching kitchen counter height — which allows most adults to work comfortably without hunching. If you’re taller than 6 feet, consider 38 inches; shorter than 5’4″, consider 32 inches. Get this right and your back will thank you for years.
Overall bench width depends entirely on your available space. A standard potting bench runs 48–60 inches wide, which provides excellent working space and storage without dominating a small garden area. Measure your intended location carefully and subtract at least 6 inches on each side for comfortable access and air circulation.
Depth is often underestimated. A 24-inch deep work surface is the comfortable minimum for potting work — deep enough to have a pot and soil bag accessible simultaneously. If space allows, 28–30 inches is even better and makes the bench feel genuinely workbench-quality.
Key planning questions to answer before you build:
- Indoor or outdoor? — Affects wood choice, finish type, and waterproofing requirements
- Against a wall or freestanding? — Determines whether you need a backsplash and upper shelving, or storage on both sides
- How much soil storage? — Decide if you need a lower shelf, a bin, or both before designing the frame
- Tool storage needs — Count your most-used tools and plan hook and rail space specifically around that number
- Sink or no sink? — A small utility sink can be incorporated into a DIY potting bench and is a genuine game-changer if you have a nearby water source
Browse our guide to designing the perfect potting station for your garden size for layout ideas and dimension templates.
Thirty minutes of planning saves three hours of fixing — always, always plan first!
Choose the Best Wood for Your Outdoor Potting Bench
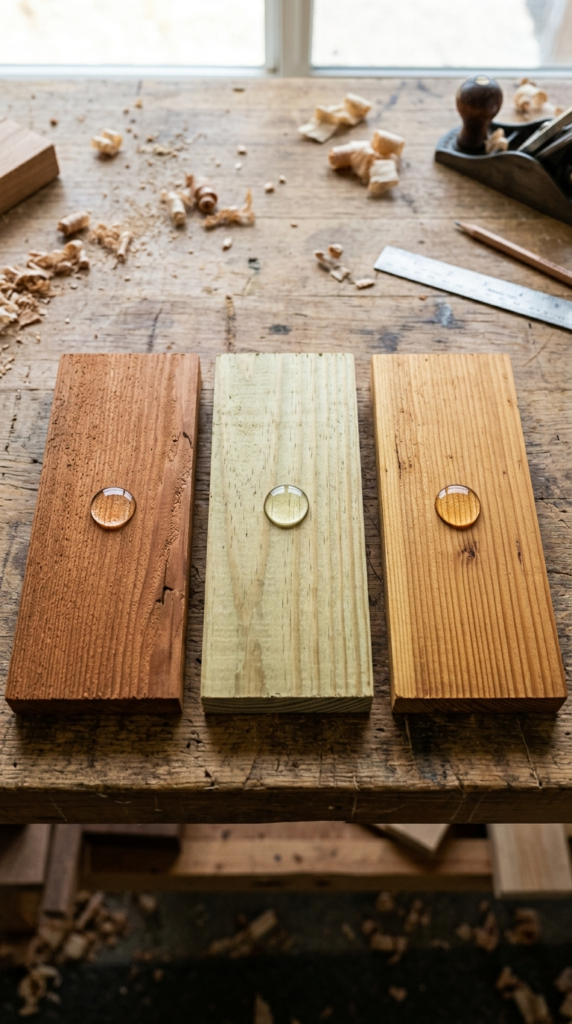
The wood you choose for your outdoor potting bench determines how long it lasts, how much maintenance it needs, and ultimately whether you’re rebuilding it in three years or still using it in fifteen. This decision is worth taking seriously.
Cedar — the overall best choice
Western red cedar is the gold standard for outdoor DIY furniture and potting benches. It contains natural oils that resist moisture, rot, and insect damage without any chemical treatment — making it genuinely safe for use around edible plants and food gardens. Cedar is lightweight, easy to work with, planes and sands beautifully, and develops a gorgeous silver-grey patina over time if left unfinished. The downside? It’s more expensive than pine, typically running $3–$5 per linear foot for standard dimensional lumber.
Pressure-treated pine — the budget-friendly workhorse
Modern pressure-treated pine (look for AC2 or above ground rated) uses copper-based preservatives that are considered safe for garden use and won’t leach harmful chemicals into soil in normal use conditions. It’s approximately 50–60% cheaper than cedar, widely available at every hardware store, and extremely rot-resistant. The trade-off is that it’s heavier, harder to work with, and requires time to dry fully before painting or staining — fresh pressure-treated lumber contains significant moisture.
Redwood — the premium option
Like cedar, redwood contains natural preservative compounds and is extraordinarily rot-resistant. It’s slightly more dimensionally stable than cedar (less warping and splitting) and arguably more beautiful. The downside is cost and availability — redwood is significantly pricier than cedar and not readily available in all regions.
| Wood Type | Rot Resistance | Cost | Workability | Best For |
| Western Red Cedar | Excellent | Medium | Easy | Overall best choice |
| Pressure-Treated Pine | Excellent | Low | Moderate | Budget builds |
| Redwood | Excellent | High | Easy | Premium builds |
| Douglas Fir (sealed) | Moderate | Low | Easy | Indoor/covered only |
| Standard Pine (unsealed) | Poor | Very low | Easy | Never for outdoor use |
💡 Pro Tip: Whatever wood you choose, buy kiln-dried lumber rather than green (freshly cut) lumber whenever possible. Kiln-dried wood has lower moisture content, which means less warping, splitting, and movement after your bench is built — your joinery stays tight and your flat surfaces stay flat!
Find our complete guide to choosing outdoor lumber for garden projects for regional availability and current pricing comparisons.
The right wood choice from day one is what separates a potting bench that lasts a decade from one that rots in three seasons!
Essential Tools and Materials for the Build
Before you cut a single piece of wood, get everything assembled in one place. There’s nothing more frustrating than stopping mid-build because you’re missing a specific screw size or don’t have a square to check your angles. Here’s exactly what you need.
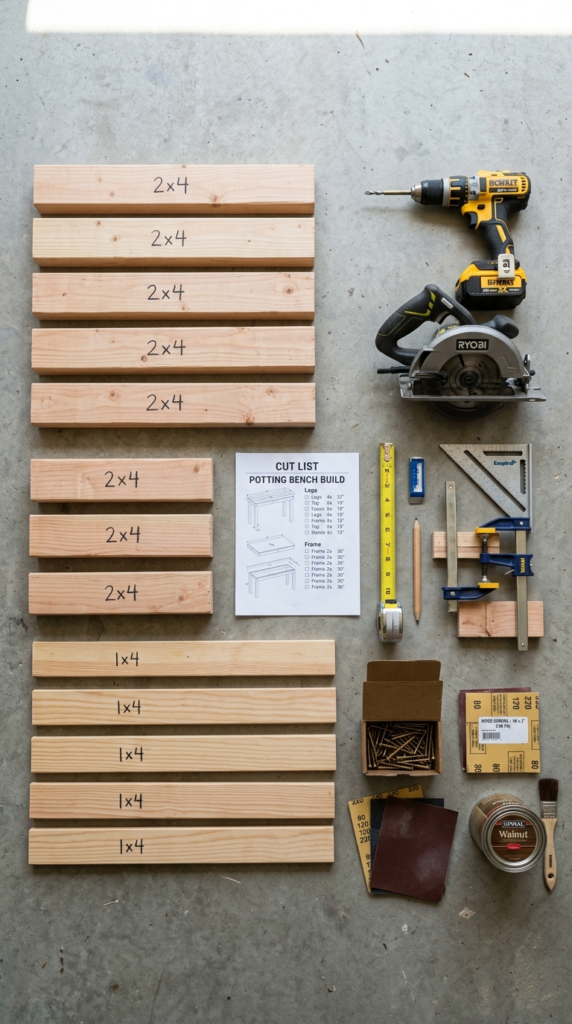
The complete materials list for a standard 48-inch potting bench:
Lumber (cedar or pressure-treated pine):
- 4x 4×4 posts, 8 feet long — legs and vertical frame members
- 6x 2×4 boards, 8 feet long — horizontal frame, shelf supports, backsplash frame
- 8x 1×6 boards, 6 feet long — work surface planks, lower shelf planks
- 4x 1×4 boards, 6 feet long — backsplash boards and upper shelf
- 1x 1×2 board, 6 feet long — tool rail
Hardware and fasteners:
- 3-inch exterior wood screws (box of 100) — primary structural fasteners
- 2-inch exterior wood screws (box of 50) — surface boards and lighter joinery
- Corner brackets (8x) — for reinforcing frame joints
- Wooden dowels or pocket hole screws (optional but highly recommended for clean joinery)
- Hooks, S-hooks, and a tool rail rod — for tool storage on backsplash
Finishing materials:
- Exterior wood stain, paint, or waterproof sealant
- Medium and fine sandpaper (80-grit and 120-grit)
- Exterior wood glue for supplemental joinery strength
Essential tools:
- Power drill and driver bits
- Circular saw or miter saw (many hardware stores will cut lumber to length for free — a great option if you don’t own a saw)
- Measuring tape and pencil
- Speed square — non-negotiable for checking 90° angles throughout the build
- Clamps (at least 4 medium bar clamps)
- Sandpaper block or orbital sander
- Safety glasses and work gloves
The Family Handyman has an excellent beginner’s guide to using circular saws safely and accurately — worth a read before starting if this is your first build.
See our guide to essential tools for DIY garden projects for budget tool recommendations and what you can borrow versus buy.
Having everything in hand before you start means the build flows smoothly from first cut to final screw — no stops, no frustration, just building!
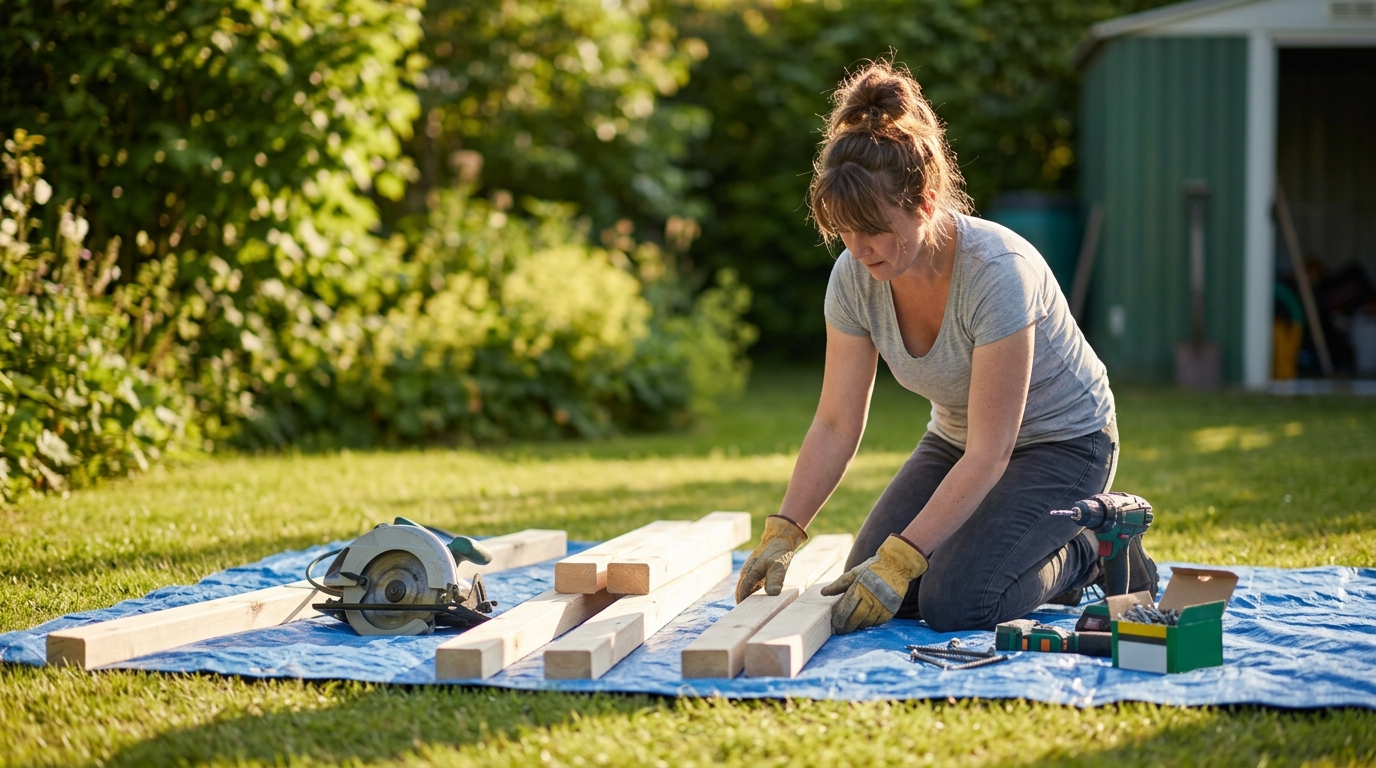
Build the Frame: Your Step-by-Step Foundation
The frame is everything — get this right and the rest of the build slots together perfectly. Get it wrong and you’ll be fighting wobbles and misalignments for every step that follows. Here’s the deal: take your time on the frame and check square at every single stage.
Step 1: Cut your leg posts
Cut your four 4×4 leg posts to your desired bench height. Remember — your finished work surface will sit on top of the frame, so cut your legs about 1.5 inches shorter than your target surface height to account for the thickness of your surface boards. For a 36-inch work surface, cut legs to 34.5 inches.
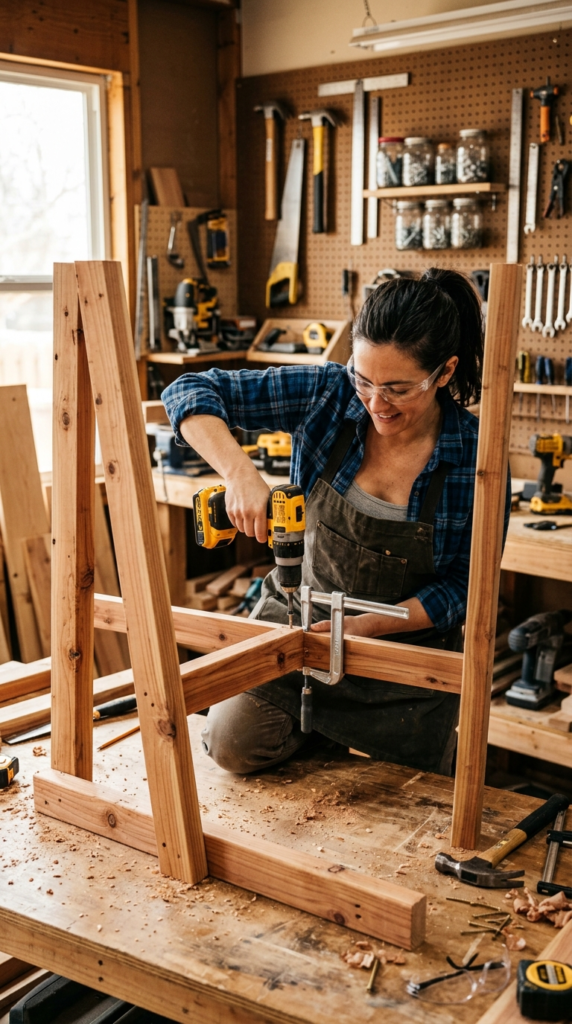
Step 2: Build two side frames
Each side frame consists of two legs connected by horizontal 2×4 cross members — one at the top (your work surface support) and one about 12 inches from the ground (your lower shelf support). Lay the pieces flat on your workshop floor, check that corners are perfectly square with your speed square, then drill and screw together using 3-inch exterior screws. Add corner brackets at each joint for extra rigidity.
Step 3: Connect the side frames
Stand your two completed side frames upright and connect them with front and back horizontal 2×4 rails at both the top and the lower shelf level. This creates your three-dimensional rectangular frame. Have a helper hold the frames steady while you drill — or use clamps to hold them in position if you’re working solo.
💡 Pro Tip: After assembling your complete frame, check it for square by measuring diagonally corner to corner in both directions — both measurements should be identical. If they differ, gently push the longer diagonal corners toward each other until the measurements match, then add your corner brackets to lock that square position permanently!
Step 4: Check for level and wobble
Set the assembled frame on your intended work surface. Check for level side-to-side and front-to-back. If one leg is slightly longer, mark it and trim it back — a wobbly potting bench is a frustrating potting bench. Now is the time to fix it, before the surface goes on.
Find our detailed DIY woodworking frame assembly guide for beginners with visual diagrams for each framing step.
A solid, square frame is the foundation of a bench that feels like quality — nail this step and everything else is straightforward!
Add the Work Surface and Lower Shelf
With your frame solid and square, it’s time to add the two surfaces that you’ll use every single gardening session — the main work surface and the lower storage shelf. Both follow the same installation principle, just at different heights.
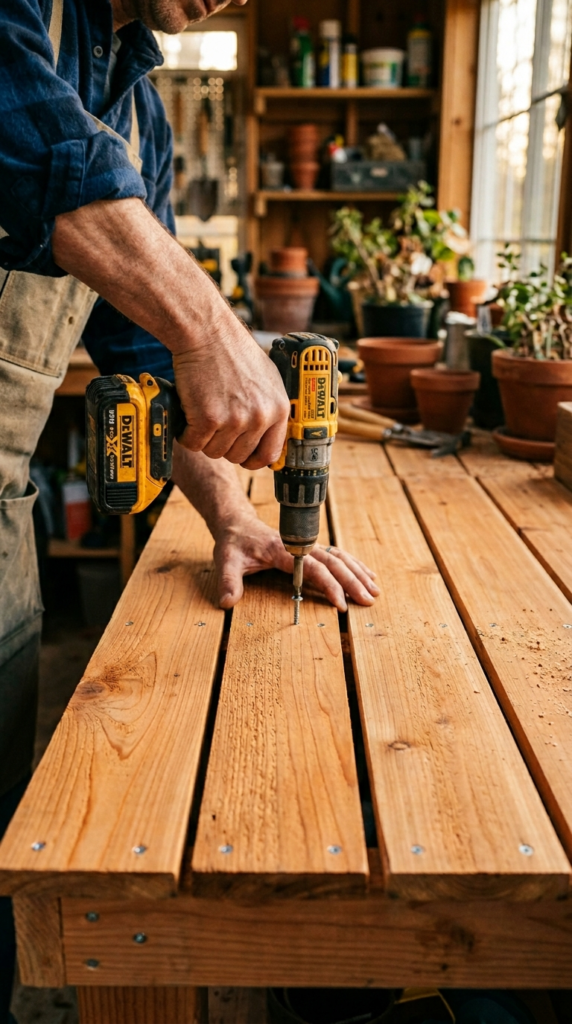
Installing the work surface planks:
Lay your 1×6 boards across the top of the frame from front to back, starting at one end. Here’s a key design decision: leave a ¼ to ½ inch gap between each plank. This gap serves two brilliant purposes — it allows soil, water, and debris to fall through rather than pooling on the surface, and it allows the wood to expand and contract with seasonal moisture changes without buckling.
Use two 2-inch exterior screws per board at each end, pre-drilling to prevent splitting. Work from one end to the other, maintaining consistent gaps using a spare piece of plywood as a spacer. When you reach the final plank, measure the remaining gap and rip-cut your last board to fit if necessary.
The lower shelf:
Install lower shelf planks using exactly the same method on your lower frame rails. The lower shelf is your heavy storage zone — this is where bags of potting soil, large containers, and heavy pots live. Consider spacing these planks slightly wider apart (½ to ¾ inch gaps) to allow any soil or water to fall through easily.
If you want to store bags of potting mix on the lower shelf, consider leaving one section completely open (no planks) — just the frame rails — creating a bay that bags can rest against the back wall and be scooped from easily without lifting the whole bag.
💡 Pro Tip: Sand all surface boards with 120-grit sandpaper before installation — it’s dramatically easier to sand individual boards than to sand an installed surface. Pay special attention to end grain, which absorbs sealant differently and can become rough and splintery if not properly prepared!
Browse our raised work surface design ideas for garden potting stations for alternative surface configurations including removable insert trays and galvanized metal surface options.
The moment those surface planks go down your bench starts looking like a real piece of outdoor furniture — one of the most satisfying moments of the entire build!
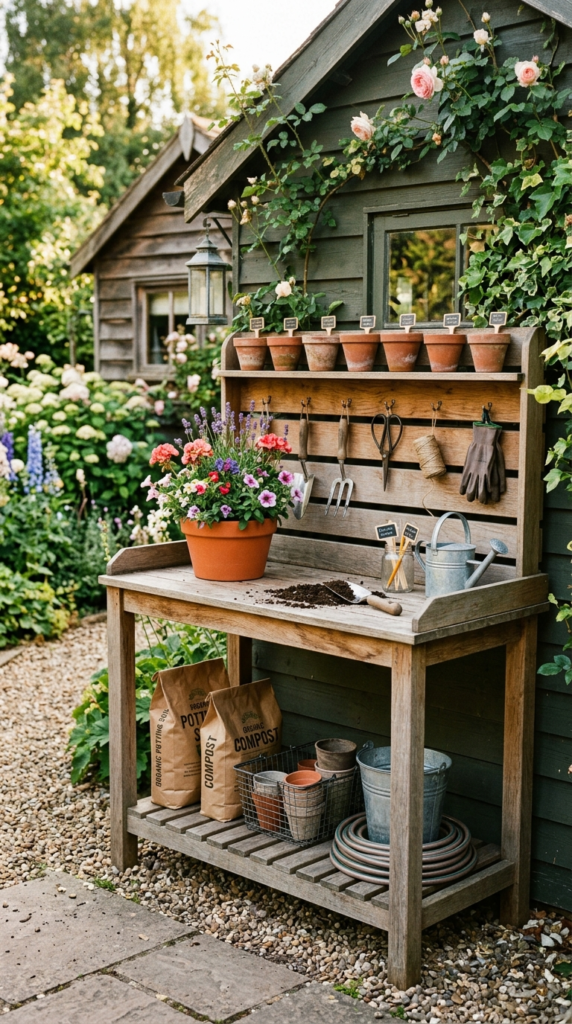
Build the Backsplash and Upper Storage
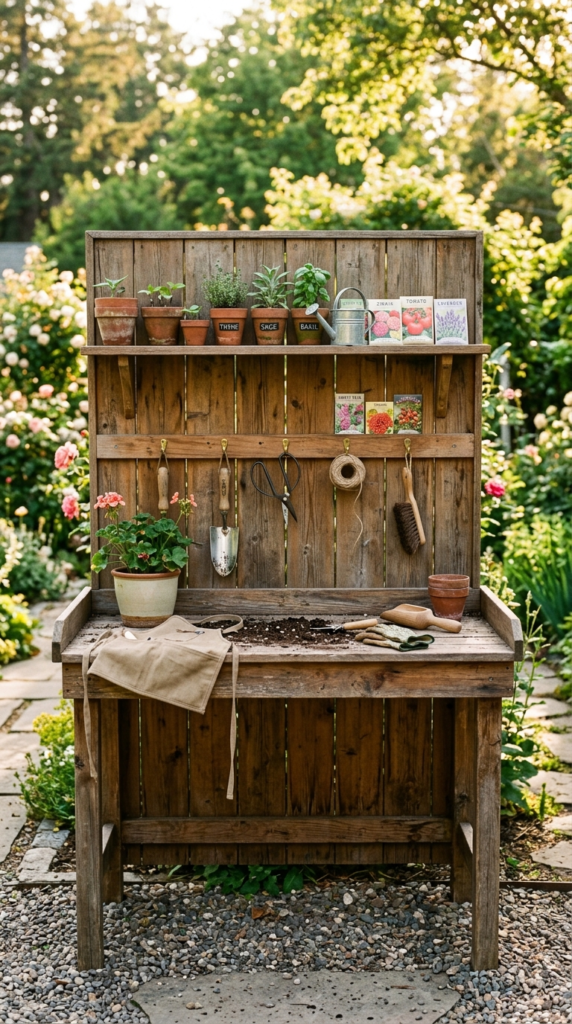
Here’s where your DIY garden potting bench goes from “basic work table” to genuinely impressive — the backsplash and upper shelf turn your bench into a complete, organized gardening command center. This section adds the storage that makes the whole setup work brilliantly.
Building the backsplash:
The backsplash is simply a series of 1×4 vertical boards running up from the back edge of your work surface to your desired backsplash height — typically 18–24 inches above the work surface. Install two vertical 2×4 uprights first, rising from the back corners of your bench frame, then attach your backsplash boards horizontally or vertically across them.
A backsplash with small ¼ inch gaps between boards allows air circulation and looks deliberately designed rather than just functional. Alternatively, tight-fitting boards with a painted finish create a cleaner, more modern look.
Adding the upper shelf:
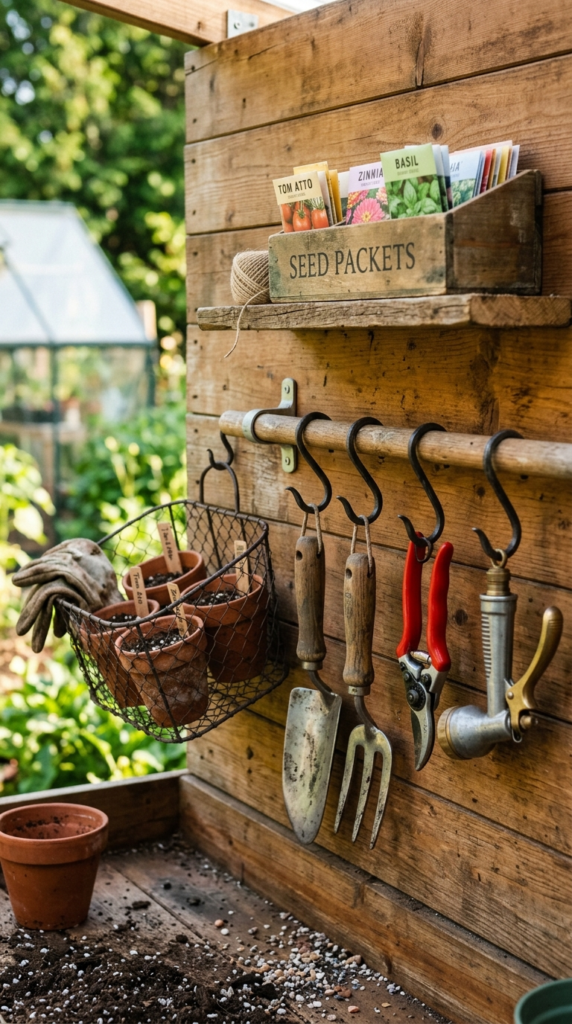
Mount a 1×6 or 1×8 shelf board across the top of your backsplash uprights using L-brackets underneath. This is your prime real estate storage zone — seed packets, small fertilizer bottles, plant labels, small pots, and your most-used supplies all live here at eye level for instant access.
Make the upper shelf at least as wide as your backsplash and add a small front lip (a 1×2 board screwed along the front edge) to prevent pots and bottles from being knocked off the front. This tiny detail prevents a lot of breaking and frustration!
Backsplash storage add-ons to build in from the start:
- A horizontal wooden dowel or copper pipe as a tool-hanging rail
- Pre-drilled holes for S-hooks at regular intervals
- A small magnetic knife strip for holding small metal tools
- Wooden cubbies or dividers for seed packet organization
- A narrow wire mesh panel section for hanging spray bottles
The Gardener’s Supply Company offers excellent inspiration for backsplash storage configurations — great reference for planning what features you actually want to build in.
See our guide to potting bench backsplash storage ideas and builds for detailed construction variations.
A well-built backsplash transforms your potting bench from a surface into a complete gardening workstation!
Add Hooks, Rails, and Smart Storage Features
The difference between a good potting bench and a great potting bench comes down entirely to how thoughtfully you’ve designed the storage details. This is the fun part — customizing your bench so that every tool has a home and every supply is exactly where you reach for it.
Tool hanging rail:
The single most useful storage feature on any potting bench. A 1-inch diameter wooden dowel or a length of copper pipe mounted horizontally across the backsplash (about 12 inches below the upper shelf) gives you an infinitely customizable hanging rail. Add metal S-hooks ($3–$5 for a pack of 20) to hang trowels, hand forks, pruners, gloves, and spray bottles. Tools you can see are tools you actually use — and tools you actually use are tools you don’t lose.
Smart storage features to incorporate:
- Pegboard panel section — Mount a square of ½ inch pegboard on part of your backsplash and add metal pegboard hooks — the most versatile tool storage system ever designed. Rearrange hooks whenever your storage needs change.
- Wire mesh bins — Simple galvanized wire bins screwed to the backsplash sides hold small pots, twine balls, and loose supplies without requiring boxes or containers.
- Labeled wooden boxes or crates — A row of small wooden boxes on the upper shelf, each labeled (seeds, labels, ties, markers), creates a tidy, attractive system for small items that otherwise vanish into the chaos.
- Paper towel holder — Mount a simple wooden dowel holder on the side of the bench. Having paper towels instantly available at your potting station is one of those small quality-of-life additions you’ll use constantly.
- Hose hook — A single large hook on the bench side holds your garden hose nozzle for instant access during potting sessions.
💡 Pro Tip: Before drilling any holes for hooks or rails, spend one full gardening session at your new bench (even before the storage is installed) and notice exactly where your hands reach naturally for tools. Place your hooks and rails at those exact points — storage that matches your natural movement patterns gets used; storage that doesn’t match gets ignored!
Explore our guide to clever tool storage ideas for small gardens and potting stations for even more creative organization solutions.
The right storage features turn your potting bench into a workspace that makes gardening genuinely feel effortless!
Finish, Seal, and Weatherproof Your Potting Bench
You’ve built something beautiful — now protect it! Finishing and weatherproofing your potting bench properly is what separates a bench that looks great for one season from one that looks great for ten. This step is far too often rushed or skipped entirely, and it shows within a year when the wood starts graying, cracking, and absorbing moisture.
Your finishing options:
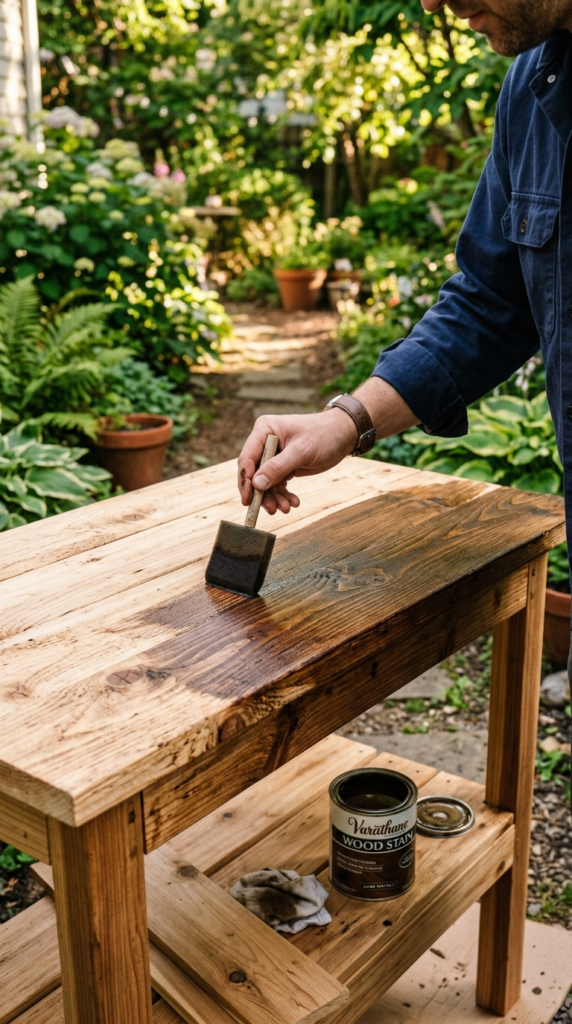
Exterior wood stain is the most popular choice for potting benches because it penetrates into the wood grain (rather than sitting on top like paint), highlighting the natural beauty of cedar or pine beautifully while providing excellent moisture protection. Use a semi-transparent or solid exterior stain rated for ground contact or exterior use. Apply two coats, allowing full drying time between coats.
Exterior paint gives a cleaner, more polished look and is excellent for moisture protection — painted surfaces shed water better than stained ones. Use a primer coat first, then two coats of exterior-grade latex paint. White, grey, and sage green are consistently popular color choices that complement garden settings beautifully.
Waterproof clear sealant — products like exterior polyurethane or marine spar varnish — preserves the natural wood appearance while creating a hard, water-resistant surface. Requires reapplication every 1–2 years but gives the most beautiful natural wood finish.
Application tips that make a real difference:
- Sand between coats with 220-grit sandpaper for a professional finish
- Pay extra attention to end grain — it absorbs more finish and needs an extra coat
- Apply finish to all six sides of every board before assembly for maximum protection
- Use a foam roller for flat surfaces and a brush for edges and details
- Allow full cure time (typically 48–72 hours) before using the bench with wet soil and water
💡 Pro Tip: Apply a coat of paste wax or outdoor furniture wax over your dried stain or sealant every spring — it takes fifteen minutes, dramatically extends the life of your finish, and makes the bench surface much easier to wipe clean during potting sessions!
Check out our guide to weatherproofing outdoor garden furniture and structures for product recommendations and application techniques by climate zone.
A properly finished potting bench weathers beautifully and genuinely looks better with every season that passes!
Budget Breakdown: What a DIY Potting Bench Really Costs
One of the best things about building your own DIY garden potting bench is the cost versus the result. A comparable bench at a garden center or home goods store typically runs $200–$500 — and they’re often flimsy, poorly finished, and missing the storage features you actually need. Here’s what a quality DIY version realistically costs.
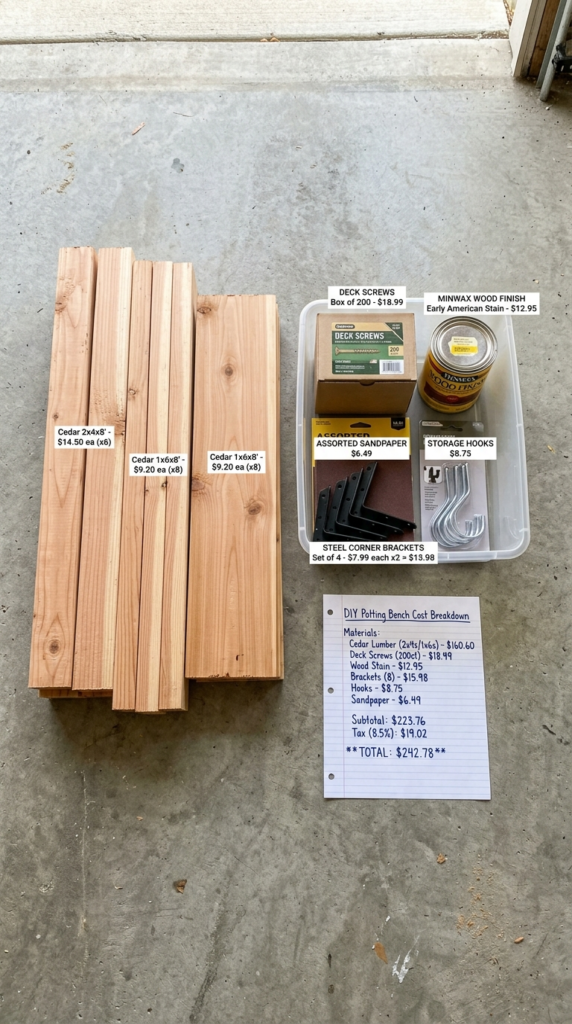
Standard 48-inch cedar potting bench budget:
| Item | Quantity | Estimated Cost |
| Cedar 4×4 posts (8ft) | 4 boards | $40–$60 |
| Cedar 2×4 boards (8ft) | 6 boards | $30–$45 |
| Cedar 1×6 boards (6ft) | 8 boards | $40–$60 |
| Cedar 1×4 boards (6ft) | 4 boards | $20–$30 |
| Exterior screws (3″ and 2″) | 2 boxes | $15–$20 |
| Corner brackets and hardware | 1 pack | $10–$15 |
| Hooks, S-hooks, dowel rail | Assorted | $10–$20 |
| Exterior stain or sealant | 1 quart | $15–$25 |
| Sandpaper and misc supplies | Assorted | $5–$10 |
| Total | $185–$285 |
Budget version using pressure-treated pine:
Swap cedar for pressure-treated pine and the lumber costs drop by roughly 50%, bringing your total build cost to $100–$160 — still a genuinely excellent result for a bench that will last a decade or more.
Ways to reduce costs further:
- Ask your hardware store if they have lumber offcuts or remnants — shorter pieces often sell at significant discounts and work perfectly for shelves and backsplash components
- Upcycle old wooden pallets for the backsplash boards or lower shelf — free and characterful
- Buy hardware in multi-packs rather than individually — far better value per unit
- Use reclaimed wood from old fencing, decking, or furniture for a zero-cost material base with beautiful patina
Browse our guide to budget DIY garden project materials and sourcing for more cost-saving strategies on outdoor woodworking projects.
For $100–$200 in materials and a weekend of your time, you end up with a custom potting bench that would cost $400+ to buy — that’s a return that’s hard to beat on any DIY project!
Frequently Asked Questions
What is the ideal height for a DIY garden potting bench?
The most comfortable work surface height for the majority of gardeners is 34–36 inches — the same as standard kitchen counter height. This allows you to work standing upright without hunching, which makes a significant difference during extended potting sessions. If you’re notably taller or shorter than average, adjust accordingly: add 2–4 inches for heights over 6 feet, subtract 2–4 inches for heights under 5’4″. Getting this measurement right is genuinely one of the most important decisions in the entire build.
Can I build a DIY potting bench without power tools?
Yes, absolutely — it just takes more time and effort. All the cuts in a basic potting bench build can be made with a hand saw, and all the joinery can be done with a hand screwdriver (though a cordless drill makes the job dramatically faster and easier). Many hardware stores also offer free lumber cutting services — bring your cut list, have them cut everything to size in-store, and you can assemble the entire bench at home with just a drill and a square. This approach is particularly great for beginners.
How do I protect my potting bench from heavy rain and frost?
Beyond applying a quality exterior finish before assembly, the most effective long-term protection strategies are: keeping the bench under a roof, awning, or pergola if possible to reduce direct rain exposure; using a weatherproof cover during winter months when the bench isn’t in use; and reapplying exterior stain or sealant annually in spring before the gardening season begins. For cedar or redwood benches, even without any finish, the natural oils provide reasonable protection — but a sealed bench will always outlast an unsealed one significantly.
What’s the minimum skill level needed to build a potting bench?
A basic DIY garden potting bench is genuinely suitable for beginner woodworkers. If you can measure accurately, drive screws straight, and check for square with a speed square, you have all the skills needed for this project. The build involves no complex joinery — just cutting lumber to length, assembling rectangular frames, and screwing surface boards into place. Start with the pressure-treated pine version (softer, more forgiving wood) and take your time checking square at each stage, and you’ll have a solid result even if it’s your first woodworking project.
Can I add a sink to my DIY potting bench?
Yes — and it’s a wonderful upgrade! The most practical approach is to cut a hole in your work surface sized to fit an inexpensive drop-in utility sink basin ($30–$60 at hardware stores) and connect it to a garden hose for water supply and a simple drain hose that empties into a bucket or garden bed. You don’t need permanent plumbing for a functional potting bench sink — a garden hose connection with a shutoff valve and a gravity drain is perfectly sufficient for rinsing pots, washing hands, and cleaning tools. Plan the sink location and cut-out during the work surface installation stage for the cleanest result.
A Few Final Thoughts
Building your own DIY garden potting bench is one of those projects that delivers on every single promise — it genuinely transforms your gardening experience, it looks beautiful in any outdoor space, and the pride of using something you built yourself adds real joy to every gardening session. Whether you go full cedar with all the features or start simple with pressure-treated pine and basic storage, the result is a dedicated, ergonomic gardening workspace that you’ll reach for every single time you step outside. The skills you build on this project carry directly forward to raised beds, cold frames, compost bins, and every other garden structure you’ll ever want to build. Start with your plan, take your time on the frame, and don’t skip the finish — your potting bench is a piece of garden infrastructure that will serve you for a decade or more with just a little annual care. Now grab that measuring tape and go make it happen!