
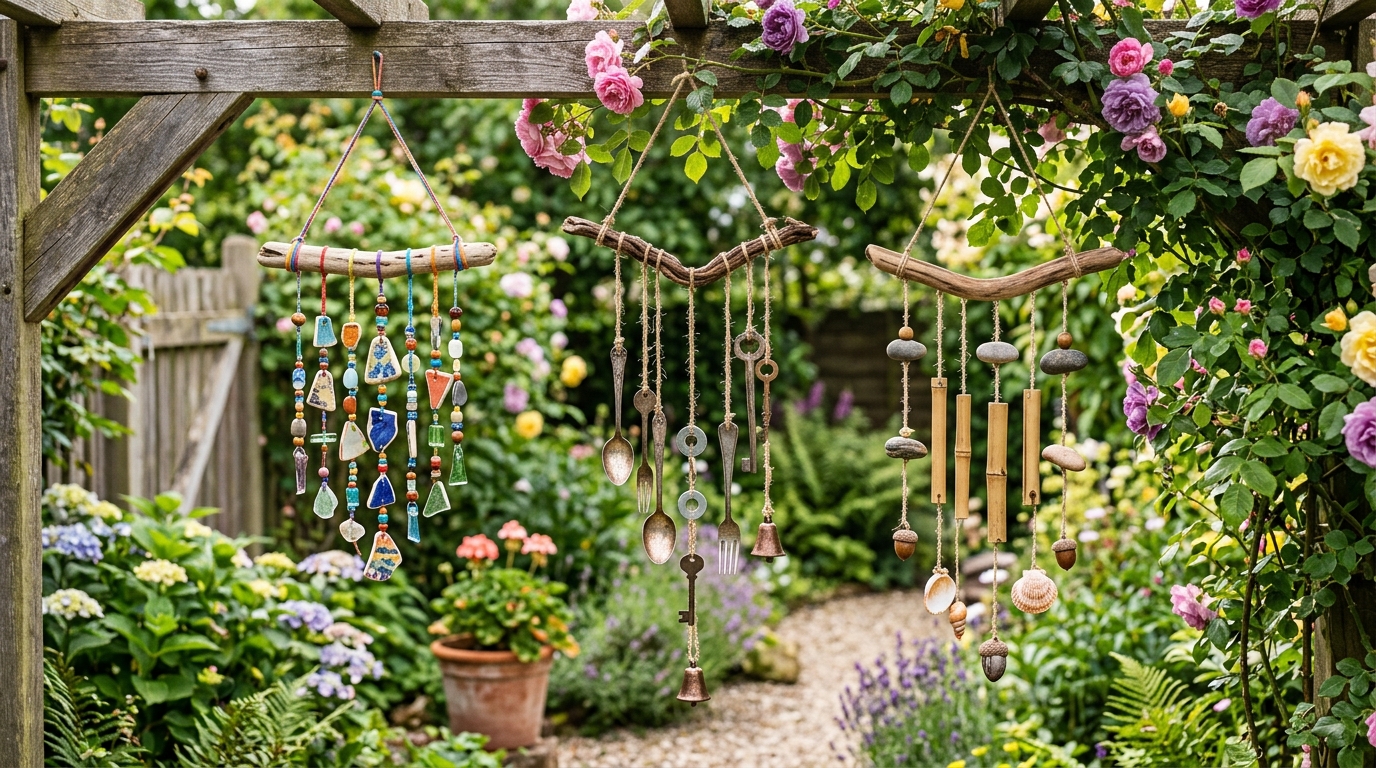
What if your balcony or garden could sing to you every time the breeze rolls through? DIY garden wind chimes are one of the most satisfying craft projects you can add to your urban garden — they’re creative, deeply personal, wildly customizable, and you can make stunning ones from materials you literally already have lying around the house! Whether you’re a total beginner or a seasoned crafter, there’s a wind chime project here that’s perfectly matched to your skill level, your garden aesthetic, and your Saturday afternoon energy. Let’s dive in!
At a Glance
- You can create beautiful DIY garden wind chimes using repurposed materials like old keys, bamboo, terracotta pots, driftwood, and seashells — no special skills required.
- The type of material you choose determines the sound your chime makes, so matching material to your desired tone is the key to a wind chime you’ll genuinely love.
- Most beginner-friendly wind chime projects can be completed in under two hours with basic craft supplies like fishing line, a drill, and strong outdoor-rated glue or twine.
- Hanging placement matters — the right spot maximizes both sound and visual impact while keeping your chime protected from harsh weather damage.
- Personalizing your wind chime with paint, beads, shells, or garden-themed charms transforms a simple craft into a genuine piece of garden art that reflects your unique style.
Why DIY Garden Wind Chimes Belong in Every Urban Garden

Wind chimes aren’t just decorative — they bring your garden to life in a completely unique sensory way. The gentle sound of chimes in a breeze transforms a simple balcony or container garden into a genuine outdoor sanctuary, adding an audio dimension that plants alone simply can’t provide.
Here’s the thing: store-bought wind chimes are fine, but handmade garden wind chimes carry something extra — your energy, your choices, your creativity. They become a real conversation piece and a meaningful part of your garden’s personality.
For urban gardeners especially, a DIY wind chime is a brilliant way to add vertical garden interest without taking up any precious floor or shelf space. Hang them from pergolas, balcony overhangs, tree branches, or even a simple shepherd’s hook in a container. They work in the tiniest of spaces.
💡 Pro Tip: Wind chimes also serve a practical garden purpose — the gentle movement and sound can help deter birds and small animals from picking at your seedlings and container gardens without harming them in any way.
Check out our collection of DIY balcony garden decor ideas for even more creative ways to personalize your outdoor space.
Once you make your first one, you’ll want to make ten more — that’s just how it goes!
Choose Your Materials: What Makes the Best DIY Wind Chime Sound?

The secret is this: sound quality is entirely determined by your material choice, and each option creates a completely different musical personality for your garden space. This is where the real fun begins!
Here’s a breakdown of the most popular DIY wind chime materials and the sounds they produce:
| Material | Sound Quality | Durability Outdoors | Skill Level |
| Bamboo | Soft, mellow, Asian-inspired hollow knock | Excellent (seal with oil) | Beginner |
| Metal pipes/keys | Clear, bright, musical tones | Excellent | Beginner |
| Terracotta | Earthy, gentle, ceramic clink | Good (seal with varnish) | Beginner |
| Seashells | Soft, airy, coastal whisper | Good (may fade) | Beginner |
| Driftwood + beads | Soft, clacking, bohemian | Moderate (seal wood) | Beginner |
| Glass pieces | Bright, delicate, tinkling | Moderate (fragile) | Intermediate |
| Copper pipe | Rich, resonant, musical | Excellent | Intermediate |
Bamboo and metal are the two top picks for most beginners because they’re easy to work with, widely available for free or very cheap, and they hold up beautifully to outdoor weather conditions.
Don’t limit yourself to one material either — some of the most beautiful handmade wind chimes combine two or three different materials for a layered, complex sound that changes subtly with every gust of wind. Pretty cool, right?
Explore the Old House Journal’s guide to wind chime acoustics for a deeper look at how tube length and diameter affect musical pitch.
The right material makes all the difference, so choose what makes your heart sing!
DIY Wind Chimes from Bamboo: The Classic Beginner Project
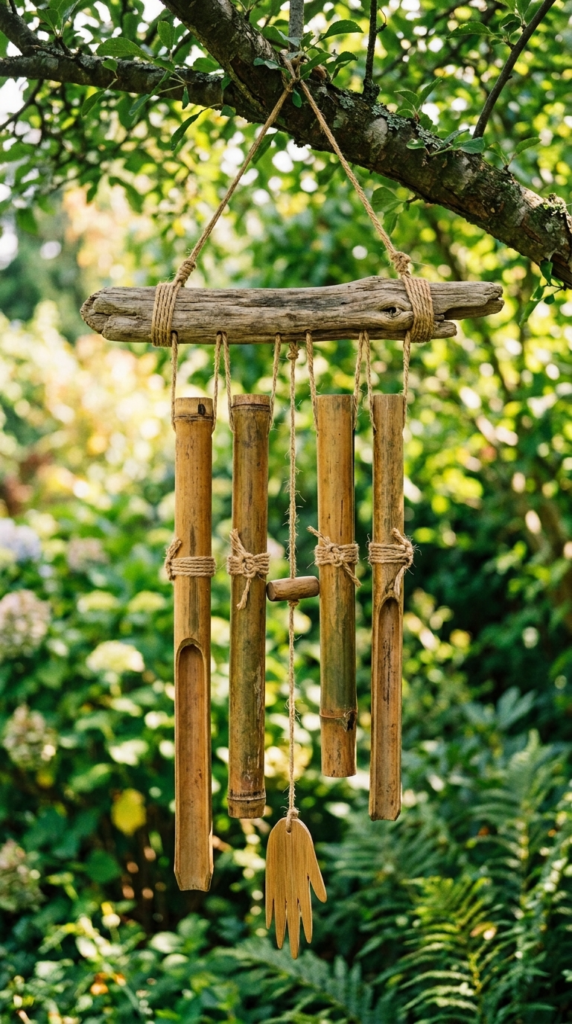
Bamboo wind chimes are the quintessential beginner DIY garden project — they’re forgiving, fast to make, and they produce that gorgeous hollow, meditative knock that instantly evokes a zen garden atmosphere. If you’ve never made a wind chime before, start here!
What you need:
- One bamboo garden stake (the kind sold at any garden center) or actual bamboo cane — cut into 5–7 segments of varying lengths (roughly 10cm to 25cm)
- A driftwood piece, thick branch, or wooden dowel for the top bar (about 30cm long)
- Jute twine, fishing line, or paracord
- A drill with a small bit
- Teak oil or linseed oil for weatherproofing
How to make it:
- Cut your bamboo into graduated lengths — the varying lengths create different pitches, so the more variety the better
- Drill a small hole near the top of each bamboo piece
- Thread your twine through each hole and knot securely
- Tie each bamboo piece to your top bar at slightly different lengths so they swing freely and strike each other
- Add a hanging loop to each end of the top bar
- Finish with a light coat of teak oil on all bamboo pieces to protect against rain and UV
💡 Pro Tip: Before cutting your bamboo, knock two pieces together to test the sound. Thicker-walled bamboo produces a deeper, more resonant knock while thin-walled pieces give a lighter, airier sound — choose based on the tone you want for your garden!
Your beautiful bamboo chime will be ready to hang in under 90 minutes — go for it!
Make Wind Chimes from Old Keys and Silverware
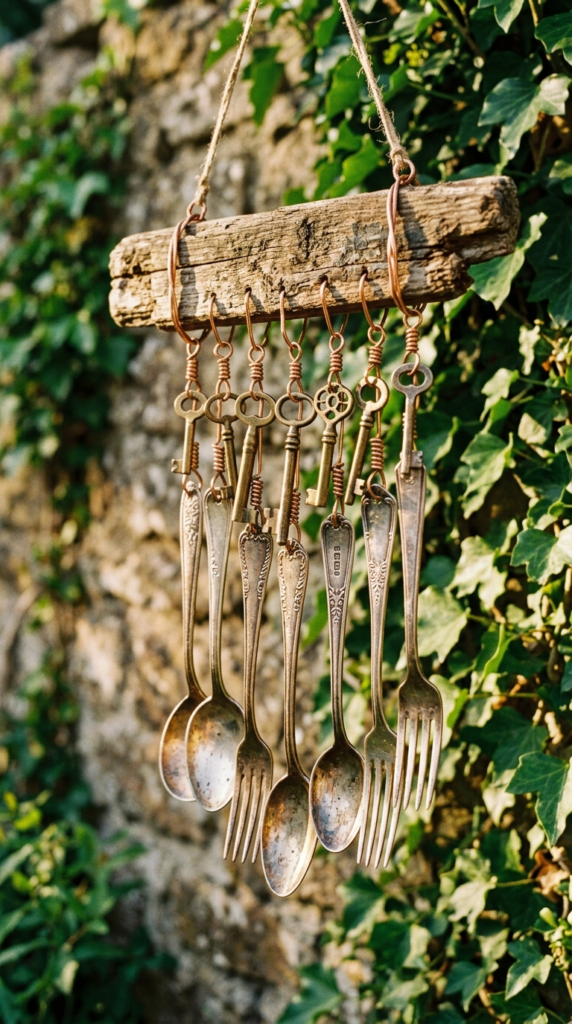
Here’s the deal: your old, unused keys and silverware are literally wind chime gold just waiting to be discovered in a junk drawer or thrift store bin. Metal makes some of the clearest, most musical tones of any chime material, and the mismatched vintage look is absolutely gorgeous in a cottage or bohemian garden aesthetic.
This is one of the most satisfying upcycling projects you can do because you’re giving beautiful old objects a completely new purpose and a new life outdoors.
What you need:
- 8–15 old keys in various sizes (check junk drawers, thrift stores, or ask neighbors!)
- Old spoons, forks, or other silverware — the thinner the metal, the clearer the ring
- A thick branch, copper pipe, or driftwood bar for hanging
- Copper wire or strong fishing line
- Optional: spray paint or metallic paint for a coordinated color scheme
How to make it:
- Lay out your keys and silverware and tap them with another metal piece to test their individual sounds — you’ll immediately hear which ones ring beautifully
- Drill or use existing holes to thread wire or line through each piece
- Attach each piece to your top bar at varying heights, clustering similar sizes together for visual balance
- Bend spoon and fork handles around the bar directly for a secure attachment that also looks stunning
- Add a decorative bead or two between pieces for extra visual interest
The organic variety of shapes and sizes means no two vintage key wind chimes ever look exactly alike — yours will be completely one-of-a-kind!
Terracotta Pot Wind Chimes for Your Garden Aesthetic

If you have a stash of small terracotta pots in your garden shed (and honestly, who doesn’t?), you have everything you need to make one of the most charming and garden-appropriate wind chimes imaginable. Terracotta chimes produce a soft, earthy clink that’s gentle and completely at home in any garden setting.
Small 2-inch or 3-inch terracotta pots work best — they’re lightweight enough to swing freely in a gentle breeze and produce a satisfying sound when they tap together. You can use them plain for a natural rustic look, or paint them for a completely customized garden art piece.
Decoration ideas for your terracotta chime:
- Paint them in a Mediterranean blue and white color scheme for a coastal garden vibe
- Use chalk paint for a matte, vintage farmhouse look that weathers beautifully
- Paint tiny botanical illustrations — leaves, flowers, bees — for a nature-inspired garden art piece
- Apply outdoor Mod Podge over paint to seal and weatherproof your designs
💡 Pro Tip: Hang a small metal washer or pebble inside each terracotta pot as a clapper — the small weight swings inside the pot and creates a clearer, more resonant sound than pots simply knocking against each other from the outside.
Read our full guide to painting terracotta pots for garden decor to level up your decorating skills before you start.
Terracotta chimes are genuinely one of the most adorable garden decor projects out there — you’re going to love how these turn out!
Seashell Wind Chimes: Bring the Beach to Your Balcony
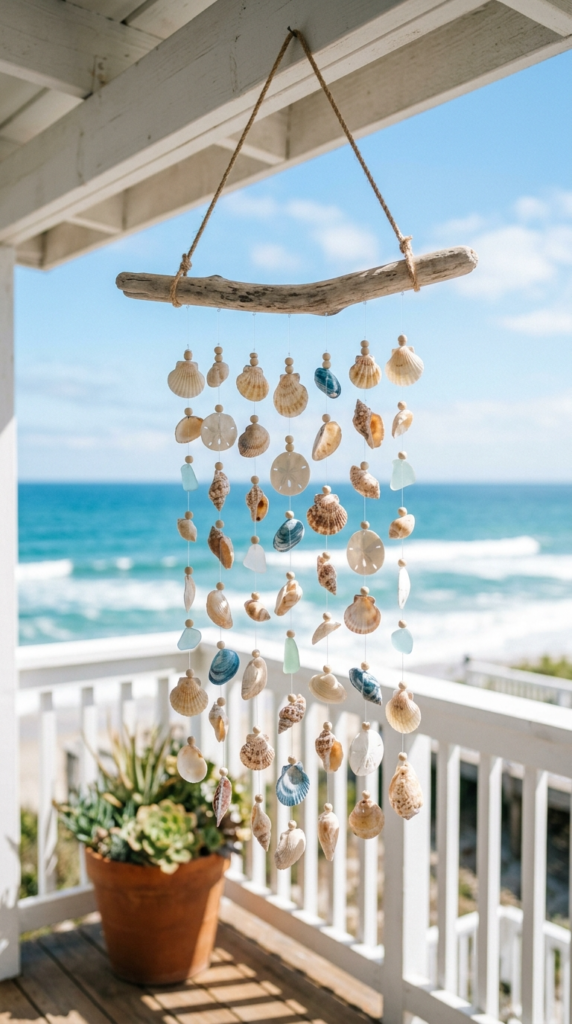
There is something absolutely magical about the soft, whispering sound of seashell wind chimes catching the breeze — they’re gentle, peaceful, and bring a genuine coastal energy to any urban balcony or garden. If you have a collection of shells from beach trips past, this is their moment to shine!
The key to a great seashell chime is using naturally holed shells (look for them at the shoreline where wave action has already drilled holes) or carefully drilling your own holes with a small diamond-tip drill bit. Take your time with drilling — shells are brittle and crack under pressure.
What you need:
- 10–20 shells in a variety of sizes and shapes (variety = better visual layering)
- A smooth piece of bleached driftwood or a painted dowel as the top bar
- Thin clear fishing line or white waxed twine
- Optional: small glass beads, sea glass pieces, and starfish for decoration
Building your seashell chime:
- Arrange your shells on a flat surface first to plan your layout — play with height variation and shape mixing
- Thread fishing line through each shell hole and knot securely below
- Tie individual shell strings to your driftwood bar at slightly different heights
- Add accent beads or sea glass between shells on some strings for extra sparkle and color
- Seal your driftwood top bar with clear outdoor varnish to protect against humidity and rain
The Smithsonian Ocean Portal has beautiful shell identification resources if you want to label your shells as part of a nature-themed garden display. How charming is that?
Hang this on your balcony and close your eyes — pure coastal bliss!
How to Hang Your DIY Wind Chimes for Maximum Sound and Style
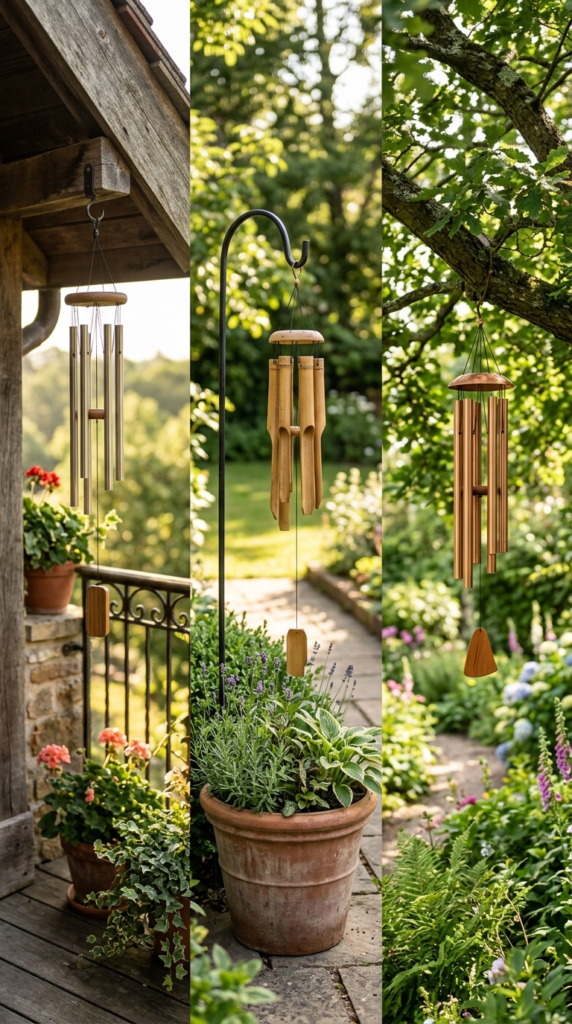
You’ve made a beautiful chime — now hanging it correctly is what determines whether it sings beautifully or just sits there looking pretty without making a sound. Placement is everything with wind chimes!
The golden rule of wind chime placement: you need airflow, but not too much airflow. A spot that catches every gentle breeze will give you that lovely constant soft sound, while a spot exposed to strong, direct wind will create a chaotic, clashing noise that quickly becomes annoying rather than soothing.
Best hanging spots for urban gardens:
- Balcony overhangs or pergola beams — excellent airflow and protected from rain underneath
- Shepherd’s hooks in large container pots — fully mobile and adjustable
- Tree branches in courtyards or ground-floor gardens — natural and beautiful
- Window frame hooks beside open windows — you hear them from inside too!
- Garden arch or trellis tops — adds beautiful vertical visual interest
💡 Pro Tip: The ideal hanging height for most DIY garden wind chimes is just above eye level — this puts the chimes in the most active airflow zone while allowing you to fully appreciate the visual details up close.
Check out our article on vertical garden display ideas for small spaces for more creative ways to add hanging interest to your urban garden.
The right spot makes the difference between a chime that occasionally tinkles and one that sings all day long!
Weatherproofing Your DIY Garden Wind Chimes
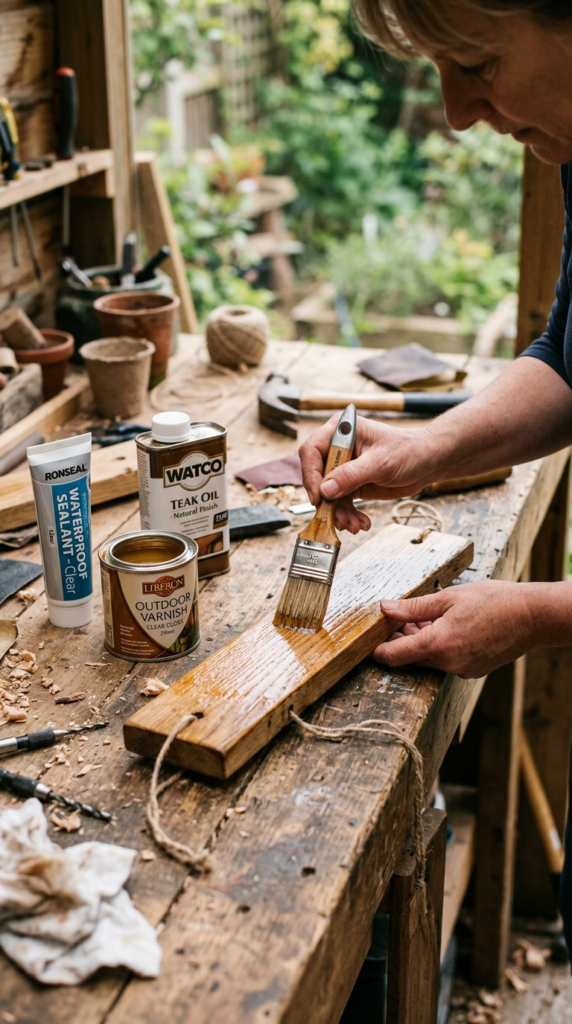
Here’s a step most first-time DIY wind chime makers skip — and then regret when their beautiful creation starts deteriorating after the first rainy season. Weatherproofing your wind chime properly is what separates a chime that lasts one summer from one that looks gorgeous for years.
Different materials need different protection strategies, and spending 20 extra minutes on this step before hanging will save you from complete rebuilds later. Talk about a game-changer for longevity!
Material-by-material weatherproofing guide:
- Bamboo: Apply teak oil or linseed oil annually; bring indoors during harsh winters
- Metal/keys: Apply a clear lacquer spray coat to prevent rust and oxidation
- Terracotta: Seal painted surfaces with outdoor Mod Podge or clear varnish; bring inside during freezing weather as terracotta can crack
- Wood/driftwood: Apply two coats of outdoor sealant or exterior wood varnish
- Rope/twine: Use waxed outdoor twine or UV-resistant fishing line instead of regular string — it lasts dramatically longer
- Shells: A light coat of clear nail polish or outdoor varnish maintains their natural luster and prevents fading
Replace any natural fiber hanging cords with synthetic alternatives for outdoor installations — natural jute looks gorgeous but deteriorates quickly in rain and humidity.
The This Old House DIY & Crafts Guide has excellent advice on outdoor weatherproofing products for mixed-material garden projects.
A little protection goes a very long way — your future self will thank you!
Personalize Your DIY Wind Chimes with Garden-Themed Charms

This is where your DIY garden wind chime goes from handmade craft to genuine personal garden art — and it’s where you get to have the most fun with the whole project! Adding charms, beads, and themed decorations makes your chime completely unique and deeply connected to your garden’s overall personality.
The best part? Most personalization materials are either free (found objects from your garden) or incredibly cheap at any craft store. Here are some ideas that look absolutely stunning:
Garden-themed charm ideas:
- Tiny dried seed heads from your own plants (sunflower, poppy, honesty)
- Small crystals or tumbled stones — rose quartz, clear quartz, or amethyst add beautiful color and catch sunlight gorgeously
- Miniature clay or ceramic plant-themed charms — cacti, succulents, mushrooms
- Painted wooden beads in your garden’s color palette
- Pressed and varnished dried flowers suspended between chime pieces
- Sea glass in greens and blues for a coastal garden vibe
- Mismatched vintage buttons from a sewing tin
💡 Pro Tip: Create a seasonal rotation for your chime decorations — swap in dried autumn leaves and acorns in fall, small ornament balls in winter, and fresh shell or seed-head accents in summer. Your wind chime evolves with your garden all year long!
Browse our roundup of upcycled garden decor ideas from everyday objects for even more creative ways to personalize your outdoor space.
There are genuinely no rules here — let your creativity run completely wild!
Kid-Friendly DIY Wind Chimes for Family Gardens

Making DIY garden wind chimes is one of the absolute best garden craft activities to do with kids — it’s hands-on, immediately rewarding, and teaches them to see everyday objects as creative materials. Plus, children who help create garden decorations are dramatically more interested in spending time in and caring for the garden. Win-win!
For child-friendly wind chime projects, skip anything that requires power tools or sharp edges and lean into safe, colorful, tactile materials that little hands can manage with minimal adult intervention.
Best materials for kid-made wind chimes:
- Large wooden craft beads and shapes (available at any craft store)
- Painted popsicle sticks as clappers
- Air-dry clay shapes they’ve molded and painted themselves — stars, flowers, animals
- Large pasta shapes (yes, really! Painted and varnished, they look surprisingly great)
- Plastic bottle caps painted in bright colors
- Large jingle bells threaded on twine
The activity teaches color theory, fine motor skills, and the satisfying experience of creating something functional from scratch — all while spending quality outdoor time in your garden. Pretty cool, right?
The National Gardening Association’s Kids Garden site has a treasure trove of garden-based craft activities that pair perfectly with a wind chime project.
Making memories in the garden is just as valuable as growing vegetables — cherish every minute of it!
Frequently Asked Questions
What materials make the best sound for DIY garden wind chimes?
Metal materials — including copper pipe, old keys, and silverware — consistently produce the clearest, most musical tones of any wind chime material. Bamboo is the runner-up for a softer, more meditative sound. For the richest musical quality, copper tubing cut to specific lengths produces the closest sound to professionally made wind chimes. That said, the “best” sound is completely subjective — seashells and terracotta produce much softer sounds that many people actually prefer for their gentle, unobtrusive quality.
How long do homemade wind chimes last outdoors?
With proper weatherproofing, a well-made DIY garden wind chime can last 3–5 years or more outdoors. The biggest vulnerability is the hanging cord, which UV light and moisture degrade over time — using UV-resistant fishing line or waxed outdoor twine dramatically extends the life of your chime. Metal pieces may develop a beautiful natural patina with weathering that actually adds to their charm. Bringing your chime inside during winter or severe weather seasons adds years to its lifespan.
Do I need any special tools to make DIY wind chimes?
For most beginner projects, the only tool you really need is a hand drill with a small drill bit for making hanging holes in shells, terracotta, bamboo, and wood. A pair of strong scissors or wire cutters handles most cord and wire work. For metal pipe wind chimes, you’ll need a hacksaw or pipe cutter to size your tubes — these are inexpensive and widely available at hardware stores. Most wind chime projects genuinely require nothing more than what you likely already have in a basic home toolkit.
How do I make my DIY wind chime sound more musical and less random?
The secret to a genuinely musical wind chime is cutting your chime pieces (especially metal or bamboo tubes) to lengths that produce harmonic intervals — notes that sound pleasant together rather than random. A simple approach: cut five bamboo or metal tubes to these relative lengths — 100%, 89%, 79%, 75%, and 67% of your longest piece. This produces a pentatonic scale, which is naturally pleasing to the human ear. The WikiHow Wind Chime Tuning Guide has a helpful calculator for this.
Where is the best place to hang a DIY wind chime on a small balcony?
On a small balcony, the single best location for a DIY garden wind chime is at the corner of your balcony overhang, about 12–18 inches inward from the railing. This position catches cross breezes from multiple directions while the overhang offers some protection from direct heavy rain. Avoid hanging directly above delicate plants, as the movement and occasional strong swinging can damage leaves and stems. A shepherd’s hook planted in a large container is also an excellent option for balconies without overhead hanging points — it’s fully movable and looks absolutely charming.
A Few Final Thoughts
Making DIY garden wind chimes is one of those rare projects that gives you something truly special: a handmade piece of garden art that sounds beautiful, looks unique, and carries a little piece of your creativity every time the wind blows through it. Whether you went the bamboo route, raided your junk drawer for old keys, or painted a set of tiny terracotta pots, you’ve added something to your garden that no store-bought product could ever replicate. The best part is that once you start, you genuinely can’t stop — every interesting stick, shell, or oddly satisfying piece of metal suddenly becomes a potential wind chime component waiting for its big moment! Take what you’ve learned here, gather your materials, and trust your creative instincts. Your handmade garden sanctuary is officially just one afternoon craft session away. Now go make it happen! 🎐