
Does spring arrive in your garden every year and somehow still catch you off guard — the weeds already ahead of you, the bulbs you meant to plant last autumn still in their bag, and that gorgeous border you planned in January still just a sketch on the back of an envelope? You are absolutely not alone — and that’s exactly why this article exists. Timeless seasonal gardening ideas for spring aren’t about doing everything perfectly or following a rigid checklist — they’re about the tried-and-tested, gardener-approved moves that make spring genuinely joyful, productive, and deeply satisfying every single year without fail. Whether you’ve got a grand garden, a city balcony, or a handful of containers on a windowsill, spring is your fresh start and these ideas will make every single moment of it count. Ready to make this your best spring garden yet? Let’s dive in!
At a Glance
- Spring seasonal gardening rewards those who act early — the gardeners who get outside in late February and March, when it still feels cold, consistently have the most beautiful and productive gardens by May and June.
- Soil preparation, feeding, and mulching in early spring set the foundation for everything that grows in your garden for the rest of the year — these unglamorous tasks deliver more return than almost any other spring investment.
- Succession sowing of vegetables, salad leaves, and flowers from March through May gives you a continuous harvest and display rather than a single glut followed by a gap — it’s the single most impactful technique change most home growers can make.
- Dividing overgrown perennials in spring is one of the most cost-free ways to dramatically increase the planting density and visual impact of your borders — one congested clump can become five healthy new plants in twenty minutes.
- Even the smallest urban outdoor space — a balcony, a windowsill, or a doorstep — benefits enormously from a deliberate spring refresh using seasonal bulbs, early flowering plants, and the first fresh herbs of the year.
1. Start Earlier Than Feels Comfortable
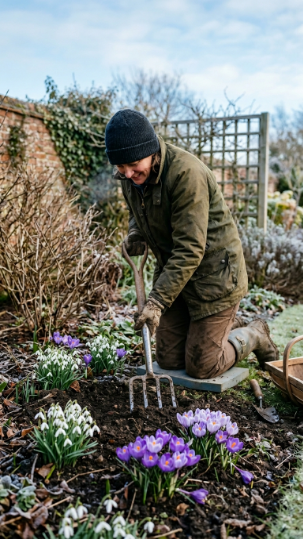
Here’s the deal: the single most impactful spring gardening habit you can develop is getting outside earlier than feels natural — and the gardeners who are already working in late February while everyone else is still waiting for it to feel properly like spring are the ones whose gardens look extraordinary by April.
The truth is that most spring gardening tasks — turning borders, removing winter debris, applying the first feeds, sowing hardy seeds under cover — can and should be done while it still feels wintry. The soil is workable (unless actually frozen), the weeds haven’t surged yet, and working now means your garden is ahead of the season rather than perpetually catching up with it.
Late February to mid-March is the window most gardeners waste by waiting — and it’s arguably the most valuable window in the entire gardening calendar. Get outside in it with purpose and the rest of your spring flows effortlessly from that early foundation.
💡 Pro Tip: The reliable signal that soil is genuinely ready to work is weed germination — when you see the first flush of tiny weed seedlings appearing in your borders, the soil temperature is sufficient for most spring gardening tasks. Nature’s own thermometer is more reliable than the calendar date and more honest than what the weather feels like.
- Late February: clear winter debris, remove dead stems, first feed of lawn and borders
- Early March: turn and prepare beds, sow first hardy seeds under cover, plant onion sets and garlic
- Mid March: first outdoor sowings of hardy vegetables, divide perennials, apply mulch
- Late March: plant summer bulbs, start tender seeds under glass, spring container refresh
Explore our early spring garden tasks — the complete late February to March guide for a week-by-week action plan. The RHS has excellent seasonal timing guides at rhs.org.uk.
Start before it feels like spring and you’ll be rewarded with a garden that looks like spring arrived a month early — the early gardener’s greatest pleasure!
2. Feed Your Soil Before You Feed Your Plants
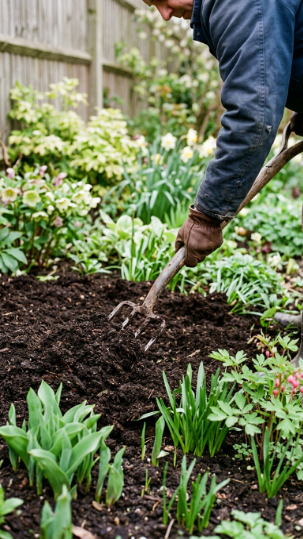
Here’s the thing: every spring, gardeners buy expensive plant food, new plants, and all manner of treatments — when the single most transformative thing they could do for their garden costs almost nothing and takes one afternoon. Feeding your soil with a generous application of well-rotted organic matter in spring is the move that underpins every other gardening success for the rest of the year.
Well-rotted garden compost, leaf mould, or well-rotted manure applied as a 5–7cm top dressing across all your borders in March does extraordinary work — it feeds soil biology, improves drainage in clay soils while improving moisture retention in sandy ones, adds slow-release nutrients, suppresses weed germination, and gives your borders that clean, rich, professional presentation that makes the whole garden look cared for.
The secret is doing it before plants fully emerge — applying compost around dormant or just-emerging perennials is infinitely easier than trying to work it around fully leafed plants later in the season. March is the ideal window: winter has passed, plants are stirring, and the soil is receptive and moist.
Homemade garden compost is the best material — free, brilliantly nutritious, and produced by your garden for your garden. Bagged soil conditioner and well-rotted farmyard manure are excellent alternatives if your compost heap isn’t producing enough volume for your whole garden.
💡 Pro Tip: Apply a dedicated rose and shrub granular feed to all your roses and flowering shrubs immediately after your organic matter application — the granular feed provides the quick-release potassium boost that drives flower production, while the organic matter provides the slow-release biological nutrition that sustains the plant through the whole season. The combination of slow and fast nutrition working together is more effective than either alone.
Read our spring soil feeding guide — organic matter, feeds and timing for compost types, application rates, and feeding schedules for different plant groups.
Feed the soil and the soil feeds everything else — this is the foundation investment that every other spring success builds on!
3. Plant a Spring Bulb Display in Layers
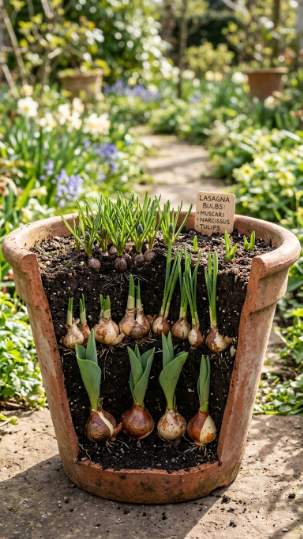
Layered bulb planting — also called lasagna planting — is one of those timeless spring gardening techniques that experienced gardeners swear by and beginners discover with genuine delight, because the results are so far beyond what the effort suggests they should be.
The technique is simple: plant three different bulb types in three layers in the same container or border space, with the largest, latest-flowering bulbs deepest and the smallest, earliest-flowering bulbs shallowest. As one layer finishes flowering, the next layer is already pushing through — giving you weeks of continuous bloom from a single planting.
The classic lasagna combination for a large pot: tulips at 20–25cm deep (your dramatic late spring showpiece), narcissus at 12–15cm (mid-spring fragrance and classic beauty), and grape hyacinth (Muscari) at 5–8cm (early spring blue-purple carpet that bridges winter and spring). All three layers in one large pot give you flowers from February through to May.
For borders, the same principle applies in ground planting — tulips and alliums deep, narcissus mid-depth, Crocus and Scilla shallow. The border that has been lasagna-planted rewards you with a months-long sequence of colour and form that a single-variety planting can never match.
💡 Pro Tip: If you missed the autumn planting window (it happens to everyone), pre-chilled bulbs are available from specialist suppliers in late winter and early spring — these have already received their cold vernalization treatment and will bloom in the current season when planted. They’re not as widely stocked as autumn bulbs but are a brilliant rescue option for spring container displays.
| Bulb Layer | Planting Depth | Flowering Time | Top Picks |
| Bottom (large) | 20–25cm | Late spring | Tulipa, Allium, Camassia |
| Middle | 12–15cm | Mid spring | Narcissus, Hyacinth |
| Top (small) | 5–8cm | Early spring | Muscari, Crocus, Scilla |
Check out our lasagna bulb planting guide for containers and borders for spacing, variety combinations, and pot sizing advice.
Plant in layers this autumn and watch your spring unfold in a continuous, perfectly sequenced floral performance — it’s genuinely one of gardening’s greatest pleasures!
4. Divide and Multiply Your Perennials

Talk about a game-changer — dividing perennials in spring is simultaneously the most cost-free way to multiply your plant stock, the most effective way to rejuvenate plants that have become congested and are flowering less vigorously, and one of the most satisfying quick-win tasks in the entire spring garden calendar.
The principle is beautifully simple: many hardy perennials develop into large clumps over 3–5 years, with the older central portion becoming woody and less productive while vigorous new growth appears at the edges. Dividing the clump — splitting it into several sections and replanting the vigorous outer portions while discarding the spent centre — simultaneously produces multiple new plants and dramatically improves the flowering performance of each one.
Which perennials to divide in spring: Hemerocallis (daylilies), Hostas, ornamental grasses, Rudbeckia, Echinacea, Helenium, Astilbe, Crocosmia, Liriope, and most clump-forming perennials respond brilliantly to spring division. Avoid dividing spring-flowering perennials while they’re in bud or bloom — wait until they finish.
The technique: use two garden forks inserted back-to-back through the centre of the clump and levered apart — this pulls the root mass apart without cutting through roots unnecessarily. For very large, congested clumps, a sharp spade makes the initial divisions before the forks complete the separation into plantable sections.
💡 Pro Tip: Water divided sections well immediately after replanting and keep them consistently moist for the first 2–3 weeks — divided perennials have a temporarily reduced root system and are more vulnerable to drought stress during establishment than undivided plants. A handful of granular slow-release fertiliser worked into the planting hole gives newly divided sections the nutritional boost they need to establish quickly.
Explore our spring perennial division guide — which plants, when, and how for a full list of dividable perennials with individual technique notes.
One congested clump divided gives you five thriving plants for free — spring division is the most generous gift the garden gives back to itself!
5. Start Succession Sowing for Continuous Harvests
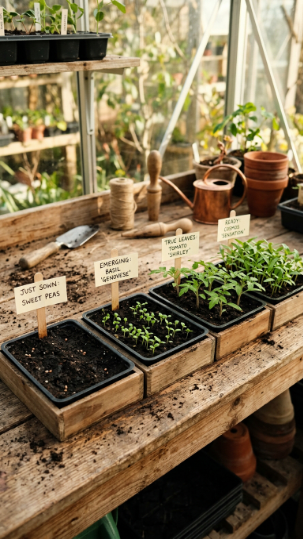
Here’s the deal: succession sowing is the single technique change that transforms a home grower from someone who has a brief glut followed by nothing to someone who has fresh harvests continuously from spring through to autumn — and it’s brilliantly simple once you make it a deliberate habit.
The principle: instead of sowing your entire packet of lettuce, radishes, or spinach in one go, sow small amounts every 2–3 weeks from March through to July. As one sowing reaches harvest size, the next is maturing, and the one after that is germinating. You’re never without fresh produce and never overwhelmed by more than you can eat.
The best crops for succession sowing are fast-turnaround vegetables and salads — lettuce, rocket, spinach, radishes, spring onions, pak choi, and coriander all go from seed to harvest in 4–8 weeks and respond beautifully to the succession approach. Beans, courgettes, and sweet corn are worth staggering in two or three batches for a longer harvesting season rather than a concentrated glut.
For flowers, succession sowing of Nigella, Calendula, Nasturtium, Cosmos, and Cornflowers from March through May gives you a continuous display of fresh blooms right through summer — far longer than a single sowing provides.
💡 Pro Tip: Keep a succession sowing diary — even just a simple note in your phone recording what you sowed and on what date. After one full season, this diary tells you exactly how long each crop takes from your specific garden conditions (which varies from the packet guidance) and gives you a precise succession schedule tailored to your own plot. It’s the kind of personalised gardening knowledge that no book or website can provide.
Read our complete succession sowing guide for vegetables and flowers for crop-specific sowing intervals and quantities per sowing.
Succession sowing turns your kitchen garden from a seasonal event into a continuous, living larder — master it and you’ll never have a week without fresh homegrown produce again!
6. Refresh Your Spring Containers and Window Boxes
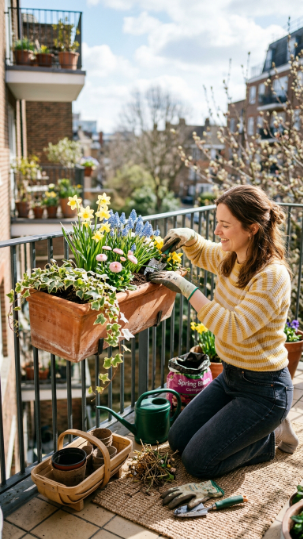
Refreshing your containers and window boxes for spring is one of the most immediately rewarding gardening tasks of the year — the transformation from a tired winter display to a vivid, fragrant spring planting takes less than an hour and changes how your whole outdoor space looks and feels overnight. Pretty cool, right?
The spring container formula that consistently produces the most beautiful results is the same thriller-filler-spiller approach applied to seasonal planting: one tall structural plant as the thriller (a potted Narcissus variety, a small Fritillaria, or a compact standard Viburnum), two or three colorful fillers (Wallflowers for fragrance and vivid color, Bellis daisies for cheerful informality, Primroses for early reliable color, Violas for longevity), and trailing ivy or Aubrieta as the spiller to cascade beautifully over the container edge.
Soil refresh matters — don’t just plant into the old winter compost. Replace at least the top 10cm of compost in your containers with fresh multi-purpose compost mixed with a handful of slow-release granular fertiliser. Old, compacted, nutrient-depleted compost from the previous season produces noticeably poorer results than fresh growing medium.
For window boxes on balconies, the spring refresh is also the perfect opportunity to check the integrity of fixings and brackets — winter weather stresses fastenings, and a check of every bracket and fixing before adding the weight of fresh compost and plants is a basic safety step that shouldn’t be overlooked.
💡 Pro Tip: Buy spring container plants in bud rather than in full flower wherever possible — plants purchased in bud give you the maximum number of flowering weeks, while plants already in full bloom at the garden centre have already used up a significant portion of their display potential. Patience at the point of purchase pays back directly in weeks of additional garden colour.
Explore our spring container and window box refresh guide for plant combinations, compost recipes, and feeding schedules.
A freshly planted spring container is one of the most cheerful sights in any garden — and the twenty minutes it takes to create it rewards you every single morning for months!
7. Sow a Wildflower Patch From Scratch
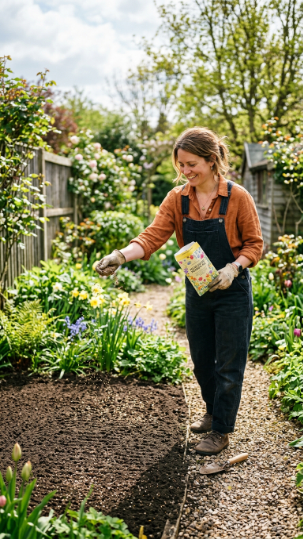
Here’s the thing: a wildflower patch is one of the most rewarding, most ecologically valuable, and — once established — most beautifully low-maintenance spring gardening projects you can start, and spring is the perfect time to begin one from scratch. The results are genuinely extraordinary and the investment of effort is remarkably small.
Spring-sown annual wildflower mixes establish beautifully from a March or April direct sowing and produce an extraordinary show from June through September in the very first year — no waiting, no establishment period, just an explosion of colour, fragrance, and pollinator activity from a single afternoon’s work.
The critical preparation step that most beginners skip: wildflowers need poor, nutrient-depleted soil to perform well. On rich garden soil, vigorous grass and weed growth outcompetes the wildflowers before they establish. Remove the topsoil from your wildflower patch (or use it elsewhere where you need fertility), expose the poorer subsoil beneath, rake to a fine tilth, and your wildflower seeds have the low-competition start they need.
Annual mix recommendations for first-year impact: look for mixes containing Cornflowers, Poppies, Corn Chamomile, Corncockle, Larkspur, and Phacelia — these are the fastest-establishing, most vivid annual wildflowers and they create a genuinely breathtaking display in the first season.
Perennial wildflower mixes take longer to establish (typically 2 years to peak performance) but create a permanent, self-sustaining display that requires only one annual cut — invest in these for a long-term naturalistic area.
| Wildflower Type | First Year Show | Maintenance | Best For |
| Annual mix | Excellent | Re-sow each spring | Immediate impact |
| Perennial mix | Modest | One cut per year | Long-term naturalising |
| Annual + perennial blend | Good first year, better every year | One cut per year | Best of both |
| Native meadow turf | Immediate | One to two cuts | Quick establishment |
Read our sowing a wildflower patch from scratch — the beginner’s spring guide for ground preparation, seed rates, and mix recommendations. Plantlife has brilliant native wildflower resources at plantlife.org.uk.
A wildflower patch started this spring will be buzzing with bees, alive with butterflies, and genuinely breathtaking by July — few spring gardening investments deliver such spectacular returns for so little effort!
8. Give Your Lawn Its Spring Renovation
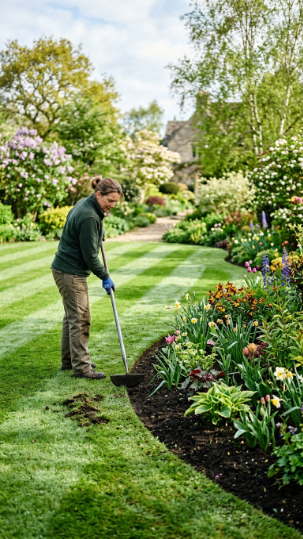
Spring lawn renovation is one of those gardening tasks that feels almost disproportionately rewarding — because a beautifully presented lawn frames everything else in the garden, and the difference between a neglected winter lawn and a properly spring-renovated one transforms the entire garden’s appearance.
The spring lawn renovation sequence (done in this order for best results):
Step 1 — First mow of the year (late February to early March when grass is actively growing): set the mower blade high — 4–5cm — for the first cut of the season. Scalping a lawn that has been growing unchecked through winter causes stress and encourages moss. High first cuts, gradually lowering over successive weeks, ease the lawn back into mown condition.
Step 2 — Scarify: rake out the accumulated thatch (dead grass and moss from the winter) using a spring-tine rake or powered scarifier. This looks alarming — the lawn looks devastated after a thorough scarification — but it’s essential for long-term lawn health and the grass recovers rapidly with the right aftercare.
Step 3 — Edge all borders: recut all lawn edges with a half-moon edging iron and trim all edges with long-handled shears or an edge trimmer. Crisp, precise edges make a moderate lawn look excellent and an excellent lawn look extraordinary.
Step 4 — Feed: apply a spring/summer lawn fertiliser (high nitrogen for green growth) in March–April. Granular slow-release fertilisers are the most practical for home gardeners — they feed evenly and don’t require watering in if rain is forecast.
💡 Pro Tip: Oversow bare patches immediately after renovation — bare lawn areas are most successfully repaired in spring when soil temperature is rising and moisture is consistent. Scratch the bare area lightly with a rake, apply fresh lawn seed at the recommended rate, cover lightly with a fine sieved compost, and keep consistently moist until the new grass is established. Spring-repaired patches are indistinguishable from the surrounding lawn by June.
Explore our complete spring lawn renovation guide — mowing, scarifying, feeding and repair for a month-by-month lawn care schedule from February through May.
A spring-renovated lawn is the canvas your whole garden is painted on — invest an afternoon in it and watch the entire garden look more beautiful as a result!
9. Plant a Cutting Garden for Summer Blooms
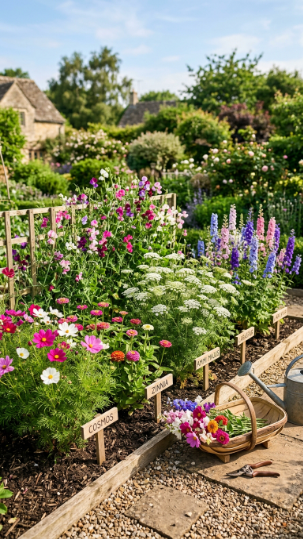
Here’s the deal: a dedicated cutting garden is one of the most joyful spring gardening projects you can start — and the extraordinary thing is that you can establish a cutting garden from scratch in spring that will fill your home with beautiful, homegrown flowers from June right through to October. The investment of one spring afternoon pays back in weekly armfuls of fresh-cut blooms for months.
The cutting garden approach is different from a display border — you’re growing flowers specifically for cutting rather than for in-situ garden display, which means you can grow them in practical rows (easier to tend, harvest, and succession sow) rather than the aesthetically arranged combinations of a border design.
The best cutting garden flowers to start from seed in spring:
Cosmos bipinnatus — feathery foliage and silky flowers in white, pink, and crimson from July onwards, flowers more prolifically the more you cut. Sweet peas (Lathyrus odoratus) — the most fragrant cut flower available, starting from March indoor sowing for outdoor planting in May. Ammi majus — the florist’s Queen Anne’s Lace, extraordinary white umbel flowers that make every arrangement look professional. Zinnia — vivid, long-lasting, heat-loving summer cut flowers in every colour imaginable. Larkspur — elegant tall spikes in blue, pink, and white that add height to any arrangement.
💡 Pro Tip: Pinch out the growing tip of your Cosmos seedlings when they reach 20–25cm — removing the central growing tip encourages the plant to branch from the base, producing 4–6 flowering stems rather than the single main stem of an unpinched plant. This single act can triple the number of flowers your Cosmos plants produce over the season. Do the same with sweet peas when they reach 10cm.
Check out our starting a cutting garden from scratch — the spring guide for seed sources, bed layout, and a succession sowing calendar for continuous blooms. The website Floret Flowers at floretflowers.com has extraordinarily good cutting garden resources.
A cutting garden started this spring gives you a summer full of flowers for your home that no florist can match for freshness, variety, or the deep satisfaction of having grown them yourself!
10. Install a Water Butt and Start Harvesting Rain

Installing a water butt in spring — before the dry months arrive — is one of those practical gardening moves that gardeners always mean to do and those who have done it wonder how they ever managed without it. The water it captures is free, naturally soft, slightly acidic, and at ambient temperature — better for plants in almost every way than tap water, and available right where you need it without a hose run.
A standard 210-litre water butt connected to a house, shed, or greenhouse downpipe fills in a single moderate rainfall event and can supply a small to medium garden through several weeks of dry weather. Two or three water butts connected in series (with an overflow from one feeding the top of the next) creates meaningful storage capacity even for larger gardens.
Spring is the ideal installation time — the wet winter has just passed, you’re about to move into the drier, higher-demand months, and fitting a water butt now means you capture every drop from spring rain showers rather than starting to think about it when the first hosepipe ban is announced in July.
For balconies and small urban spaces, compact slimline water butts (200–250 litres in a 30–40cm depth profile) are designed to fit against walls in confined spaces and connect easily to standard downpipes — they’re a brilliant solution for apartment balconies where water access is limited.
💡 Pro Tip: Fit your water butt on a raised platform or purpose-built stand (even 30–40cm high) — this raises the tap above the height of a standard watering can, making filling effortless and preventing the awkward angling and spillage that comes from trying to fill a can from a tap at ground level. Raise it on the first day and you’ll appreciate that decision every single time you use it.
Read our installing a water butt — the complete spring guide for beginners for connection types, positioning, and maintenance advice.
A water butt is the most quietly useful spring gardening investment available — install it now and it will save you money, save your plants, and make your garden greener in every sense of the word!
11. Plant a Fragrant Spring Herb Pot
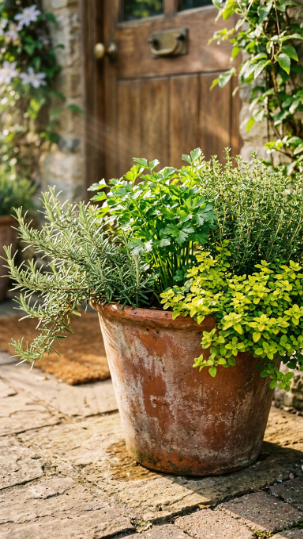
A beautifully planted spring herb pot is the garden project that delivers every single day — not just a visual pleasure but a genuinely functional, fragrant, kitchen-useful display that pays back in fresh flavour every time you cook. And spring is the perfect time to plant one, giving herbs time to establish before the peak cooking and entertaining season of summer.
The herb pot formula that looks best and functions most practically combines herbs with complementary growing requirements — pairing moisture-loving herbs like basil and parsley separately from drought-tolerant Mediterranean herbs like rosemary, thyme, and oregano. Mixing the two groups in one pot means you’ll inevitably either drown the drought-tolerant ones or stress the moisture-lovers.
The Mediterranean herb pot (for a sunny, well-drained position): trailing rosemary as your thriller, upright thyme and sage as fillers in two or three varieties for color contrast (purple sage, golden thyme, common thyme), and creeping golden marjoram as a beautiful trailing spiller. This combination is drought-tolerant, frost-hardy, evergreen, and incredibly beautiful as well as useful.
The leafy herb pot (for a partially shaded position with consistent moisture): flat-leaf parsley as the centre, curly parsley for contrast, French tarragon for that anise-flavoured elegance, and trailing Greek basil (much hardier than standard sweet basil) around the edges. Keep this pot consistently moist and feed fortnightly through summer.
💡 Pro Tip: Harvest herbs regularly and boldly from spring onwards — the biggest mistake herb growers make is being too timid about harvesting. Regular harvesting stimulates bushy, productive growth. Neglected herbs that are never cut become leggy, woody, and far less productive. Pick regularly, pick generously, and your herbs will reward you with abundant fresh growth all season long.
Explore our planting a spring herb pot — varieties, combinations and care guide for pot sizing, compost mixes, and feeding schedules for every herb type.
A well-planted herb pot on your doorstep is the most practical and beautiful small spring gardening investment you can make — it makes every meal better and every morning more fragrant!
12. Create a Wildlife-Friendly Spring Border
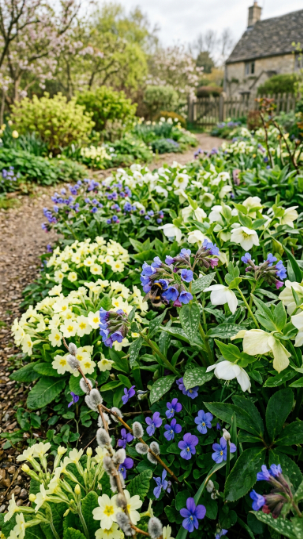
Here’s the thing: a wildlife-friendly spring border isn’t a compromise or a sacrifice of beauty for ecology — the plants that pollinators and beneficial insects find most attractive in spring are some of the most beautiful plants in the entire spring garden palette, and planting for wildlife simply means making choices that serve both beauty and biodiversity simultaneously.
Spring is the most critical season for supporting pollinators — bumblebee queens emerging from hibernation in February and March desperately need early nectar sources while their colonies are at their most vulnerable. A border with nothing in flower in early spring is a genuine gap in the food chain for these vital insects.
The best early spring pollinator plants: Pulmonaria (Lungwort) — produces blue, pink, and white tubular flowers from February to April that bumblebees adore. Hellebores — one of the very earliest flowering plants, blooming from December onwards and providing nectar through the late winter and early spring hunger gap. Flowering currant (Ribes sanguineum) — a shrub that produces dangling pink flower clusters in March beloved by early bees. Native Primrose (Primula vulgaris) — one of the most important early pollinator plants in British gardens, providing accessible nectar from February onwards.
💡 Pro Tip: Avoid double-flowered cultivars of spring plants for your wildlife border — the extra petals of double flowers look beautiful to us but make nectar and pollen inaccessible to most insects. Single-flowered forms of the same plants (single Hellebores, single Primroses, single Anemones) provide the same visual impact while being fully functional as pollinator food sources.
Read our creating a wildlife-friendly spring border — plants and design guide for a month-by-month flowering sequence plant list. The Bumblebee Conservation Trust has brilliant pollinator garden resources at bumblebeeconservation.org.
A wildlife-friendly spring border brings your garden genuinely alive in the truest sense — the buzz of bees and the flash of early butterflies is one of the most joyful sounds and sights in the spring garden!
13. Set Up a Composting System
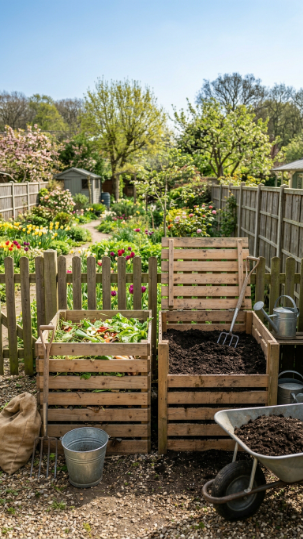
Setting up a composting system in spring is the gardening infrastructure investment that pays back more generously than almost anything else you’ll ever do — because good garden compost is simultaneously the best soil improver, the best mulch, the best plant feed, and the best approach to garden waste management available, and it costs absolutely nothing to produce.
Spring is the ideal time to start composting — you have an abundance of green material (lawn clippings from the first mows, the soft spring growth removed during border clearance, the spent winter plants from your container refresh) to get a new heap activating quickly, and you’re about to enter the peak production months of the growing season.
The two-bin system is the most practical home composting setup: one bin actively receiving fresh material throughout the growing season, a second bin containing the previous season’s material finishing its decomposition undisturbed. When the second bin’s contents are ready (dark, crumbly, earthy-smelling), you empty it onto the garden and use the now-empty bin to start receiving fresh material while the first bin finishes.
The secret to fast, good compost is the carbon to nitrogen ratio — commonly called “browns and greens.” Greens (fresh grass clippings, kitchen fruit and vegetable waste, soft young plant material) provide nitrogen. Browns (cardboard, dry leaves, straw, paper bags) provide carbon. An approximately equal mixture by volume of the two produces compost far faster than either alone.
💡 Pro Tip: Shred or chop all compost materials before adding them — a leaf shredder or simply cutting material with shears into 5–10cm pieces dramatically accelerates decomposition by increasing the surface area available to soil organisms. Whole branches, entire cabbage plants, and unshredded cardboard take months longer to break down than the same material chopped small.
Explore our setting up a two-bin composting system from scratch for bin construction, material ratios, and troubleshooting common composting problems.
A composting system started this spring will be producing the most valuable material in your garden by autumn — it’s the infrastructure investment with the longest and most compounding return!
14. Plan and Plant a Productive Spring Raised Bed
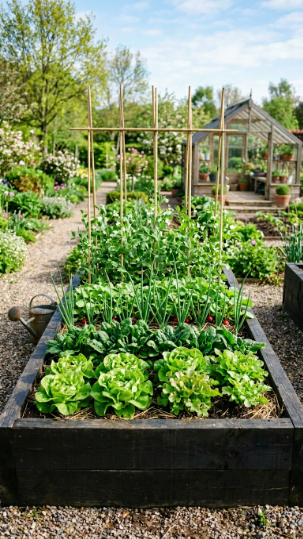
A productive spring raised bed is one of those gardening investments that changes your relationship with your garden permanently — once you’ve grown your own food in a raised bed that you planned, built, and planted yourself, the combination of creative satisfaction and practical reward makes it one of the year’s most anticipated spring rituals.
Raised beds warm up faster than ground-level soil in spring — the improved drainage and the exposure of the bed sides to sunlight means raised bed soil can be sowing-ready 2–3 weeks ahead of surrounding ground, giving you a genuine head start on the growing season that compounds into significantly earlier and more abundant harvests.
The spring raised bed plant list for maximum variety and continuous harvest: lettuce and salad mix (cut-and-come-again at the front), spring onions (sow densely, harvest progressively), radishes (fastest crop available — 3–4 weeks from seed to harvest), spinach or chard for bulk leaf harvest, early peas on a bamboo trellis at the north end (so they don’t shade other crops), and a row of hardy herbs (flat-leaf parsley, chives) at the bed’s edge for constant kitchen use.
Spacing for raised beds can be significantly denser than ground-level spacing recommendations — the improved soil and fertility of a raised bed allows plants to be grown at approximately 70% of standard spacing, dramatically increasing yield per square metre while maintaining individual plant health.
💡 Pro Tip: Label everything you sow immediately — even if you’re certain you’ll remember what’s in each row, you won’t by week three when all the seedlings look similar and the garden is in full swing. Use weatherproof labels and a permanent marker rather than pencil on wooden sticks, and include both the variety name and the sowing date — the date is invaluable for succession planning and for knowing when to expect harvest.
Check out our planning and planting a productive spring raised bed for bed layout templates, spacing charts, and a spring harvest timeline.
A well-planted spring raised bed delivers some of the greatest pleasures in all of gardening — the first radish pulled, the first salad cut, the first peas eaten warm from the pod. Start yours this spring and experience it for yourself!
15. Prune and Train Your Climbing Plants
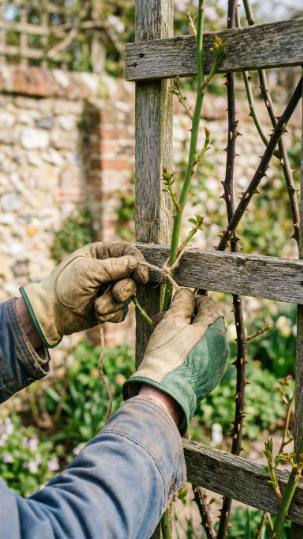
Here’s the deal: spring is the critical moment for pruning and training climbing plants — the window between winter dormancy ending and the spring flush of growth beginning is when climbing roses, Clematis, and wall-trained shrubs are most receptive to pruning, most legible in their structure (no leaves to obscure the framework), and most capable of directing their energy into the trained framework you want rather than into random, untrained growth.
Climbing roses pruned and trained in early spring (February–March) produce dramatically more flowers than unpruned ones — removing the previous year’s flowered stems back to two or three buds, keeping the strongest new canes, and training them as horizontally as possible (horizontal canes produce more flowering side shoots than vertical ones) is the foundation of spectacular rose performance.
Clematis requires understanding which pruning group your plant belongs to — Group 1 (early flowering on old wood) needs minimal pruning, Group 2 (large-flowered, flowering on old and new wood) needs light pruning in early spring, and Group 3 (late summer flowering on current season’s growth) needs hard pruning to 30cm in late February. Pruning the wrong group incorrectly removes all the season’s flowers.
Wall shrubs like Ceanothus, Pyracantha, and Garrya all benefit from spring tying-in of new growth before it becomes woody — flexible young stems can be trained to any direction; older woody stems cannot be repositioned without risk of snapping.
💡 Pro Tip: When training climbing roses, use soft jute twine rather than wire ties or plastic clips — jute is biodegradable, expands gently as stems thicken, and leaves no permanent marks on the cane. Loop it in a figure-of-eight between the cane and the support to prevent chafing, and the cane will grow against its support naturally over the season. Replace jute ties every 2–3 years as they biodegrade.
Read our spring pruning and training guide for climbing plants for Clematis group identification, rose training diagrams, and wall shrub pruning schedules.
A climbing plant well pruned and trained in spring is an architectural, flowering masterpiece by midsummer — invest the hour now and admire the results for months!
16. Design a Spring Sensory Corner

A spring sensory corner — a deliberately designed small area of the garden dedicated to fragrance, texture, sound, and the multi-sensory experience of spring — is one of the most personally rewarding gardening ideas in this entire article, and one that most gardeners never think to create deliberately even though instinctively they know exactly what they want from their garden on a warm April afternoon.
The concept is simple: choose the most sheltered, sunniest corner of your garden, install a simple seat, and plant the surrounding space exclusively with the most fragrant and sensory-rich spring plants you can find. Create a reason to sit there, and then plant reasons to never want to leave.
The spring fragrance plant list that delivers the most extraordinary sensory experience: Viburnum carlesii for a spiced clove fragrance so powerful it perfumes an entire garden from a single plant. Hyacinths in a cluster of pots for that sweet, heady, unmistakeable spring fragrance. Lily of the Valley (Convallaria majalis) in a shaded corner for the most elegant of all spring fragrances. Daphne for a citrus-rose scent of extraordinary intensity. Sweet Violets (Viola odorata) carpeting the ground with purple and white flowers and a gentle sweet perfume at ankle height.
💡 Pro Tip: Plant your most fragrant spring plants on the south or west side of your seating area — the prevailing breeze in most UK gardens comes from the south-west, and fragrance carried on a gentle breeze toward you as you sit is a profoundly different sensory experience from fragrance you have to lean into a plant to encounter. Let the garden bring the scent to you.
Explore our designing a spring sensory garden corner — plants and layout guide for fragrance planting combinations and seating area integration.
A spring sensory corner is the garden space that makes you stop, breathe deeply, and feel genuinely grateful for the season — create it this spring and it becomes the most loved spot in your entire outdoor world!
Frequently Asked Questions
When is the best time to start spring gardening tasks?
The honest answer is earlier than most people think — late February to early March is when the most valuable spring gardening work happens, even though it doesn’t yet feel like spring. The reliable signals to look for are: soil temperature above 7°C (check with an inexpensive soil thermometer), the first flush of weed seedlings appearing in your borders, and snowdrops in flower. These three indicators together confirm that the soil is biologically active and ready for spring work, regardless of what the calendar or the air temperature suggests.
What are the most important spring gardening jobs if I only have limited time?
If time is genuinely limited, prioritise in this order: soil feeding and mulching first (the foundation that everything else benefits from), followed by lawn edging and renovation (the single highest-impact visual improvement per hour invested), then container refresh with spring plants (the most immediately transformative). Everything else — succession sowing, wildlife planting, sensory corners — is the enriching layer on top of that foundation. Even two or three focused spring mornings spent on soil, lawn, and containers will produce a garden that looks consistently beautiful through the whole season.
How do I know if my soil is ready to work in spring?
The simple squeeze test: take a handful of soil and squeeze it firmly in your fist. Open your hand — if the soil falls apart easily when you tap it, it’s ready to work. If it holds its shape as a sticky, compacted ball and smears when rubbed, it’s still too wet and working it now will damage its structure. Attempting to dig, fork, or plant into waterlogged spring soil compacts the air spaces that plant roots need, and the damage can persist for an entire growing season. Patience with a wet spring soil pays back directly in better plant performance throughout the year.
What spring bulbs can I still plant if I missed the autumn planting window?
Don’t despair — several options remain available in spring. Pre-chilled tulip and hyacinth bulbs from specialist online suppliers can be planted in pots in late winter and will bloom in the current season. Pot-grown spring bulbs (already in growth or even in early bud) are available from garden centres from February and provide immediate spring colour when planted into containers or borders. Summer-flowering bulbs including Dahlias, Gladioli, Crocosmia, and Lilies are all planted in spring (March to May) rather than autumn — so spring is actually the correct planting season for these and there’s no catching up required.
How can I make my spring garden more wildlife-friendly without sacrificing beauty?
The key insight is that wildlife-friendly and beautiful aren’t opposing goals in spring — they’re almost entirely the same goal. Choose single-flowered over double-flowered varieties (more accessible nectar and pollen), include native species alongside garden cultivars (Primrose, Bluebell, native Violet, wild Garlic in appropriate positions), avoid pesticide use particularly in spring when pollinators are most vulnerable and most active, leave some leaf litter and bare soil patches for ground-nesting bees and overwintering insects, and install a simple wildlife pond or even a container pond — the single most impactful wildlife-friendly addition any spring garden can have.
A Few Final Thoughts
Timeless seasonal gardening ideas for spring are timeless precisely because they work every single year, in every kind of garden, for every level of experience — the principles of starting early, feeding soil generously, planting thoughtfully, and creating spaces that genuinely reward time spent in them are as true today as they were in every great gardening generation before ours. Whether you act on just one idea from this article — finally setting up that compost bin, planting your first succession-sown row of salad, creating a fragrant sensory corner just for you — or you embrace the whole spring gardening calendar with both hands, the garden will reward every single investment of time, thought, and care with something extraordinary in return. Spring is gardening’s greatest gift — an annual fresh start, a clean slate, a riot of possibility in every bed and border and container. Now go make it happen! 🌿