
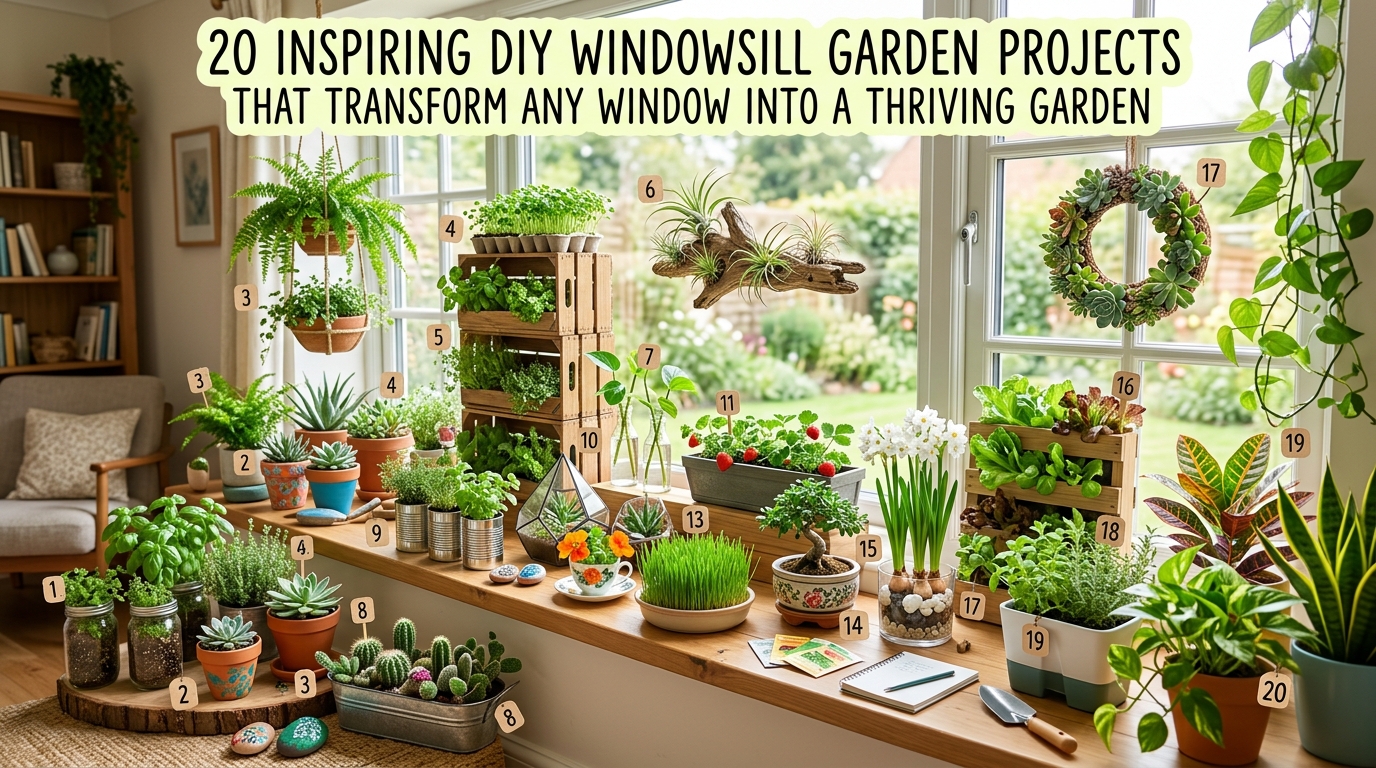
Is your windowsill doing absolutely nothing except collecting dust and the occasional dead fly? That south-facing ledge, that sunny kitchen window, that bathroom sill catching morning light — every single one of them is a completely untapped growing and styling opportunity that most people walk past every day without a second thought. DIY windowsill garden projects can transform the most ordinary window into a thriving herb garden, a lush tropical display, a productive microgreen station, or a sculptural succulent collection — and the results are genuinely stunning whether you have a wide Victorian sill or a slim modern ledge barely five centimeters deep. The secret is matching the right project to the right window and building it with enough intentionality that it looks designed rather than accidental. Ready to find out?
At a Glance
- Every window orientation offers different growing opportunities — south and west-facing sills suit herbs, succulents, and fruiting plants; north and east-facing windows work beautifully for ferns, trailing plants, and moisture-loving tropicals.
- DIY windowsill gardens can be built at every skill level — from a simple painted pot collection to a fully plumbed hydroponic herb wall.
- Narrow sills are not a barrier — wall-mounted brackets, magnetic containers, tension rod systems, and hanging solutions all multiply usable space dramatically.
- Most projects need only basic tools, a weekend afternoon, and a modest material budget — the creative vision does far more work than the spend.
- A well-designed windowsill garden improves air quality, adds genuine living beauty to your interior, and — in the case of herbs and microgreens — genuinely improves what you cook and eat every day.
1. Build a Classic DIY Painted Terracotta Herb Window Garden
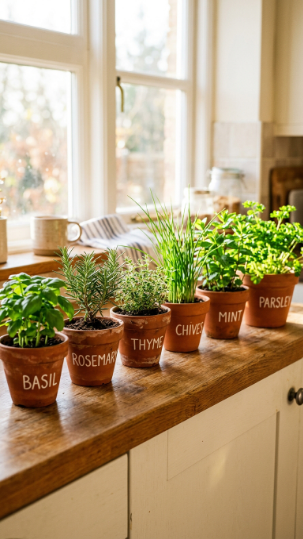
The classic DIY painted terracotta herb windowsill is the project that started a thousand kitchen gardens — and it earns its timeless popularity because it looks beautiful, costs almost nothing, performs brilliantly, and genuinely changes how you cook. Six pots, six herbs, six simple painted names — it’s as simple as that, and as satisfying as anything in home gardening.
Paint each pot with one coat of chalk paint in a warm white before adding the herb name in simple hand lettering using a fine brush and outdoor acrylic paint — the name on each pot is functional, beautiful, and adds a personalized artisanal quality that store-bought labeled pots never achieve. Seal with exterior matte varnish for longevity.
The secret to a herb windowsill that actually performs is giving each herb its own individual pot rather than planting them together — mint especially will take over any shared container it’s placed in, and individual pots allow you to remove, replace, and harvest each herb independently without disturbing the whole display.
🌿 Pro Tip: Position your most-used herbs closest to the kitchen — basil near the stove, chives beside the chopping board — rather than organizing by height or color. A herb garden you interact with daily is infinitely more satisfying than one you admire from a distance.
Explore herb display ideas in our indoor kitchen garden setup guide.
Gardeners’ World covers windowsill herb growing for kitchen gardens with variety and care guidance.
Paint your pots this afternoon and plant your herbs tonight — your kitchen will smell incredible by morning!
2. Create a DIY Succulent and Cactus Windowsill Collection
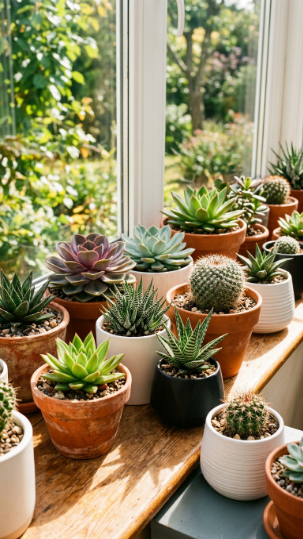
A DIY curated succulent collection on a sunny south or west-facing windowsill is the most genuinely low-maintenance windowsill garden project available — and when styled with intention, the results look like a sculptural art installation that happens to be alive. The extraordinary variety of succulent forms, textures, and colors creates a display that rewards close inspection and changes subtly through the seasons.
The secret is vessel consistency with plant variety — choose two or three pot materials (white ceramic, terracotta, and matte black work beautifully together) and stick to them, while varying plant varieties as wildly as possible. Geometric echeverias, spiky haworthias, architectural aloes, and columnar cacti at different heights create visual rhythm across the display.
Here’s the deal: succulents on a bright sunny windowsill are virtually indestructible — water deeply once every two weeks, turn pots a quarter rotation monthly so growth stays even, and they’ll thrive for years with genuinely minimal intervention.
| Succulent Type | Light Need | Water Frequency | Best Position |
| Echeveria | Full sun | Every 2 weeks | South windowsill |
| Haworthia | Partial shade | Every 3 weeks | East windowsill |
| Aloe vera | Full sun | Every 2–3 weeks | South or west |
| Sedum | Full sun | Every 2 weeks | South windowsill |
| Gasteria | Low–medium | Every 3 weeks | North–east sill |
Explore succulent display ideas in our creative indoor planter ideas guide.
The Sill covers succulent windowsill care and variety selection with detailed growing guidance.
Curate your succulent collection, style with consistent vessels, and create living sculpture on your sunniest windowsill!
3. Build a DIY Microgreen Growing Station
🖼️ IMAGE PROMPT: A lifestyle wide image of a bright kitchen windowsill set up as a DIY microgreen growing station with five shallow wooden trays at staggered heights holding different microgreens — sunflower, radish, pea shoots, broccoli, and cress — at various growth stages. Bright natural window light. Color palette: vivid seedling green, warm natural wood tray, white windowsill, bright clean light. Mood: productive and fresh. Photography style: eye-level. Background: blurred bright kitchen window.
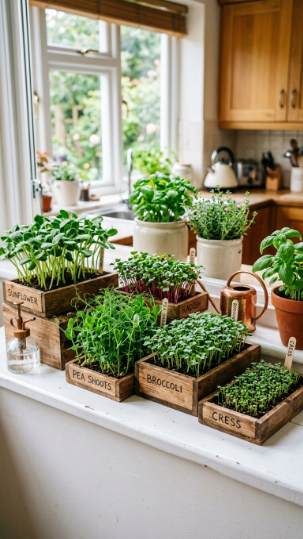
A DIY microgreen growing station is the windowsill garden project with the most immediate, tangible payoff — because microgreens go from seed to harvest in seven to fourteen days, deliver extraordinary nutritional density, and transform salads, sandwiches, and garnishes with flavors that bought microgreens simply don’t match.
Build a staggered tray system using shallow wooden trays or repurposed food containers at three different heights — the varying levels create the visual interest that makes a productive growing station look styled rather than utilitarian. Sow a new tray every five days in a rotation so you always have microgreens at different growth stages, ensuring a continuous harvest rather than a feast-then-famine cycle.
Talk about a game-changer! Sunflower shoots, pea shoots, radish, broccoli, and cress are the most productive and delicious microgreens for a windowsill station — fast-growing, vivid green, and genuinely impressive in both nutrition and flavor.
🌿 Pro Tip: Water microgreen trays from below rather than above — place each tray in a shallow water tray and allow the growing medium to absorb moisture upward. This prevents damping off (fungal collapse of seedlings) which is the most common microgreen failure, caused by water sitting on young stems.
Find productive windowsill project ideas in our indoor kitchen garden setup guide.
The RHS covers growing microgreens indoors on windowsills with sowing and harvest guidance.
Set up your first microgreen tray today and harvest your first crop in ten days — genuinely that fast!
4. Create a DIY Air Plant and Driftwood Windowsill Installation
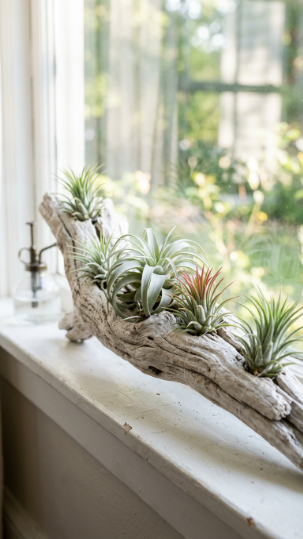
A DIY air plant and driftwood windowsill installation is the windowsill garden project that occupies almost no sill depth while creating a display of extraordinary sculptural beauty — because driftwood and air plants together create a piece of genuinely art-quality living decor that looks like something you’d find in a high-end botanical interiors shop.
Source a beautiful piece of bleached driftwood or a curved branch whose natural hollows and irregular form can cradle individual air plants without any fixing — or secure plants with a small dab of non-toxic waterproof adhesive or clear fishing line. Different Tillandsia varieties — spiky, soft, curling, large and small — nestled in a single piece of sculptural wood create a cohesive botanical installation.
Here’s the thing: air plants require no soil, no pot, and no drainage — they sit directly on the driftwood and need only a weekly misting or fortnightly soak in water. For a windowsill garden project, they’re as close to zero-maintenance as living plants get.
Find driftwood air plant display ideas in our unexpected houseplant display ideas guide.
The Sill has a comprehensive air plant care and mounting guide for indoor displays.
Find your driftwood, nestle your air plants, and create a living windowsill sculpture that takes zero floor or sill space!
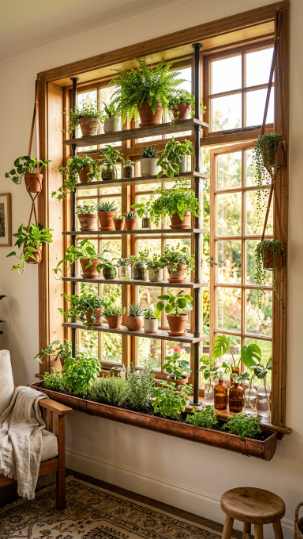
5. DIY Window Greenhouse Shelf System With Tension Rods
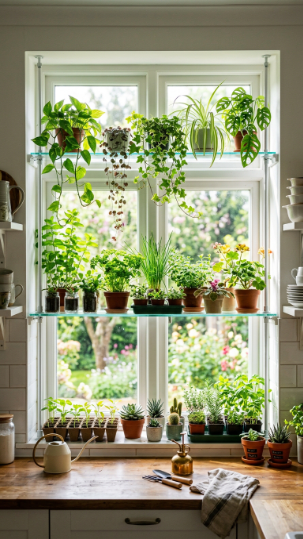
A DIY tension rod window greenhouse shelf — multiple tension rods spanning your window width at different heights, holding glass or acrylic shelves packed with plants — turns your largest, sunniest window into a full-height growing wall that doesn’t require a single wall fixing and can be removed completely without leaving a mark.
Use adjustable tension rods (available from any hardware store, the longer the better) at three heights across the window — bottom, middle, and top third. Rest cut-to-size glass or acrylic shelves on pairs of rods at each level, ensuring the shelf extends slightly beyond each rod so weight keeps everything stable. Load each shelf with plants that match the light level at each height — sun-hungry plants on the top shelf, partial-shade lovers lower down.
Pretty cool, right? The play of light through glass shelves and plant material at different heights creates a genuinely magical effect at different times of day — the window essentially becomes a living stained glass installation that changes with the light throughout the day.
🌿 Pro Tip: Use frosted acrylic rather than clear glass for the middle and lower shelves — it diffuses harsh direct light that can scorch lower plants while allowing enough brightness for good growth, and the frosted quality gives the whole window installation a beautifully soft, luminous quality.
Build your window greenhouse with ideas from our indoor greenhouse window guide.
Gardeners’ World covers window shelf greenhouse systems for indoor growing with plant recommendations.
Install your tension rod shelves this weekend and transform your sunniest window into a full-height growing greenhouse!
6. Build a DIY Magnetic Windowsill Herb Garden for Metal Frames
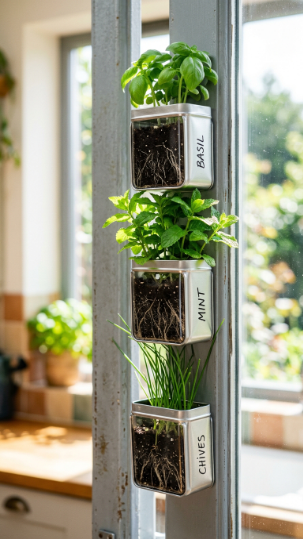
A DIY magnetic windowsill herb garden attached directly to a steel window frame is the most brilliantly space-efficient windowsill garden project for anyone with metal frames and a narrow or absent sill — because it uses the window frame itself as the growing surface and keeps the herbs literally inside the window without using any sill space.
Use small tin cans with strong neodymium magnets hot-glued to the back — or purchase purpose-made magnetic planters — and attach directly to any steel or powder-coated metal window frame. Plant with compact herbs — basil, mint, chives, and cress all work brilliantly in small magnetic containers with adequate drainage.
The practical elegance of herbs growing in the window frame itself — right where the cooking light and kitchen work happens — creates a genuinely functional and visually charming display that takes zero surface space and works on any metal frame.
Explore magnetic and space-saving display ideas in our small space indoor garden guide.
Apartment Therapy features magnetic planter installation ideas for small kitchen windows.
Attach your magnetic herb containers to the frame itself and grow herbs in mid-air above your windowsill!
7. Create a DIY Propagation Station on a Bathroom Windowsill
🖼️ IMAGE PROMPT: A lifestyle close-up image of a bathroom windowsill styled as a propagation station with glass bottles and jars of varying sizes holding plant cuttings in water — pothos, tradescantia, begonia, and ivy — with roots visible through the glass in soft morning bathroom light. Soft diffused morning light. Color palette: clear glass, trailing green cuttings, white windowsill, soft pale bathroom tiles. Mood: serene

botanical. Photography style: eye-level. Background: blurred white bathroom tiles.
A DIY propagation station on a bathroom windowsill — a collection of glass vessels holding plant cuttings in water as they develop roots — is simultaneously a productive plant-growing project and one of the most quietly beautiful windowsill displays imaginable. Those trailing green stems with developing white root systems visible through clear glass have a genuinely delicate, scientific beauty.
Collect glass bottles and jars of different heights and diameters — wine bottles, old pharmacy bottles, jam jars, sauce bottles — and fill each with fresh water. Take stem cuttings from your existing houseplants — pothos, tradescantia, begonia, ivy, and impatiens all root readily in water — and place one cutting per vessel, or several complementary varieties in a cluster of matching bottles.
The bathroom windowsill is the ideal propagation environment — the ambient humidity from showers and baths accelerates root development, and the diffused light typical of bathroom windows suits the semi-shaded conditions that water-propagating cuttings prefer before they develop full root systems.
🌿 Pro Tip: Change the water in propagation vessels every five to seven days to prevent bacterial growth that inhibits root development and clouds the water — fresh water keeps roots white, healthy, and growing actively rather than deteriorating in stagnant conditions.
Explore propagation display ideas in our humidity-loving indoor plants guide.
The Sill covers water propagation techniques and plant varieties that root readily in water.
Set up your propagation station this weekend and multiply your plant collection for free — one cutting at a time!
8. Build a DIY Windowsill Cold Frame for Early Season Growing
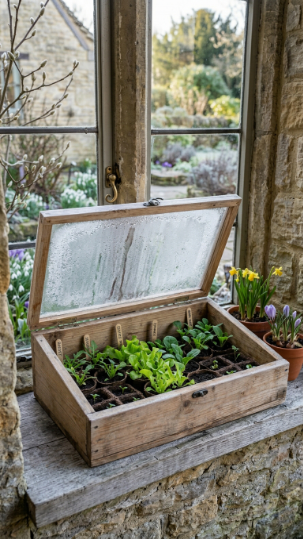
A DIY windowsill cold frame — a simple shallow wooden box with a hinged clear acrylic or glass lid — placed on your external windowsill creates a protected growing microclimate that’s several degrees warmer than the ambient outdoor temperature, allowing you to start seeds and grow salad leaves weeks earlier in spring and weeks later into autumn than would otherwise be possible.
Build the box from 22mm treated timber cut to fit your specific windowsill dimensions — measure carefully so the frame sits securely and can’t be blown off in wind. Hinge a piece of cut-to-size 4mm clear acrylic as a lid that can be propped open for ventilation on warm days and closed completely during cold nights and frosts.
Here’s the deal: a windowsill cold frame dramatically extends your productive growing season at both ends — spring salads in February, autumn lettuce in November — and the warm backdrop of the house wall provides additional heat retention that a freestanding cold frame in the open garden simply can’t match.
Find cold frame growing ideas in our indoor kitchen garden setup guide.
The RHS covers cold frame construction and seasonal growing with temperature management guidance.
Build your windowsill cold frame this weekend and start growing a full month earlier than you thought possible!
9. Create a DIY Geometric Terrarium Windowsill Collection
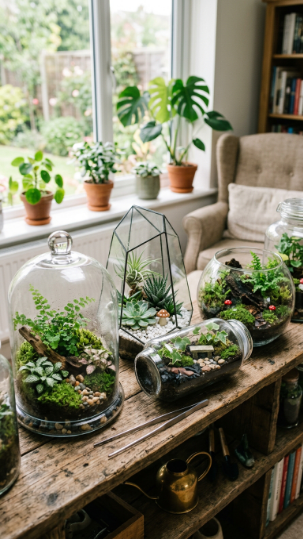
A DIY geometric terrarium collection on a windowsill is the project that creates the most consistently beautiful and conversation-starting windowsill garden display — because geometric glass forms containing tiny, perfectly maintained plant worlds are endlessly fascinating to look at and incredibly photogenic in window light.
Source geometric glass terrariums (widely available online and from home stores at various price points) and build individual miniature scenes inside each one — different plant communities in each vessel that share a consistent aesthetic but offer unique detailed worlds to explore up close. Cushion moss with a single tiny fern, air plants with white sand and pebbles, miniature succulents with decorative grit — each terrarium its own contained ecosystem.
The interplay of different geometric forms — triangular, hexagonal, square — at different heights and orientations creates a windowsill display that looks like a miniature architectural botanical installation when the collection reaches five or more pieces.
🌿 Pro Tip: Rotate terrarium positions on the windowsill quarterly — glass terrariums are light-direction sensitive and plants grow unevenly toward the light source over time. A quarter rotation every few months keeps all sides of each plant equally lit and the display balanced.
Build your terrarium collection with ideas from our closed terrarium plant selection guide.
Gardeners’ World features geometric terrarium building and plant selection with detailed guidance.
Build your geometric terrarium collection piece by piece and create a windowsill gallery that gets more beautiful with every addition!
10. DIY Reclaimed Wood Windowsill Planter Box
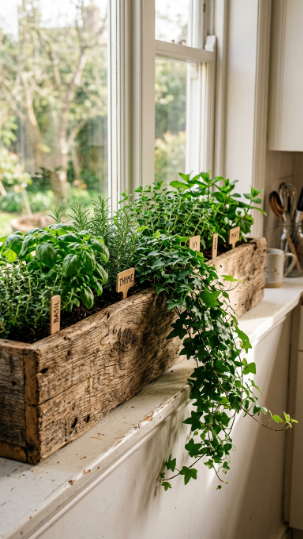
A DIY reclaimed wood planter box cut to run the full length of your windowsill creates a unified, bespoke growing trough that looks completely built-in and professional — like it was designed as part of the architecture rather than added afterward. The aged, grained texture of reclaimed timber is infinitely more beautiful on a windowsill than any plastic trough.
Measure your sill precisely, cut reclaimed pallet wood or scaffold board to exact length, construct a simple rectangular box with internal drainage holes and a waterproof liner, and finish with raw linseed oil or exterior wax to protect the wood while preserving the natural character of the grain and aging marks.
Plant as a continuous drift — herbs running the length of the box with trailing ivy at both ends spilling over the sill edge — rather than in separate sections, for a display that reads as a single designed element rather than several individual plantings.
Find reclaimed wood planter ideas in our fall decor upcycling guide.
This Old House covers DIY window planter box construction with waterproofing and joinery guidance.
Measure your sill, build your box, plant continuously, and create a completely bespoke windowsill garden!
11. Build a DIY Hydroponic Windowsill Herb System
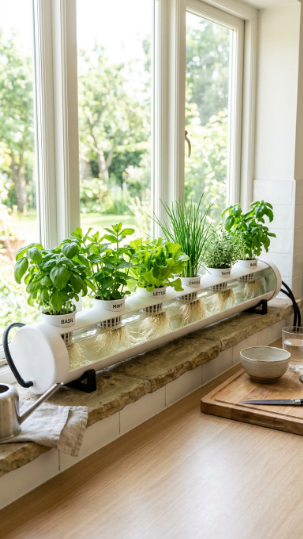
A DIY hydroponic windowsill herb system — a simple channel-and-nutrient-solution setup where herbs grow in water rather than soil — is the windowsill garden project for the genuinely ambitious indoor grower who wants maximum productivity, zero mess, and significantly faster growth rates than any soil-based system delivers.
Build the channel from 50mm PVC conduit pipe cut to your windowsill length, drill evenly spaced holes for net cups every 15cm, fill with diluted hydroponic nutrient solution, and plant herb seedlings in net cups with clay pebbles as the growing medium. A small aquarium air pump bubbling oxygen through the solution completes the system and dramatically accelerates root development and growth rate.
Here’s the thing: hydroponically grown herbs grow two to three times faster than soil-grown equivalents, have higher essential oil content (stronger flavor), and never dry out because the roots are continuously in contact with nutrient-rich water. The entire system can be built for under £30/$35 in materials.
🌿 Pro Tip: Change the nutrient solution completely every two weeks to prevent salt buildup and maintain optimal pH — hydroponic herbs in windowsill systems can develop nutrient deficiencies if the solution is topped up rather than replaced, which causes yellowing leaves and reduced flavor intensity.
Explore productive growing systems in our indoor kitchen garden setup guide.
The RHS covers basic hydroponic growing for indoor herb gardens with nutrient and system guidance.
Build your hydroponic channel this weekend and harvest herbs growing twice as fast as any pot on your sill!
12. Create a DIY Trailing Plant Cascade From a High Windowsill

A DIY trailing plant cascade from a high windowsill is one of the most dramatically beautiful windowsill garden projects — using gravity as a design element to create long, flowing curtains of living plant material that drape down from sill height toward the floor in a genuinely spectacular display.
Choose the longest-trailing plants for maximum dramatic effect — string of pearls, tradescantia, heartleaf philodendron, and pothos all produce trails of 60–120cm or more given time and the right conditions. Plant in a row along a high windowsill, let the trails grow freely downward, and resist every temptation to cut them back — the longer the better.
The visual drama of multiple trailing plants at different drop lengths — some reaching halfway down the wall, others almost touching the floor — creates a living curtain effect that transforms the entire wall below the window into something genuinely breathtaking.
Find trailing plant display ideas in our indoor trailing plant display guide.
Gardeners’ World covers trailing houseplant care for maximum length with variety recommendations.
Plant your trailers, let them grow, and watch your windowsill become the most dramatic feature in the room!
13. DIY Windowsill Salad Garden With Cut-and-Come-Again Varieties
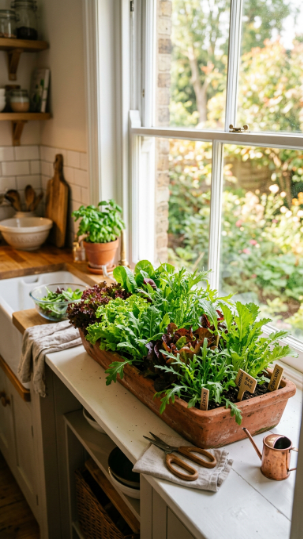
A DIY windowsill salad garden planted with cut-and-come-again varieties is the most productively satisfying windowsill garden project for food growers — because the harvest is continuous, the growth is rapid, and the flavors of window-grown fresh salad are genuinely superior to anything available in supermarket bags.
Use a long shallow tray (minimum 8cm depth, full windowsill length) and sow densely with a mixed cut-and-come-again seed blend — red and green lettuce, rocket, mizuna, mustard greens, and spinach. Sow in strips every two weeks for continuous harvest, and cut with scissors 2–3cm above soil level when leaves reach 8–10cm height.
Pretty cool, right? A windowsill salad garden on a bright south or east-facing sill produces a continuous fresh salad harvest within three weeks of sowing — and a single long tray replaced with fresh sowings every two weeks means you’re harvesting fresh salad from your own kitchen window every single week of the growing season.
🌿 Pro Tip: After harvesting, feed the tray with a liquid seaweed fertilizer diluted to half strength — cut-and-come-again varieties are harvested so frequently that the growing medium becomes nutrient-depleted quickly, and a weekly liquid feed maintains the leaf quality and regrowth speed that makes this system truly productive.
Explore productive food growing ideas in our indoor kitchen garden setup guide.
The RHS covers cut-and-come-again salad growing indoors with sowing schedules and variety recommendations.
Sow your first tray today and harvest fresh salad from your kitchen window in three weeks!
14. Build a DIY Hanging Windowsill Planter With Leather Straps
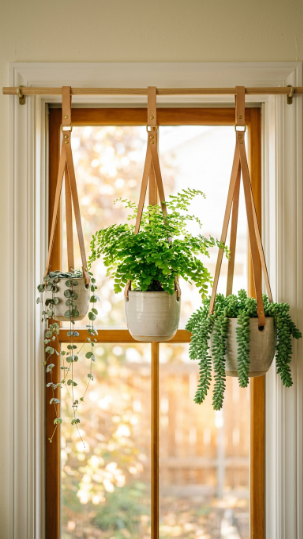
DIY leather strap hanging planters suspended from a wooden dowel or curtain rod above your window are the windowsill garden project that creates the most sophisticated, gallery-quality result in the shortest build time — because leather and ceramic together communicate quality, intentionality, and craft in a way that rope or wire never quite matches.
Cut thick vegetable-tanned leather straps (4–5cm wide, available from leather suppliers or repurposed from old belts) into measured lengths, punch holes for pot drainage and hanging points, and rivet or bolt together at the base to create a cradle for each pot. Hang three or five at varying heights from a single wooden dowel suspended across the window for a hanging display that frames the window beautifully.
Here’s the deal: the leather strap hanger ages magnificently with exposure to light and humidity — it darkens, softens, and develops a patina over months that makes the whole display look increasingly expensive and beautifully worn-in rather than deteriorating.
Find leather and craft display ideas in our DIY balcony plant decoration guide.
Apartment Therapy features DIY leather strap plant hanger tutorials with cutting and riveting techniques.
Cut your leather, punch your holes, and hang your plants — the most sophisticated windowsill project on this entire list!
15. Create a DIY Windowsill Moss Garden in a Shallow Tray
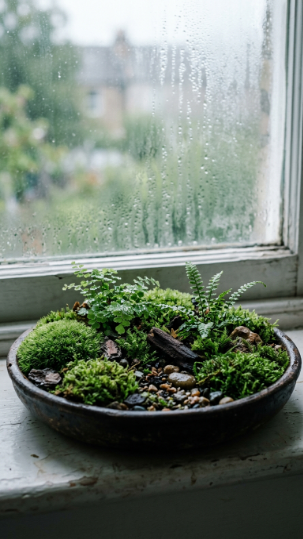
A DIY windowsill moss garden in a shallow tray is the project for the gardener who wants a display of profound, contemplative natural beauty that requires almost zero care — because moss in a humid window environment thrives on the ambient moisture and indirect light that most bathroom and kitchen windows provide naturally.
Use a shallow dark slate or dark ceramic tray (5–8cm deep, any length that suits your sill) and arrange cushion moss, sheet moss, and mood moss in a naturalistic landscape — gentle rises and dips, a clear open “path” of fine gravel, one or two tiny fern fronds as vertical accents, and a smooth stone or piece of bark as a focal element.
The deeply peaceful quality of a moss garden — its quietness, its evenness of color, its absolute lack of drama — creates a windowsill presence that’s completely unlike any flowering or foliage plant display and appeals to a completely different but equally powerful aesthetic sensibility.
🌿 Pro Tip: Mist the moss surface with rainwater or distilled water rather than tap water — moss is extremely sensitive to the chlorine and fluoride in tap water, which causes browning at the tips over time. A small spray bottle of collected rainwater kept beside the window sill makes this effortless.
Find moss garden ideas in our closed terrarium plant selection guide.
The RHS covers indoor moss gardening and care with variety and moisture guidance.
Build your moss tray garden this afternoon and create the most quietly beautiful windowsill in your home!
16. DIY Painted Mason Jar Herb Garden With Rustic Labels
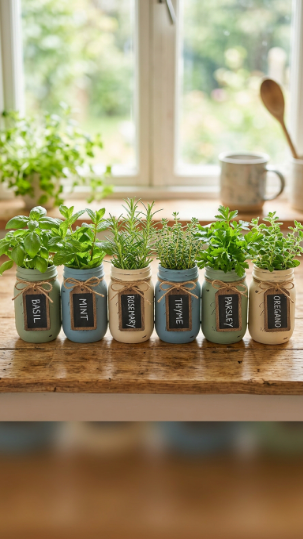
DIY painted mason jar herb gardens are one of the most universally loved windowsill garden projects — combining the accessibility and affordability of recycled glass jars with the warmth of chalk-painted surfaces and hand-written labels to create a herb display of genuine cottage charm that costs almost nothing to make.
Paint standard mason jars with two coats of chalk paint in a complementary muted palette — sage green, dusty blue, and warm cream work beautifully together — allow to dry, then distress lightly with sandpaper at the rim and handle areas for an aged quality. Add mini chalkboard labels tied with jute twine or hand-write herb names directly onto the painted surface with a chalk pen.
Here’s the thing: drainage is the critical modification for glass jar herb planters — drill two or three holes in the base of each jar using a diamond-tipped drill bit at low speed, or layer the base with 3–4cm of horticultural grit to act as an internal reservoir that prevents root rot.
Find mason jar display ideas in our fall decor upcycling guide.
Gardeners’ World covers DIY herb planting in recycled glass containers with drainage solutions.
Paint your jars, drill your drainage, plant your herbs — the most charming herb windowsill you’ll ever build!
17. Build a DIY Tiered Spice Rack Plant Shelf for a Narrow Sill
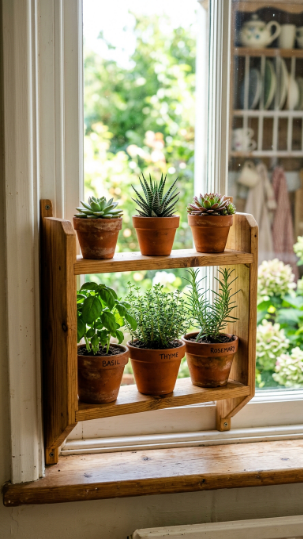
A DIY tiered spice-rack-style plant shelf built specifically for a narrow windowsill is the cleverest space-multiplication project in this entire list — because it literally doubles or triples your windowsill planting capacity by adding a second and third level above the sill surface without any wall fixing or major construction.
Build from 22mm pine strip wood — two side supports with notched slots at two or three heights, into which horizontal shelf strips slot and lock without screws — the whole structure can be assembled and disassembled without tools. The footprint matches your existing sill width exactly, so it feels completely built-in.
Talk about a game-changer for narrow modern windowsills where a single row of small pots has always been the frustrating maximum! A tiered shelf system on a 10cm deep sill creates three tiers of 8cm each — enough for nine individual small herb or succulent pots where only three would otherwise fit.
🌿 Pro Tip: Build each tier at a slight backward tilt (2–3 degrees toward the window) so pots lean slightly toward the light rather than away from it — this prevents the forward-leaning growth habit that plants on flat window shelves develop when their light source comes entirely from one direction.
Explore narrow sill solutions in our small space indoor garden guide.
Apartment Therapy covers narrow windowsill planting solutions with space-maximizing ideas.
Build your tiered sill shelf and triple your planting capacity on the narrowest windowsill imaginable!
18. Create a DIY Windowsill Fairy Garden Scene
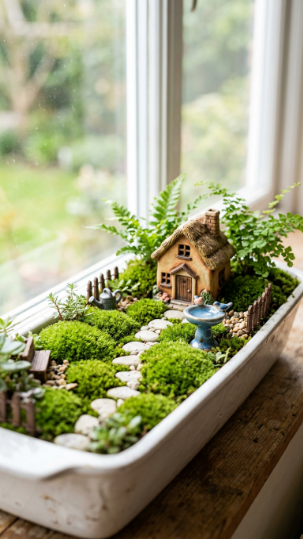
A DIY windowsill fairy garden — a complete miniature garden world built in a long trough on your windowsill — is the windowsill garden project that generates the most joy, the most close-up inspection, and the most questions from visitors of any display on this list. A tiny world, perfectly realized, sitting right on your window ledge.
Use a long white ceramic trough or reclaimed wooden box as your landscape container, build the terrain with layered compost and fine grit, cover with cushion moss as lawn, create paths with tiny gravel or miniature stepping stones, plant small ferns as trees and tiny-leafed creeping plants as ground cover, then add miniature accessories — a ceramic cottage, a tiny bench, a miniature birdbath, a small lantern.
The miniature scale makes every detail significant — the slight irregularity of the moss surface, the curve of a tiny path, the shadow cast by a miniature tree — and rewards the kind of close, patient observation that a large garden never encourages.
Find fairy garden building ideas in our closed terrarium plant selection guide.
Gardeners’ World features miniature fairy garden building and plant selection with detail and scale guidance.
Build your tiny world on the windowsill and create a garden that inspires wonder every single day!
19. DIY Copper Gutter Herb Planter System
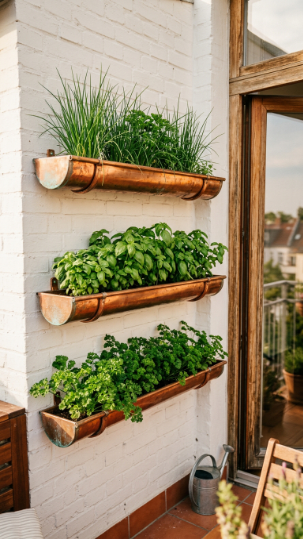
A DIY copper gutter herb planter system — lengths of copper rainwater gutter pipe mounted horizontally at staggered heights beside or beneath a window and planted with herbs — is the windowsill garden project with the most architectural impact and the most dramatic material beauty. The burnished copper ages magnificently through green-blue patina stages over months, developing the kind of beautiful oxidization that makes the installation look increasingly designed and intentional rather than simply functional.
Cap the ends of each copper gutter length with push-fit copper end caps available from plumbing suppliers, drill drainage holes at 15cm intervals along the base, mount on copper pipe brackets at three heights with 15–20cm vertical spacing between runs, and plant with a single herb variety per run — basil in the top, chives in the middle, parsley in the bottom for a graduated height display.
The stacked copper runs beside a window create an herb garden of genuine architectural presence — it looks like a designed element of the building rather than an afterthought, and it photographs with extraordinary beauty as the copper develops its patina through the seasons.
🌿 Pro Tip: Seal copper gutter planters with clear lacquer spray inside the growing channel before planting if you want to preserve the bright copper finish — or leave completely unsealed if you want to encourage and enjoy the beautiful natural patina development that makes copper so visually distinctive.
Find copper planter ideas in our DIY balcony plant decoration guide.
This Old House covers copper planter construction and material guidance for garden and windowsill installations.
Mount your copper gutters, plant your herbs, and watch the most beautiful windowsill installation you’ve ever built develop its patina over the coming months!
20. Create a Complete DIY Windowsill Garden Room With Layered Projects
Close out this list of DIY windowsill garden projects with the most ambitious, the most rewarding, and the most completely transformative of all — a complete DIY windowsill garden room where every element of the window and its immediate surroundings is planted, styled, and lit to create a total botanical environment that makes the window itself the most beautiful feature in your home.
Combine tension rod greenhouse shelves filling the full window height with plants at every level, a copper gutter herb run at the base sill level, leather strap hanging planters framing the window on both sides, a propagation station of glass bottles at one sill end with developing cuttings, and small fairy lights woven through the plants at the top for evening atmosphere.
Here’s the thing: the cumulative effect of multiple windowsill garden projects layered together is dramatically greater than any single project in isolation — the window stops being a window and becomes a complete living installation that frames the outside world through layers of plant life, glass, copper, and light.
You’ve totally got this! Start with one project, add another when the first is established, and keep layering until your window is everything you’ve always imagined a living plant window could be.
Build your complete windowsill garden room with ideas from our indoor greenhouse window guide.
Apartment Therapy covers complete windowsill garden room design and styling with layering and plant selection guidance.
Your most beautiful, lush, and productive windowsill garden is assembled one project at a time — start today, layer thoughtfully, and let your window garden grow into something genuinely spectacular. Now go make it happen!
Frequently Asked Questions
What are the best DIY windowsill garden projects for absolute beginners?
Painted terracotta herb collections, mason jar herb gardens, and succulent windowsill displays are the three most beginner-friendly projects — all require zero specialist tools, minimal materials, and no prior gardening or DIY experience. A painted terracotta herb collection needs only chalk paint, a brush, and some herb seedlings. Mason jars need paint, drainage holes, and potting mix. A succulent collection needs only well-draining compost and a sunny south-facing sill. All three deliver immediate, beautiful results that build confidence for more complex projects.
How do I choose the right windowsill garden project for my specific window orientation?
Match your project to your light level — this is the most important decision in windowsill gardening. South and west-facing windows with direct sun suit herbs, succulents, microgreens, and hydroponic systems. East-facing windows with gentle morning light work beautifully for propagation stations, salad gardens, and trailing plant cascades. North-facing windows with no direct sun are ideal for moss gardens, fern displays, air plant installations, and propagation stations — all of which prefer or tolerate low light conditions. Never place succulents or sun-loving herbs on a north-facing sill regardless of how appealing the project looks.
How do I prevent water damage to my windowsill from multiple plant containers?
Waterproofing the sill surface and using appropriate drainage solutions are the two essential steps. Apply exterior wood sealant or tile adhesive sealant to wooden windowsills before installing any planting system. Use drip trays or waterproof liner trays beneath all individual pots and planter boxes — never allow water to pool directly on the sill surface. For railing and hanging systems, ensure drip trays are deep enough to hold at least one full watering’s worth of drainage without overflowing. Check trays after every watering in the first few weeks until you understand each plant’s drainage pattern.
What are the best plants for a north-facing windowsill garden project?
Ferns, air plants, moss, pothos, tradescantia, begonias, and shade-tolerant herbs like mint and parsley all thrive on north-facing windowsills where direct sun is absent. For a propagation station, north or east-facing windows are actually ideal — the indirect light encourages root development without the stress of direct sun on rootless cuttings. For purely decorative displays, heuchera, ivy, and small peace lilies all provide beautiful foliage in north-facing conditions. Avoid any herb requiring direct sun (basil, rosemary, thyme) and all succulents on north-facing sills — they simply cannot sustain healthy growth in those conditions.
How do I maintain a windowsill garden through the winter months?
Supplemental grow lighting is the most effective tool for maintaining productive windowsill gardens through the short, low-light days of winter. A full-spectrum LED grow light strip mounted under a shelf or above the sill for six to eight hours daily effectively extends the light day and keeps herbs, salad leaves, and microgreens producing through November to February when natural daylight alone is insufficient. Reduce watering frequency significantly in winter as plants grow more slowly and evaporate less moisture. Move any cold-sensitive plants away from window glass on the coldest nights — the air immediately adjacent to single-glazed windows can drop to damaging temperatures even when the room is warm.
A Few Final Thoughts
Every window in your home is a completely untapped garden waiting to happen — and these DIY windowsill garden projects prove that the right combination of creativity, simple materials, and a clear project vision transforms the most ordinary ledge into something genuinely extraordinary. Whether you’re building a copper gutter herb run that develops a beautiful patina beside your kitchen window, filling your sunniest sill with a layered geometric terrarium collection, harvesting fresh microgreens from a continuous-sowing windowsill station, or assembling a complete living plant window room that makes the window itself your home’s most beautiful feature, every project in this list delivers results that are deeply satisfying, genuinely useful, and completely personal to your space and your style. The best windowsill garden isn’t the most expensive or the most complex — it’s the one that matches your window’s light, your plants’ needs, and your own creative vision perfectly. Start with the project that excites you most today, build it well, and let your windowsill garden grow from there. Your most beautiful, productive, and inspiring windowsill is just one afternoon project away — now go make it happen!