
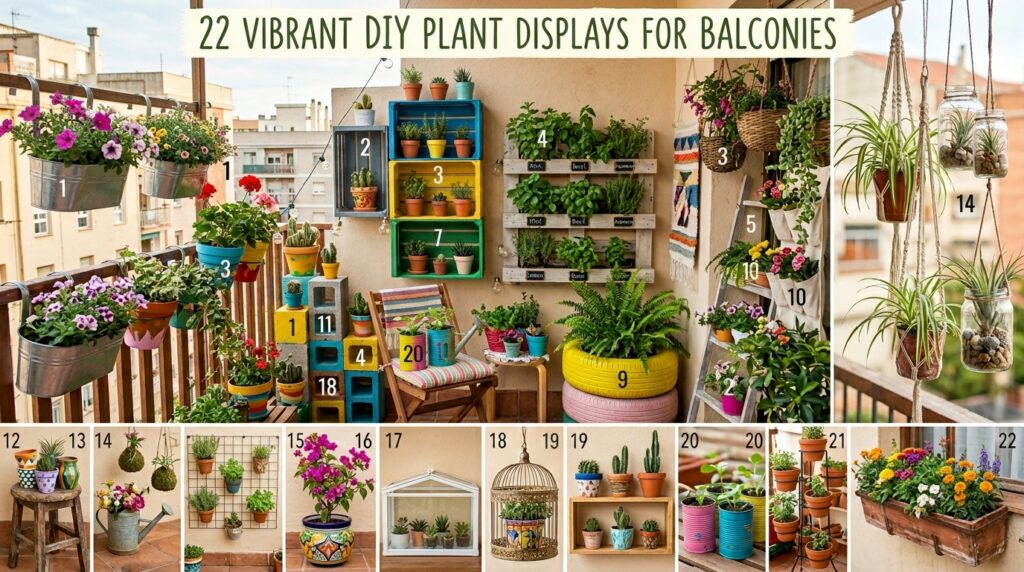
22 Vibrant DIY Plant Displays for Balconies
Your balcony is a blank canvas waiting to explode with colour, texture, and life — and you don’t need a landscaper’s budget or a sprawling garden to make it happen. With the right DIY plant displays, even a narrow apartment balcony can feel like a lush urban sanctuary that stops guests mid-sentence. Whether you’re working with two metres of railing or a generous wraparound terrace, the 22 ideas ahead cover every style, skill level, and budget. From upcycled pallet walls dripping with trailing vines to terracotta tower stacks bursting with herbs, there’s a display here that will completely transform how you see your outdoor space. Ready? Let’s explore all 22 of them.
Why DIY Plant Displays for Balconies Are Worth Your Time
Creating your own plant displays isn’t just a cheaper alternative to buying ready-made planters — it’s a genuinely more satisfying approach that produces results you simply can’t find in a garden centre. When you build a display yourself, you control the dimensions, the materials, the plant combinations, and the aesthetic entirely. That level of customisation is what separates a balcony that looks curated from one that looks assembled.
Beyond aesthetics, DIY balcony gardens deliver measurable practical benefits. Research from the Royal Horticultural Society consistently shows that gardening — even in small outdoor spaces — reduces cortisol levels and improves mood within 30 minutes of engagement. A balcony garden gives you that therapeutic reset without leaving home, which is why apartment dwellers in particular have embraced container gardening so enthusiastically.
Here’s a lesser-known fact that surprises many beginners: balconies often receive more usable growing light than ground-level gardens, because they sit above fences, walls, and neighbouring structures that would otherwise cast shade. That means plants which struggle at ground level — like sun-loving Mediterranean herbs and trailing petunias — frequently thrive on a south or west-facing balcony.
These ideas are ideal for renters who can’t dig into soil, city dwellers with limited square footage, and anyone who wants a high-impact outdoor space without a high-maintenance commitment.
At a Glance
- A vertical pallet herb garden costs under £20 to build and produces fresh cooking herbs all season long.
- Hanging macramé planters can hold trailing pothos or string-of-pearls at eye level, doubling your growing space without using floor area.
- Grouping odd numbers of terracotta pots at different heights creates a professional-looking display that mimics how designers style shelving.
- Upcycled colanders, tin cans, and wooden wine crates make surprisingly effective — and genuinely charming — balcony planters.
- A single draping Hedera helix (English ivy) trained along a railing can green up an entire balcony wall within one growing season.
1. Vertical Pallet Herb Wall
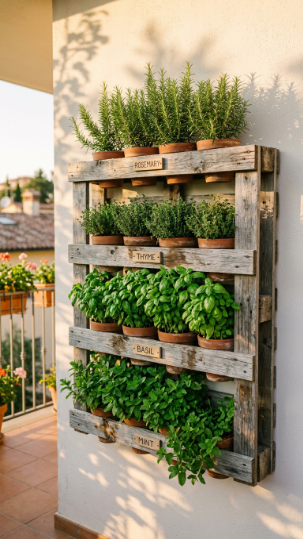
A reclaimed timber pallet is one of the most versatile structures you can mount on a balcony wall — and for herb growing, it’s practically purpose-built.
You’ll need a heat-treated pallet (stamped HT, never MB), landscape fabric stapled across the back and between slats to create planting pockets, a good quality multi-purpose compost mixed with 20% perlite for drainage, and a south or west-facing wall receiving at least 5–6 hours of direct sun daily. Compact herbs like thyme, oregano, chives, parsley, and dwarf basil work best; avoid full-size rosemary which outgrows the pockets quickly.
Staple the fabric into U-shaped channels between slats, fill firmly with compost, and plant through the slat gaps. Water slowly from the top and allow it to percolate down — a diluted liquid seaweed feed every two weeks keeps growth vigorous. Mount the pallet at a slight forward angle (about 15 degrees from vertical) so plants naturally lean toward the light and compost doesn’t pour out.
The most common mistake is planting before the pallet is mounted. Always hang it first — filling it with soil makes it extremely heavy, and repositioning a fully planted pallet risks cracking the frame or dislodging roots entirely.
💡 Pro Tip: Line each pocket with a layer of dampened sphagnum moss before adding compost — it retains moisture between waterings, reducing how often you need to water by nearly half during hot summer weeks.
Explore more ideas at vertical herb garden displays for balconies and learn about ideal growing conditions for culinary herbs from the Royal Horticultural Society.
Start with just three herbs you actually cook with, and you’ll be harvesting within six weeks.
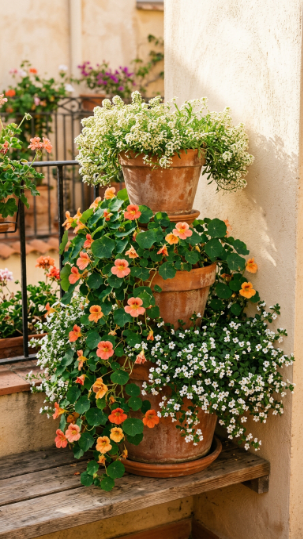
2. Tiered Terracotta Tower Stack
🖼️ IMAGE PROMPT: A realistic close-up photograph of three terracotta pots stacked in descending sizes on a sunlit balcony corner, planted with cascading nasturtiums, lobularia, and trailing bacopa spilling over the edges. Lighting: bright diffused
light. Colour palette: warm terracotta orange, deep green, cream white, soft coral. Mood: lush and botanical. Photography style: three-quarter angle lifestyle. Background: sun-drenched rendered wall with subtle texture. Style tags: photorealistic, 8K, botanical photography, magazine quality, no people.
Stacking terracotta pots into a graduated tower creates a sculptural focal point that commands attention from the moment you step onto your balcony.
Use three pots in descending sizes — 40cm, 28cm, and 18cm diameter are ideal proportions. Fill the largest with quality loam-based compost (John Innes No. 2 is excellent for outdoor containers), place the medium pot slightly off-centre inside the large one before it’s fully filled, and repeat with the smallest on top. This offset stacking is what gives the tower its visual drama and allows water to cascade naturally from tier to tier.
For the most impactful display, plant trailing varieties that spill downward: bacopa, verbena, Calibrachoa ‘Million Bells’, or trailing nasturtiums all perform beautifully. Keep the top tier reserved for an upright centrepiece — a Pelargonium (geranium), compact lavender, or ornamental grass adds height and visual contrast.
Water the top tier thoroughly each morning during summer — terracotta is porous, so each pot needs individual attention. Push your finger 2cm into the compost; if it feels dry at that depth, water thoroughly until it drains freely from the base.
Best trailing plants for tiered towers:
- Bacopa (Sutera cordata) — heat-tolerant, flowers continuously
- Calibrachoa — 40+ flower colours, no deadheading needed
- Trailing Verbena — attracts pollinators, drought-tolerant
- Nasturtium ‘Alaska’ — edible flowers, variegated foliage
Browse terracotta container styling ideas for outdoor spaces and discover how to choose the right compost for container plants via Gardeners’ World.
A well-planted terracotta tower costs under £40 to build and rivals anything you’d find in a garden designer’s portfolio.
3. Hanging Macramé Planter Cluster

Hanging macramé planters solve the perennial balcony problem of too many plants and too little floor space — they claim vertical air space that would otherwise go entirely to waste.
For a cluster of three, hang planters at three distinct heights: 90cm, 60cm, and 45cm from ceiling hooks. Use 4mm natural cotton macramé cord (nylon grips better in wet weather if yours is exposed) and basic square knot patterns, which even complete beginners can master in under an hour. Each hanger needs a pot with drainage holes — without them, water pools at the bottom of the macramé and rots both the cord and the roots.
Pothos (Epipremnum aureum) is the single best plant for macramé hangers on partially shaded balconies — its trailing vines can reach 90cm within one season, and it tolerates inconsiderable neglect. For sunnier spots, string-of-pearls (Curio rowleyanus) or a compact trailing petunia makes a more dramatic statement. Group all three hangers within 60cm of each other to create the effect of a cascading green installation rather than isolated pots.
💡 Pro Tip: Spray the insides of your macramé knots with an outdoor fabric protector once a season — this extends cord life significantly in humid or rainy climates without affecting plant health at all.
Discover how to hang plants safely on balcony structures and read about caring for trailing houseplants outdoors via Better Homes & Gardens.
Once hung, a well-chosen macramé cluster becomes the visual anchor your entire balcony display organises itself around.
4. Upcycled Tin Can Herb Garden
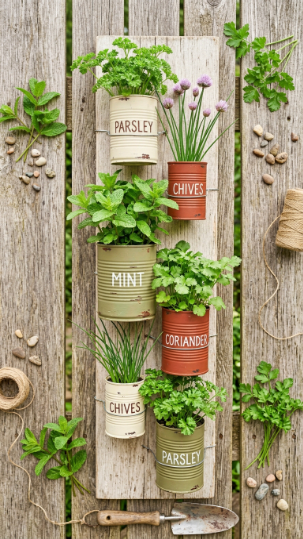
Tin cans are the most underrated planting vessel in DIY balcony gardening — free, drainage-ready with a nail punch, and capable of looking genuinely stylish with minimal effort.
Collect cans of varying sizes (large catering tins, standard baked bean tins, small tomato paste tins). Pierce five to seven drainage holes in the base of each using a hammer and thick nail. Paint the exterior with exterior-grade chalk paint — no primer needed — in a coordinated palette of two or three colours. Once dry, fill with a 50/50 mix of multi-purpose compost and horticultural grit to prevent waterlogging.
Mount cans directly to a timber board using jubilee clips or U-shaped hose clamps, creating a wall-mounted herb display that takes up zero floor space. Arrange by descending size or in a grid pattern depending on your aesthetic preference. Plant one herb per can — mixing herbs in small containers creates competition for nutrients and water that stunts growth significantly.
Herbs that genuinely thrive in tin cans: chives, coriander, flat-leaf parsley, and dwarf basil. Mint is productive but invasive — keep it in its own can and never allow it to share soil with other herbs or it will dominate entirely.
Explore upcycled container gardening ideas for small spaces and learn about growing herbs in small containers from The Old Farmer’s Almanac.
This is genuinely one of the most budget-friendly DIY plant displays you can build — the materials cost almost nothing, but the result looks completely intentional.
5. Railing Planter Box Row
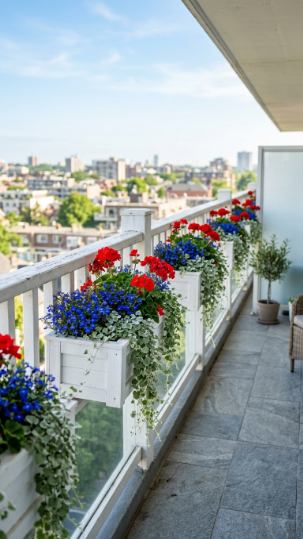
A continuous row of matched railing planters is the single fastest way to transform a plain balcony railing into a living, flowering boundary that’s beautiful from both inside and outside.
Railing-mounted planter boxes come in timber, galvanised steel, and fibreglass — but for DIY builds, 18mm exterior-grade plywood cut to length, with internal lining of pond liner or heavy-duty plastic sheeting, is both cost-effective and durable. Size matters: minimum 20cm depth is essential for flowering annuals; anything shallower dries out too quickly in summer heat and wind, which is higher on balconies than at ground level.
Fill boxes with a peat-free multi-purpose compost and incorporate slow-release granular fertiliser at planting time (Osmocote or similar, following packet rates). This single step eliminates the need for liquid feeding for the first 12–16 weeks and produces consistently lush growth. Plant in the “thriller, filler, spiller” formula: one tall upright plant, two medium bushy plants, and one trailing plant per 60cm of box length.
💡 Pro Tip: Attach railing boxes with adjustable brackets rated to at least 15kg — a fully planted, watered 60cm box weighs more than most people expect, and safety is non-negotiable at height.
Discover how to build and plant balcony railing boxes and read expert advice on balcony container safety and weight limits from the RHS.
A well-planted railing row turns your balcony into something neighbours stop to photograph.
6. Wooden Wine Crate Succulent Display
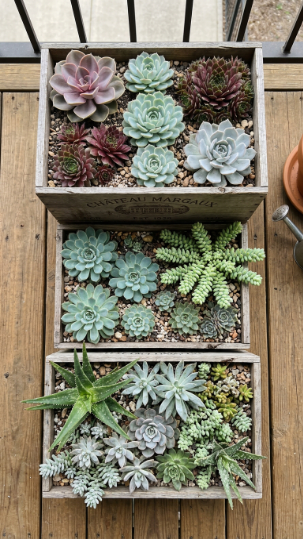
Wine crates have exactly the right depth and drainage characteristics for succulent displays — shallow, fast-drying, and beautiful in a way that purpose-built planters rarely match.
Line each crate with a sheet of weed-suppressing fabric (not solid plastic — succulents demand airflow around their roots) before filling with a specialist cactus and succulent compost. Alternatively, mix standard multi-purpose compost with 50% horticultural grit or coarse sand. Standard potting compost alone retains too much moisture and causes root rot in succulents within weeks — this is the single most common failure point for beginners.
Group succulents by water and light needs: Sempervivum (houseleeks) and hardy Sedum are fully frost-tolerant and thrive outdoors year-round in the UK and northern Europe. Echeveria and Aloe need to come indoors when temperatures drop below 5°C. Arrange them in odd-numbered clusters of 3 or 5 plants for a more natural, less planted-in-a-grid appearance.
What works vs. What to avoid:
- ✅ Coarse grit top-dressing — keeps crown dry, prevents rot
- ✅ Full sun positioning (6+ hours) — essential for compact, colourful growth
- ❌ Deep watering more than twice a week in summer — less is genuinely more
- ❌ Mixing cacti with high-moisture herbs — incompatible water requirements
Browse succulent container garden ideas for balconies and learn how to care for outdoor succulents through summer at Missouri Botanical Garden.
With succulents, the less you do, the more rewarding your display becomes.
7. Hanging Basket Floral Cascade
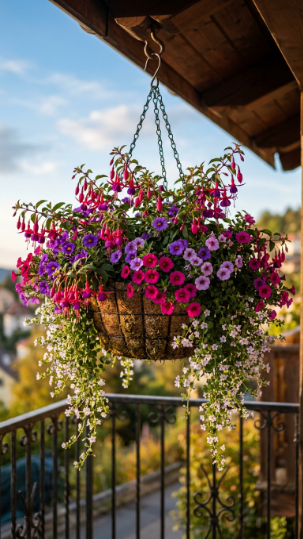
A generously planted hanging basket in full bloom is one of the most dramatic DIY plant displays you can create on a balcony — and when done right, it looks far more expensive than it is.
Choose a minimum 35–40cm wire basket (smaller baskets dry out too fast and produce disappointing results). Line with a thick layer of sphagnum moss pressed firmly against the wire, then fill with a high-quality hanging basket compost formulated with water-retaining gel. These gels absorb 400 times their weight in water, substantially reducing how often you need to water in hot weather — on a warm south-facing balcony in July, this means watering once daily rather than twice.
Plant through the sides of the basket as well as the top — push small plug plants through the wire and moss lining at the equator and lower hemisphere of the basket. This “planted all over” technique is what separates spectacular professional baskets from thin, disappointing ones. Use 4–5 trailing plants (fuchsia, bacopa, Calibrachoa, trailing verbena) and one upright centrepiece such as Osteospermum or an ornamental grass.
💡 Pro Tip: Feed hanging baskets with a high-potassium liquid fertiliser (tomato feed works perfectly) every seven days from June onwards — this is what keeps a basket flowering continuously through September rather than peaking in July and declining.
Discover how to plant and maintain stunning hanging baskets and explore the best plants for hanging baskets via Gardeners’ World.
One well-planted hanging basket can genuinely carry an entire balcony’s aesthetic through a full summer season.
8. Ladder Shelf Plant Display
🖼️ IMAGE PROMPT: A realistic lifestyle photograph of a reclaimed wooden A-frame ladder leaning against a balcony wall, each rung holding terracotta and ceramic pots of varying sizes with trailing ivy, herbs, succulents, and a small flowering Calibrachoa. Lighting: soft
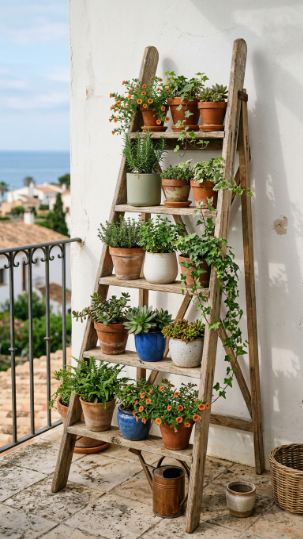
morning light. Colour palette: weathered blonde wood, terracotta orange, muted sage, cream white, cobalt blue ceramic. Mood: relaxed, eclectic, and layered. Photography style: three-quarter wide-angle. Background: white render wall with natural shadows. Style tags: photorealistic, 8K, botanical photography, magazine quality, no people.
A repurposed ladder is one of the cleverest structural solutions for small balcony plant displays — it uses vertical space brilliantly while remaining portable, adaptable, and visually striking.
A wooden A-frame or standard ladder propped against a wall gives you four to six distinct planting levels from floor to above eye height. Sand back any rough areas and treat with exterior wood oil (teak oil or decking oil works well) to weatherproof it before outdoor placement. Secure the ladder to the wall with two screw hooks and S-hooks if your balcony experiences strong winds — a toppled ladder loaded with pots causes expensive damage quickly.
Each rung becomes its own shelf. Mix pot materials deliberately: terracotta at lower levels for their pleasant visual weight, light fibreglass or plastic at upper rungs to reduce top-heaviness. Arrange by plant height — tall, architectural plants at lower levels, cascading trailers and small succulents higher up, where their spilling habit looks most natural. Vary the pot sizes rather than using identical sizes on every rung.
The pro insight: resist the temptation to fill every rung. Leaving one or two rungs empty creates breathing room in the display and actually makes the arrangement look more considered and intentional, not emptier.
Browse creative ladder plant display ideas for outdoor spaces and read about layering plants for visual impact in containers at Better Homes & Gardens.
A ladder display grows with your plant collection — simply add and rearrange as new plants join your balcony.
9. Bamboo Trellis Climber Wall
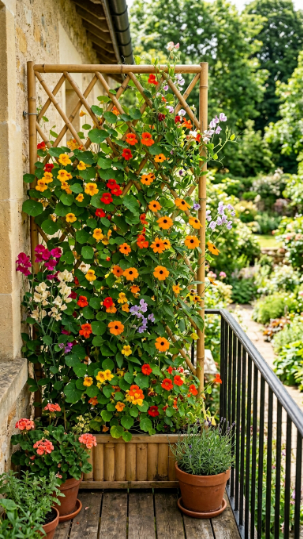
A bamboo trellis transforms a flat, lifeless balcony wall into a living tapestry of climbing flowers — and fast-growing climbers can cover a full panel within 8–10 weeks of planting.
Fix an 180cm × 90cm bamboo trellis panel to your balcony wall using masonry anchors and allow at least a 5cm gap between the panel and the wall for airflow and to allow stems to weave through the lattice naturally. Plant climbers in a deep container (minimum 30cm depth) positioned directly in front of the trellis base. Sweet peas, Thunbergia alata (black-eyed Susan vine), and climbing nasturtiums are perfect for this — all grow rapidly, flower prolifically, and are fully beginner-friendly.
Guide the first stems through the lowest trellis gaps with soft plant ties (never wire, which cuts stems). After the initial guidance, these plants self-cling or scramble willingly. Deadhead sweet peas and nasturtiums every three to four days — removing finished flowers is the single most impactful thing you can do to prolong their flowering season, stimulating the plant to produce more blooms rather than setting seed.
💡 Pro Tip: Sow a second batch of sweet pea seeds six weeks after your first — this succession planting staggers the flowering period and keeps your trellis display looking fresh from June all the way through to early October.
Explore climbing plants for balcony trellis displays and read expert sweet pea growing guidance from the RHS.
Once your climbers reach the top of the trellis, your balcony wall will feel genuinely private and beautifully alive.
10. Galvanised Metal Bucket Collection
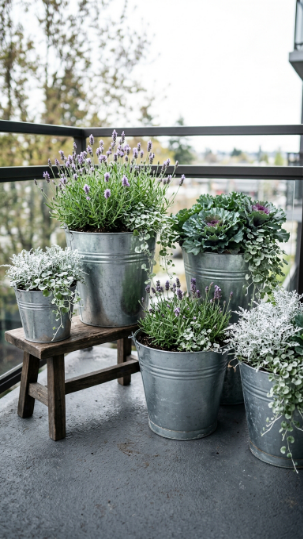
Galvanised metal buckets occupy a sweet spot between rustic charm and industrial chic — grouped together, they create a cohesive DIY balcony display that looks expensive and intentional with almost no effort.
Drill or punch five to seven drainage holes in the base of each bucket before planting — metal containers heat up quickly in direct sun, which accelerates water evaporation and increases root temperature stress. Offset this by double-potting: place the plant in a standard plastic pot inside the galvanised bucket, with a layer of gravel between them. This air gap insulates the roots from heat and allows easy removal for maintenance or seasonal replanting.
Lavender (Lavandula angustifolia ‘Hidcote’ or ‘Munstead’) is an exceptional choice for galvanised containers on sunny balconies — it’s drought-tolerant, richly fragrant, fully hardy, and the silver-green foliage looks stunning against the metal texture. Pair with ornamental kale for contrasting leaf texture in autumn, or Osteospermum for a riot of summer daisies.
Arrange buckets in a loose triangular cluster rather than a straight line — three larger buckets at the back and sides, two smaller ones at the front — to create the natural depth that makes a display feel designed rather than arranged.
Discover galvanised metal planter ideas for contemporary balcony gardens and explore growing lavender in containers from The Old Farmer’s Almanac.
The natural patina that develops on galvanised metal over time only makes this display more beautiful.
11. Colander Strawberry Tower
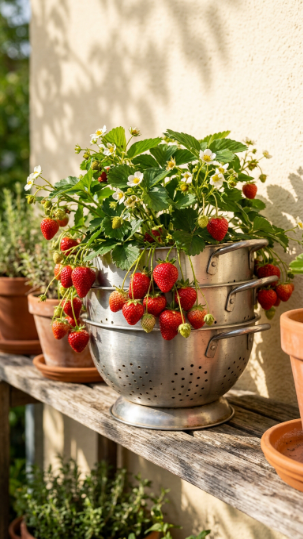
Old metal colanders are among the most charming and genuinely practical DIY planters for growing strawberries on a balcony — their existing drainage holes make them ready to plant immediately, and the cascading fruit looks almost impossibly pretty.
Choose a large colander (28–30cm diameter) and a smaller one (18–20cm). Stack them using a central threaded rod or bamboo cane, with the smaller on top. Fill both with a 60/40 mix of multi-purpose compost and perlite. Strawberry roots are shallow and fast-drying, so watering once daily in summer is essential — the compost should never feel bone dry at the surface.
Plant everbearing varieties such as ‘Albion’, ‘Mara des Bois’, or ‘Flamenco’ — these produce fruit continuously from June through September rather than in a single flush. Plant four to six runners per colander level, allowing them to trail naturally over the edges. The runners that cascade down produce secondary plantlets, which you can root in small pots of compost to create free plants for next season.
Best strawberry varieties for container growing:
- ‘Flamenco’ — heavy cropping, compact, excellent flavour
- ‘Mara des Bois’ — wild-strawberry taste, everbearing
- ‘Albion’ — large fruit, very vigorous, drought-tolerant once established
- ‘Toscana’ — ornamental pink flowers, excellent balcony variety
Browse how to grow strawberries in containers on a balcony and read detailed strawberry container growing advice from the RHS.
Few things are more satisfying on a balcony morning than picking sun-warmed strawberries directly from your own display.
12. Driftwood Air Plant Sculpture
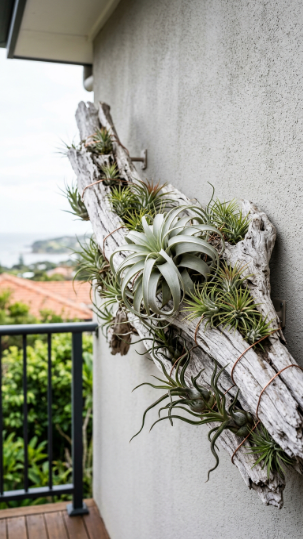
Air plants (Tillandsia) need no soil, no pot, and no drainage — they attach directly to driftwood, bark, or stone, making them perfect for creating genuinely sculptural DIY balcony displays that look more like living art than conventional gardening.
Select a piece of driftwood with natural crevices, forks, and texture. Mount it horizontally on the wall using two large L-brackets, or balance it vertically in a heavy terracotta pot filled with decorative gravel. Attach Tillandsia directly using non-toxic waterproof adhesive or fine copper wire — never superglue or anything that seals the trichomes (the tiny hair-like structures through which the plant absorbs water and nutrients).
Mist your air plants two to three times weekly with rainwater or filtered water (tap water in hard water areas deposits mineral salts that block trichomes). Once a month, submerge the entire plant in room-temperature water for 20–30 minutes, then shake off excess water and hang upside-down briefly before replacing on the sculpture — this prevents water pooling in the crown, which causes rot.
💡 Pro Tip: Place your driftwood sculpture where it receives bright, indirect light — south-facing balconies with shade netting or east-facing positions are ideal. Direct midday sun bleaches and desiccates air plants within days; they need brightness, not scorching heat.
Explore air plant display ideas for outdoor spaces and learn how to care for Tillandsia air plants from The Sill.
A driftwood air plant sculpture requires almost no maintenance but creates an enduring, ever-evolving focal point that genuinely surprises visitors.
13. Repurposed Drawer Planter Shelf
🖼️ IMAGE PROMPT: A realistic lifestyle photograph of three reclaimed timber dresser drawers mounted at staggered heights on a balcony wall, planted with trailing lobelia, portulaca, and variegated ivy. Lighting: warm natural afternoon light. Colour palette: distressed cream-painted
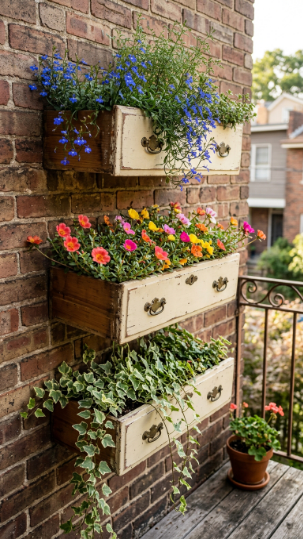
, vivid blue lobelia, coral portulaca, cream and green ivy. Mood: vintage, eclectic, and colourful. Photography style: eye-level angled shot. Background: soft weathered brick wall. Style tags: photorealistic, 8K, botanical photography, magazine quality, no people.
Old dresser drawers repurposed as wall-mounted planters offer something no conventional container can: generous depth, unusual proportions, and a genuine vintage character that makes your balcony look like it was styled by a set designer.
Line each drawer with heavy-duty pond liner, stapling it firmly to the interior walls. Cut a series of drainage slits in the liner base rather than removing it entirely — this retains some moisture in the lower layer while preventing waterlogging. Fill with a rich mix of two-thirds multi-purpose compost and one-third well-rotted garden compost for a nutrient-dense growing medium that sustains hungry bedding plants through summer.
Mount drawers using heavy-duty mirror plates fixed to both the back and base of each drawer, secured with 60mm exterior screws into wooden batten or masonry anchors. Stagger the heights — high, low, medium from left to right creates visual rhythm and ensures each drawer receives adequate light without being shaded by neighbours.
Portulaca (moss rose) is an exceptional plant for drawer planters in full sun positions — it produces jewel-bright flowers all summer long, thrives in the heat, and is remarkably drought-tolerant once established, forgiving the occasionally missed watering session.
Discover upcycled furniture planter ideas for balconies and explore trailing and bedding plants for wall containers via Gardeners’ World.
There’s a quiet joy in giving old furniture a new outdoor life, and the result is one of the most characterful DIY plant displays you can create.
14. Copper Pipe Succulent Frame
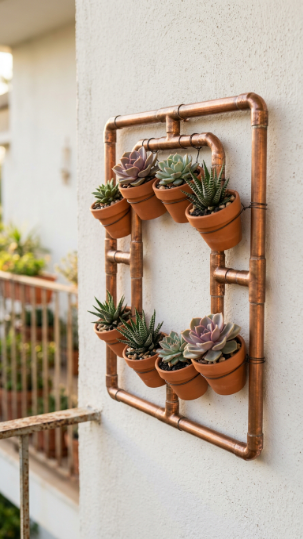
Copper pipe frames are one of the most sophisticated DIY balcony plant displays you can build — the material oxidises beautifully over time, the geometric form contrasts brilliantly with organic plant shapes, and the entire project costs under £30 to construct.
Use 15mm copper pipe and standard push-fit corner fittings (no soldering required) to create a rectangular or square frame in your chosen dimensions — 60cm × 80cm is a good starting size. Hang the frame using two picture hooks or masonry anchors. Wire small terracotta or ceramic pots to the frame at varying heights using copper wire, which blends invisibly with the frame and corrodes at the same rate for a cohesive aged look over time.
Haworthia and small Echeveria varieties are perfect for the compact pots this frame requires — both grow slowly, need infrequent watering (once a week in summer, once a fortnight in winter), and produce the striking rosette forms that look most architecturally beautiful within a geometric frame. A top-dressing of black volcanic grit in each pot elevates the display to gallery-quality aesthetic.
💡 Pro Tip: Apply a thin coat of clear lacquer to the copper pipe before mounting if you want to preserve the bright metallic finish permanently. Leave it untreated if you prefer the natural green-blue verdigris patina — both approaches look beautiful, but they’re impossible to reverse, so decide before you begin.
Explore geometric plant frame ideas for balcony walls and learn about growing Haworthia and small succulents outdoors at Missouri Botanical Garden.
This is the kind of DIY display that people ask about every single time they step onto your balcony.
15. Wicker Basket Fern Display
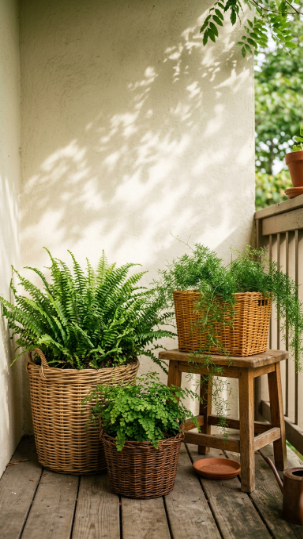
Wicker baskets transform ferns from ordinary houseplants into a lush, Instagram-worthy display — the natural texture of woven willow or rattan pairs with fern fronds in a way that feels curated, organic, and genuinely beautiful.
Line each basket with a double layer of heavy-duty plastic sheeting before planting — wicker is not inherently waterproof, and unlined baskets deteriorate rapidly with repeated watering. Seal the lining to the interior with waterproof tape, pierce drainage holes at the base, and fill with a moisture-retentive compost mixed with 20% peat-free ericaceous compost to create the slightly acidic, humus-rich environment that ferns prefer.
Boston fern (Nephrolepis exaltata) and the asparagus fern (Asparagus setaceus) are best suited to partially shaded balconies receiving 2–4 hours of indirect light — direct sun scorches their fronds within days. Mist the foliage every morning in dry weather; ferns absorb a portion of their moisture through their fronds, particularly in low-humidity urban environments. Group the baskets close together to create a naturally humid microclimate between the plants.
Never allow ferns to completely dry out between waterings. Check by pressing into the compost 3cm deep — it should feel consistently damp, like a wrung-out sponge, never bone dry and never sodden.
Discover shade-tolerant plants for north-facing balconies and read comprehensive fern care guidance from the University of Florida Extension.
A well-watered fern display in wicker baskets brings the feeling of a forest floor to the most urban of balconies.
16. Recycled Pallet Succulent Frame

A pallet laid flat and planted with a close-packed tapestry of mixed succulents functions like a living painting — and it’s one of the few DIY plant displays for balconies that genuinely improves over the growing season as the plants fill in and intermingle.
Lay the pallet flat, fill between the slats with a shallow layer (8–10cm) of cactus and succulent compost mixed with 50% coarse horticultural grit. Plant densely — 5–7 succulents per slat gap — using a mix of low-growing Sedum, rosette Echeveria, mat-forming Sempervivum, and trailing Sedum spurium. The key to a visually successful tapestry planting is colour contrast: pair blue-green rosettes next to deep burgundy sempervivums, silver Crassula against acid-green Sedum.
Allow the pallet to lie flat for the first six weeks while roots establish — tilting too early causes newly planted succulents to dislodge before they’re anchored. After establishment, you can prop the pallet vertically against a wall if preferred, creating a genuinely theatrical vertical living picture.
Beginner vs. Advanced approach:
- Beginner: Lay flat permanently, use only Sempervivum and hardy Sedum (fully frost-hardy, zero maintenance)
- Advanced: Tilt vertically, incorporate tender Echeveria, bring indoors in winter, water on a weekly summer schedule
Browse succulent living picture frame projects and explore which succulents are fully frost-hardy outdoors from the RHS.
This display rewards patience — four to six months after planting, the tapestry effect is truly stunning.
17. Terracotta Pot Herb Spiral
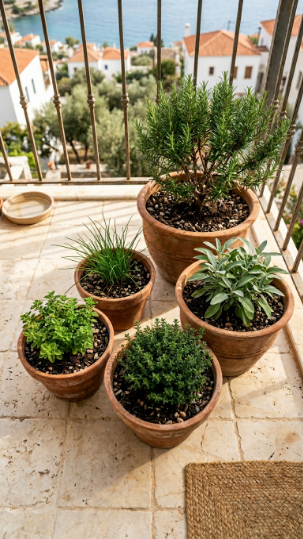
Arranging terracotta pots in a spiral formation on the balcony floor is one of the oldest kitchen garden design tricks — it creates a space-efficient, visually dynamic herb garden that is easy to harvest, easy to water, and endlessly extendable.
Use five to seven terracotta pots in progressively smaller diameters — beginning at 35cm and reducing in roughly 5cm increments. Arrange them in a gentle clockwise spiral, with the largest at the back left and smallest at the front right. Elevate alternate pots on terracotta feet or stacked bricks to introduce height variation — this prevents larger pots from shading smaller neighbours while adding three-dimensionality to what might otherwise look simply like a row.
Plant each pot with a single Mediterranean herb: rosemary in the largest (it needs space and excellent drainage), then sage, thyme, Greek oregano, marjoram, and finally chives in the smallest. All of these herbs share the same care requirements: full sun (6+ hours), minimal watering, and well-drained soil. Use John Innes No. 2 compost with 30% added grit for drainage that closely mimics their native Mediterranean conditions.
💡 Pro Tip: Label each pot with a small slate plant marker engraved or written in chalk pen — beyond the practical benefit, it gives the display a kitchen garden aesthetic that looks charming and intentional rather than an afterthought.
Explore Mediterranean herb garden ideas for balconies and read growing Mediterranean herbs in containers via Gardeners’ World.
Once established, a well-arranged herb spiral gives you fresh flavour at your fingertips every single day.
18. Fabric Grow Bag Vegetable Garden
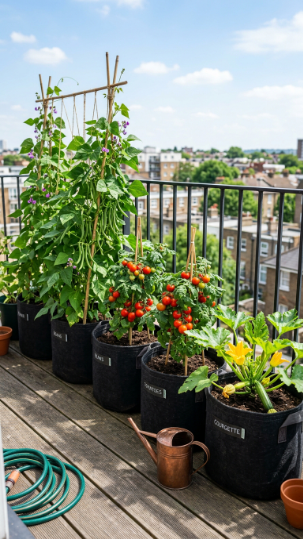
Fabric grow bags are a revelation for balcony vegetable gardening — they’re lightweight, air-prune roots for healthier plants, stack flat when not in use, and produce genuinely impressive harvests even in compact outdoor spaces.
Choose minimum 30-litre bags for tomatoes and courgettes, 20-litre for French beans and chard. Fill with a mix of two-thirds quality vegetable compost and one-third well-rotted farmyard manure or homemade compost — vegetables are hungry plants and need nutrient-dense soil to perform well in containers. Incorporate a generous layer of slow-release vegetable fertiliser granules at planting time and top-dress with additional compost six weeks into the growing season.
Compact or dwarf vegetable varieties are essential for balcony growing: ‘Tumbling Tom Red’ cherry tomatoes require no staking and trail beautifully over the bag edges, ‘Patio Choice Yellow’ courgette is genuinely compact and very productive, ‘Cobra’ French bean climbs a simple bamboo support and produces all season. Water daily in warm weather — fabric bags dry faster than plastic pots.
Fabric bags need to stand in saucers or on drip trays to prevent staining the balcony floor during watering. Position in the sunniest spot available — vegetables require 6–8 hours of direct sun minimum for productive cropping. North-facing balconies will disappoint for vegetables; herbs and leafy greens are better choices in those conditions.
Discover balcony vegetable gardening in containers and learn about growing vegetables in fabric grow bags from Penn State Extension.
There is something genuinely magical about harvesting your own tomatoes from a balcony three floors above street level.
19. Colourful Glazed Pot Cluster
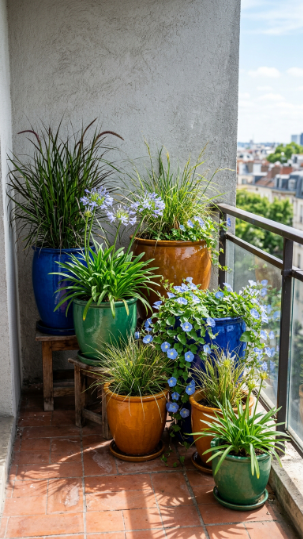
A cluster of bold, coloured glazed ceramics is one of the highest-impact DIY plant displays you can create on a balcony — the pots themselves become part of the composition, working with the plants rather than simply containing them.
The design principle is simple but important: choose two complementary colours (cobalt + amber, emerald + terracotta) and vary the finish within those colours (gloss, matte, speckled) rather than introducing too many different hues. This creates a collected, curated feeling rather than a chaotic mishmash. Use seven pots in total — odd numbers always look more natural and dynamic than even groupings in plant display design.
Glazed ceramics are non-porous, meaning they retain moisture significantly longer than terracotta — water approximately half as frequently and always check that drainage holes are large and unobstructed. They’re also heavier than plastic, so be mindful of total weight on your balcony; spread pots across the floor space rather than clustering in one structural zone.
For planting: ornamental grasses (Stipa tenuissima, Carex ‘Evergold’) add movement in the wind and look stunning against bold ceramic colours. Agapanthus thrives in glazed pots and produces spectacular blue umbel flowers in summer. Trailing blue Convolvulus sabatius spills beautifully over the pot edges with minimal care.
Browse glazed ceramic pot display ideas for balcony gardens and learn how to choose and care for glazed garden pots from Better Homes & Gardens.
Bold ceramic pots don’t just grow plants — they make your balcony feel like a thoughtfully designed room.
20. Upcycled Birdcage Planter

A vintage birdcage repurposed as a hanging planter is one of the most instantly recognisable and distinctive DIY plant displays possible — the sculptural cage frames its plants like a jewellery box, turning even a modest plant collection into something genuinely beautiful.
Line the bottom third of the cage interior with a thick layer of sphagnum moss pressed into shape, then place a small plastic nursery pot (with drainage holes) inside it. This approach allows water drainage through the moss while keeping the compost contained. Fill the nursery pot with a free-draining mix of multi-purpose compost and perlite. Plant through the cage bars — trailing string-of-pearls and Tradescantia fluminensis work particularly well, their stems weaving naturally through the metalwork as they grow.
Hang the birdcage from a ceiling hook rated to at least 5kg, using a heavy-duty S-hook and chain or thick jute rope for a softer aesthetic. Position in bright, indirect light — deep shade will make trailing plants leggy and pale, while direct hot sun through the cage bars risks scorching foliage at the focus points of the bars.
💡 Pro Tip: Spray the cage with clear exterior lacquer before planting if it’s an antique or has any rust — this prevents further deterioration without changing the aged aesthetic that makes it beautiful.
Explore creative hanging planter ideas using repurposed objects and read about growing string-of-pearls and Tradescantia outdoors from The Sill.
A birdcage planter is the kind of display that genuinely transforms the atmosphere of a balcony from functional to something closer to magical.
21. Vertical PVC Pipe Herb Tower
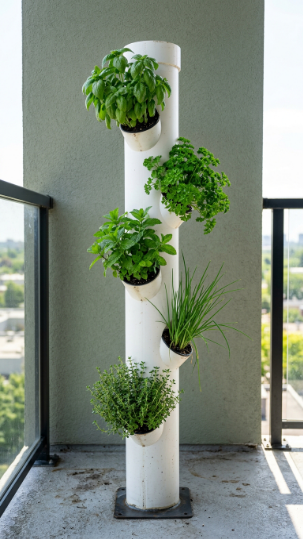
A vertical PVC pipe tower is the most space-efficient DIY herb planting system you can build on a balcony — a single 120cm pipe holds 12–16 individual plants in a footprint of just 15cm diameter.
Use a 110mm or 160mm diameter PVC drainage pipe (available from any DIY store, inexpensively). Cut circular planting holes approximately 6–8cm in diameter using a hole saw, staggering them around the pipe at 15–20cm vertical intervals and rotating 90–120 degrees around the circumference so each hole receives adequate light. Place a central inner pipe of 40mm diameter filled with gravel to act as a watering column — water poured into the top distributes evenly throughout the tower, preventing the top plants from monopolising all moisture.
Fill the outer pipe with a 50/50 mix of potting compost and perlite. Plant herb plugs or small plants directly into each hole — push the rootball through the opening, spread the roots into the compost, and firm gently. Compact herbs including chives, thyme, marjoram, basil, and dwarf parsley work well; avoid mint in a tower as its invasive root system colonises the entire pipe rapidly.
Rotate the tower 90 degrees every week so all sides receive balanced sun exposure — this prevents the shaded side from becoming leggy and pale while the sunny side thrives. A single quarter-turn each week takes ten seconds and keeps every plant growing equally well.
Discover vertical herb tower projects for balconies and read about companion herb planting in containers from the University of Florida Extension.
A PVC herb tower is the engineering solution that turns a completely bare balcony corner into a full herb garden.
22. Mixed Sensory Balcony Garden Display
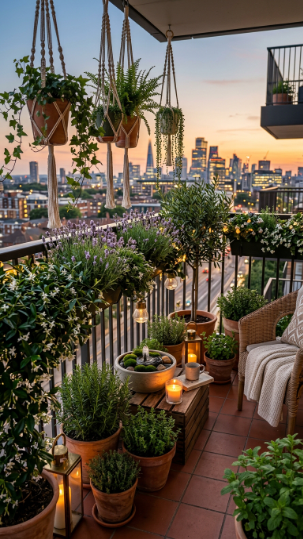
A sensory balcony display goes beyond what looks beautiful — it deliberately incorporates plants that engage touch, scent, sound, and taste alongside sight, creating an outdoor space that feels immersive and genuinely restorative in a way a purely visual display cannot.
Design the display in zones: a fragrance zone along the railing with lavender (Lavandula angustifolia), star jasmine (Trachelospermum jasminoides), and sweet-scented stocks; a tactile zone with feathery ornamental grasses (Stipa tenuissima moves beautifully in a breeze), velvety lamb’s ear (Stachys byzantina), and soft moss in a shallow dish; a taste zone with compact herbs in a window box or small pots. A small solar-powered water feature adds the sound dimension — the gentle sound of moving water has measurable relaxation effects and masks ambient urban noise.
Add outdoor string lights or lanterns among the planting to make the display beautiful after dark as well as during daylight hours — a balcony that’s welcoming in the evening becomes an outdoor room you actually use rather than simply admire from inside.
This display requires more planning than the others in this list, but it rewards every moment of that effort with a space that engages all your senses simultaneously.
💡 Pro Tip: Plant star jasmine in your largest available container and allow it to climb a wall-mounted trellis or wire frame — in a warm, sheltered balcony position, it can cover 2 metres of wall and fill the entire space with fragrance on warm evenings.
Explore how to create a sensory balcony garden and discover fragrant plants for outdoor containers and patios via Gardeners’ World.
A sensory balcony garden doesn’t just decorate a space — it genuinely transforms how you feel when you’re in it.
Getting Started With DIY Plant Displays for Balconies
The single easiest first step any beginner can take today is to buy one 30cm terracotta pot, one bag of multi-purpose compost, and three plug plants of trailing lobelia or Calibrachoa. Place the pot in the sunniest spot your balcony offers, plant the plugs, water thoroughly, and that is your balcony garden started. Not in a month, not when you’ve researched it sufficiently — today, for under £15.
The most common mistake beginners make is choosing plants before choosing the right location. Before buying anything, stand on your balcony at midday and honestly assess how many hours of direct sunlight it receives. South and west-facing balconies with 5–6+ hours of sun support most flowering plants, vegetables, and Mediterranean herbs. North or east-facing balconies with less than 3 hours of direct sun are better suited to ferns, hostas, begonias, and leafy herbs like mint and parsley.
For your first purchase: one railing planter, one bag of hanging basket compost with built-in water-retaining gel, and three to five plants in the “thriller, filler, spiller” combination. One upright plant, two bushy plants, two trailers. This formula works every single time, in every container, at every skill level.
Expect to see visible growth within two to three weeks, full establishment within six weeks, and a display that genuinely impresses within eight weeks of planting. Balcony gardens, particularly in summer, move faster than you’d expect.
Frequently Asked Questions
What are the best DIY plant displays for balconies with limited sunlight?
For shady balconies receiving fewer than 3 hours of direct sunlight, focus on ferns (Boston fern, maidenhair fern), hostas, begonias, impatiens, and shade-loving foliage plants like Caladium. Arrange them in hanging baskets and railing planters using moisture-retentive compost, as shaded balconies tend to stay cooler and require less frequent watering. Avoid sun-lovers like lavender, succulents, and most vegetables entirely in these conditions — they will underperform regardless of how well you care for them.
How do I stop my balcony plants from drying out too quickly in summer?
The three most effective strategies are: incorporating water-retaining gel into your compost at planting time (it absorbs 400 times its weight in water), mulching the compost surface with decorative gravel or horticultural bark to reduce evaporation, and self-watering planters with integrated water reservoirs for time-away periods. On a sunny south-facing balcony in peak summer, plan to water most containers once daily — in the morning if possible, as evening watering can encourage fungal issues in warm, still weather.
Can I create a DIY balcony plant display as a renter without drilling into walls?
Absolutely. Railing-mounted planter boxes clamp directly to railings with no fixings into walls. Freestanding ladder displays, tiered terracotta towers, and floor-level pot clusters require no wall fixings whatsoever. Hanging baskets can attach to freestanding tension poles (specifically designed for balcony use) rather than ceiling hooks. The only display ideas in this article requiring wall fixings are pallet herb walls and trellis panels — skip those for a fully non-invasive setup.
How often should I fertilise balcony container plants?
Container plants exhaust available nutrients within 6–8 weeks of planting because watering continually flushes nutrients from the compost. Flowering balcony plants benefit from a high-potassium liquid feed (tomato fertiliser works perfectly) every 7–14 days from late spring through summer. Foliage plants and herbs need a balanced liquid feed every two to three weeks. Succulents require a diluted cactus fertiliser once monthly during the growing season only — overfeeding succulents produces weak, leggy growth.
Why are my balcony plants dying despite regular watering?
Overwatering is far more commonly fatal to balcony plants than underwatering. If foliage is yellowing, wilting despite wet compost, or the plant looks generally collapsed, check the drainage holes — blocked drainage causes root rot within days. Push your finger 3–4cm into the compost: if it feels wet and the plant looks poorly, stop watering and allow it to dry out before watering again. Also check for extreme wind exposure, which desiccates foliage rapidly on high balconies and causes damage that looks identical to drought stress.
A Few Final Thoughts
There’s something quietly extraordinary about transforming even the smallest balcony into a living, breathing outdoor space — and with these 22 vibrant DIY plant displays, you now have far more than enough inspiration to begin. You don’t need a large budget, professional skills, or a spacious terrace to create something genuinely beautiful; you need one good idea, one afternoon, and the willingness to get your hands in compost. Every spectacular balcony garden in the world started with a single pot in a sunny corner. Perhaps the most important thing to remember about DIY plant displays for balconies is that they evolve — the display you build this spring will look completely different by September, and better again the following year as you add, rearrange, and grow in confidence. Start with one of the simpler ideas here, master it, then add another layer. Before long, your balcony will be the one that neighbours stop to photograph. One pot, one sunny spot, one green idea — your balcony garden starts right now.
Published on Greenbotanicalgarden.com | Category: Balcony & Outdoor Container Gardening

