
At a Glance
- Upcycled containers — tin cans, teacups, wine corks — are free or near-free and make the most charming windowsill planters you’ve ever seen.
- A coat of paint and a handful of pebbles can transform a basic terracotta pot into a designer-looking display piece in under an hour.
- Layering heights using stacked books, wooden crates, or small shelves turns a flat ledge into a lush, gallery-style plant scene.
- Propagating cuttings from plants you already own is the ultimate budget trick — new plants, zero cost, endless windowsill fillers.
- Mixing textures, colours, and container types is what separates a casual grouping from a curated, intentional display.
1. The Classic Painted Terracotta Row
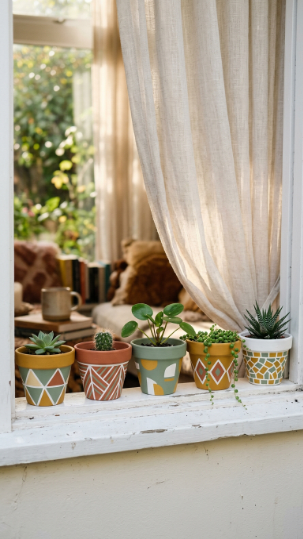
You already own terracotta pots. You probably have craft paint somewhere. This is the most satisfying afternoon project in the history of windowsill decor — and it costs practically nothing.
Pick two or three colours and commit to a coordinated colour story. Stripes, polka dots, colour-blocked halves, abstract brushstrokes — all of it works. The trick is repetition: use the same colours across all pots in different patterns so the row looks intentional, not random.
Use outdoor or ceramic acrylic paint and seal with a matte varnish to protect from watering splashes. Paint the inside rim too — it shows beautifully when the plant sits lower in the pot and makes the whole thing look deliberately finished.
Pro Tip: Apply a white primer coat first on terracotta before your colour — it stops the clay from absorbing your paint and gives you a much more vibrant, even result with just one colour coat instead of three.
🌿 How to paint terracotta pots for indoor plants 🔗 The Sill: Plant Styling Tips for Your Home
Your windowsill, your rules — make it uniquely, unmistakably yours!
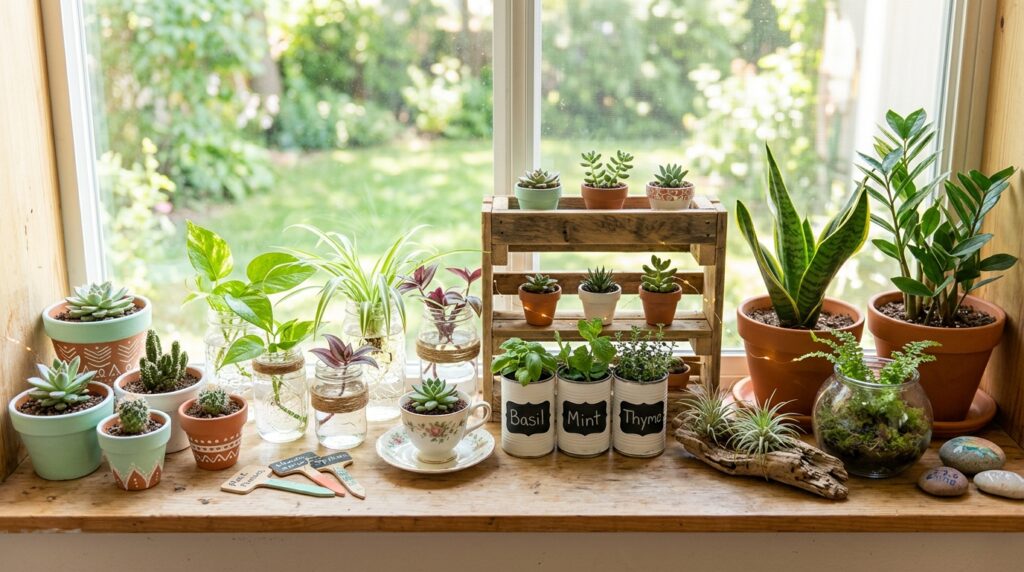
2. Upcycled Tin Can Herb and Plant Gallery

Here’s the deal: you’ve been throwing these away, and that is a decorating crime. Tin cans — baked bean tins, coffee canisters, sardine tins, tomato tins — are completely free windowsill planters just waiting to happen.
Punch drainage holes in the base with a nail and hammer, rinse clean, and the container is ready. From there, go wild: paint them, wrap them in jute twine or leather cord, hammer a repeating dot pattern around the outside, or leave them raw and silver for an industrial vibe. Mix all three treatments in one row for a curated, collected-over-time look.
The natural size variation of different tin types creates interesting height contrast without buying a single thing extra. Tiny sardine tins for succulents, big coffee canisters for herbs — it works perfectly.
Pro Tip: For a professional painted finish on metal tins, use a spray primer designed for metal surfaces first. It prevents rust forming under the paint and stops the colour from flaking off after a few weeks of watering.
🌿 Upcycled container planter ideas for beginners 🔗 RHS Sustainable Gardening: Upcycling at Home
Free, fun, and endlessly customisable — the tin can gallery is the unsung hero of budget windowsill decor!
3. DIY Cork and Succulent Miniature Planter Wall
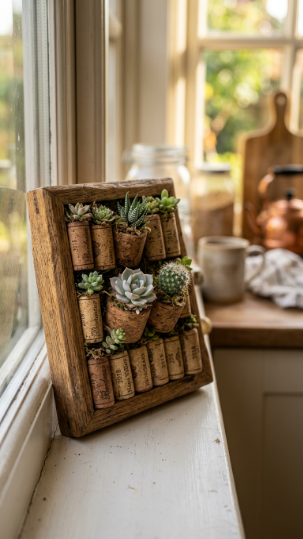
Pretty cool, right? Wine corks are one of the most charming free materials for a budget windowsill project — each one hollows out easily with a small knife or drill and holds a perfect tiny succulent or cactus.
Use a hot glue gun to arrange your planted corks on a small piece of driftwood, a reclaimed wooden board, or even a repurposed picture frame to create a miniature living wall display that sits on your windowsill ledge. Compact rosettes like Haworthia, Echeveria, and tiny Sempervivum fit perfectly.
The whole display is incredibly lightweight and can be moved, rearranged, and refreshed with new cuttings as often as you like. Start saving corks now — you’ll need 12 to 20 for a good-sized display.
🌿 Miniature succulent display ideas for small spaces 🔗 Gardeners’ World: How to Grow Succulents in Unusual Containers
Collect corks, hollow them out, plant them up — your most conversation-starting windowsill project starts tonight!
4. Tiered Display Using Stacked Books and Wooden Crates
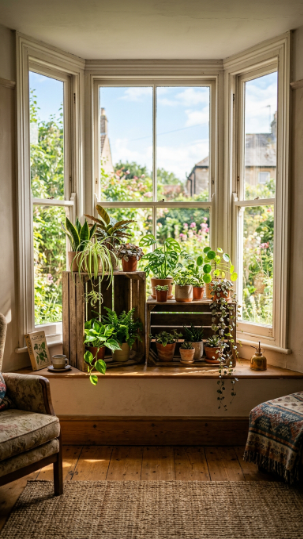
Here’s the thing: a flat row of pots is fine, but a tiered display is where windowsill decor becomes truly editorial. And you don’t need to buy anything special — stacked books, a wooden crate from the supermarket, a small upturned pot used as a riser, even a thick cutting board as a platform all do the job beautifully.
The rule is simple: tallest plants at the back or bottom tier, trailing plants at the front or elevated tier so they can cascade downward. String of Hearts, Burro’s Tail, and Pothos all look incredible draping over the edge of an elevated crate.
Vary your risers for an organic, curated look — not everything needs to be at the exact same height. The slight asymmetry of different lift heights actually looks more intentional and designed than a perfectly uniform step arrangement.
Pro Tip: Line wooden crates with a cut piece of plastic bag before filling with soil or placing pots — this protects the wood from moisture damage and dramatically extends how long your display stays looking fresh and clean.
🌿 Windowsill plant display ideas for every home 🔗 Gardeners’ World: How to Display Houseplants
A little height difference makes the biggest visual impact — stack it up and watch your windowsill transform!
5. Vintage Teacup and Saucer Succulent Garden

Thrift stores and charity shops are absolutely full of mismatched teacups and saucers — and they cost almost nothing. These make the most adorably charming windowsill planters, especially for compact succulents and small trailing plants.
Choose cups with wide, shallow openings for rosette-type plants like Echeveria, Haworthia, or Graptoveria. If you can, drill a small drainage hole in the base with a ceramic drill bit. If not, add a thin layer of activated horticultural charcoal at the bottom to manage moisture without drainage — it absorbs excess water and keeps roots healthy.
Mismatched patterns actually look better than a matching set — the eclectic collected look is the whole charm of this style. Arrange them on a lace runner or a small wooden tray for a cohesive cottage-garden feel.
🌿 Best succulents for teacup and novelty container planting 🔗 RHS Guide to Growing Cacti and Succulents
Head to your nearest charity shop this weekend — your next favourite windowsill planter is waiting there for 50p!
6. DIY Propagation Station — Beautiful and Completely Free
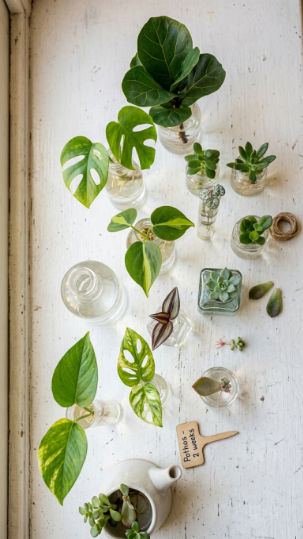
The secret is: this is the only windowsill decor idea that literally pays for itself. A propagation station — rows of small glass bottles and jars holding plant cuttings — looks genuinely gorgeous on a windowsill while growing you a continuous supply of free new plants.
Use any small glass vessels you have: jam jars, olive jars, small vases, empty spice bottles, even a repurposed wine glass. Arrange them on a small wooden tray or book to group them as a cohesive display. Pop cuttings from pothos, tradescantia, begonia, ivy, or coleus directly into water — roots usually form within 2 to 3 weeks in a bright spot.
For succulents, rest leaf cuttings on top of dry cactus mix in a shallow tray — they root without any soil contact. The whole station becomes a living, evolving display that looks different and more exciting every single week.
Pro Tip: Change the water in your propagation jars every 3 to 4 days to keep it fresh and oxygenated. Adding a tiny piece of activated charcoal to each jar keeps the water clear and prevents the murky bacterial buildup that can slow rooting.
🌿 How to set up a plant propagation station at home 🔗 The Sill: How to Propagate Plants — Complete Guide
More plants, zero budget, maximum display value — the propagation station is THE windowsill multitasker!
7. Colour-Coded Plant Marker Sticks for a Neat, Stylish Display
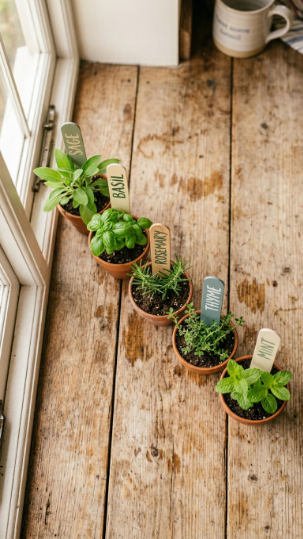
This one costs almost nothing and completely elevates the look of any windowsill display. Hand-lettered plant markers — painted on wooden lollipop sticks, cut-down twigs, or flat river stones — add a personalised, artisan quality to even the most basic collection of pots.
Pick up wooden lollipop sticks or tongue depressors from a craft store (you get 100 for about £1), paint the tops in your display’s accent colour, and write plant names in a fine permanent marker or white paint pen. The small, repeated detail of matching markers throughout your display creates a polished, cohesive look.
Alternatively, paint flat stones from the garden with chalk paint and write names in marker — zero cost and they look incredible propped against pots. This works brilliantly for herb windowsill displays where you want to tell rosemary from thyme at a glance.
🌿 Creative plant label and marker ideas for indoor gardens 🔗 Gardeners’ World: Labelling Your Plants Creatively
Tiny detail, huge impact — your windowsill instantly looks like it belongs in a magazine!
8. DIY Washi Tape Geometric Pot Designs

Here’s the deal: this is the most beginner-friendly budget DIY windowsill idea on the entire list. Washi tape comes in hundreds of patterns and colours, costs almost nothing, is completely repositionable, and transforms a plain white or terracotta pot in about four minutes flat.
Apply tape in geometric patterns — diagonal stripes, triangle sections, chevron bands, colour-blocked halves. Because washi tape is designed to peel off cleanly, you can completely redesign your pot display seasonally without damaging anything. Swap out autumn earth tones for spring pastels, or go graphic and bold for summer.
The only real technique: press tape edges down firmly with a fingernail and seal the design with a thin coat of clear matte varnish if you want it to last more than a few weeks against watering splashes.
Pro Tip: Layer two or three different washi tape patterns on the same pot for a more complex, eclectic look. Use a neutral metallic gold or silver tape as a trim strip between colour sections to give the design a finished, professional edge.
🌿 Easy DIY plant pot makeover ideas for beginners 🔗 University of Maryland Extension: Indoor Plant Display Guide
Four minutes, a roll of tape, a completely new windowsill vibe — you have zero excuses not to try this one today!
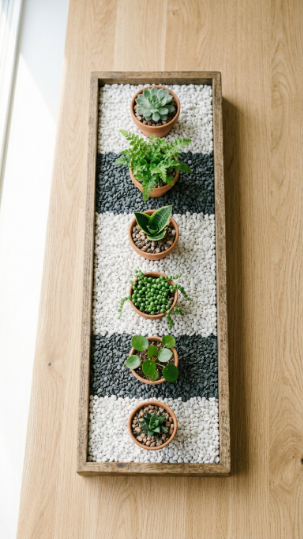
9. Pebble and Stone Top-Dressing for Instant Polish

This takes five minutes and makes every single pot look like it came from a designer plant shop. Top-dressing — covering the bare soil surface of a pot with decorative stones, gravel, or pebbles — is the finishing touch that most people skip and shouldn’t.
Use white gravel for a clean, modern look. Black pebbles for something dramatic and moody. Terracotta grit to complement the colour of your pots. Collected river stones for a natural, coastal feel. Mix and match across your windowsill collection — different top-dressing materials on adjacent pots actually adds beautiful texture contrast to the overall display.
Beyond looking amazing, top-dressing has a practical bonus: it slows surface evaporation, keeps soil from splashing onto leaves when you water, and discourages fungus gnats by covering the bare soil surface they love to lay eggs in.
🌿 How to top-dress indoor plant pots like a professional 🔗 RHS: Mulching and Top-Dressing Guide
Five minutes, a bag of gravel, and every pot instantly looks like it cost three times what you paid — do this one immediately!
10. Reclaimed Wood Windowsill Shelf Extension
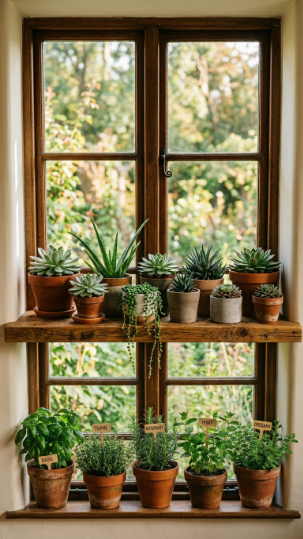
If your windowsill is narrow and you keep running out of space, here’s the fix: extend it yourself. A single plank of reclaimed wood or an offcut from a timber merchant (often free or pence) bracketed just below your existing sill gives you a whole extra tier of display space.
This is especially effective in kitchen windows where you want both herbs AND trailing decorative plants but simply don’t have the ledge width. Two or three small L-shaped brackets from a hardware store, a piece of wood cut to width, and you’ve doubled your windowsill real estate for under £5.
Sand and oil the wood to protect it from watering, or paint it to match your window frame. The layered, two-tier look adds depth and interest to the window view from both inside and outside.
Pro Tip: Attach a thin strip of wooden beading along the front edge of your new shelf — it acts as a lip that stops pots from being nudged off and gives the shelf a more finished, intentional look.
🌿 DIY windowsill shelf ideas to maximise plant display space 🔗 Gardeners’ World: Making the Most of Small Growing Spaces
Don’t let a narrow sill limit your green ambitions — build it wider and plant it up!
11. Mason Jar Herb Garden With Twine and Label Detailing
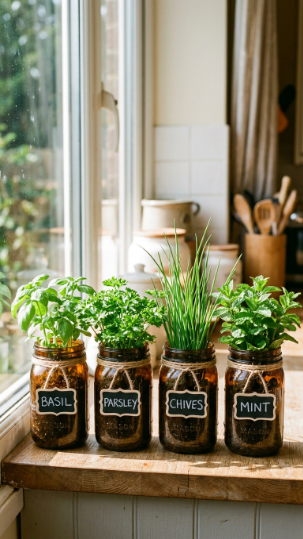
Talk about a game-changer for kitchen windowsills — mason jars are the perfect budget herb planter, especially when you add a loop of jute twine around the neck and a small chalk label. The whole look is clean, organised, and genuinely beautiful.
Line the base of each jar with a layer of small pebbles for drainage (mason jars have no drainage hole, so this is essential), then activated charcoal, then good-quality potting mix. Herbs like basil, parsley, chives, mint, and coriander all thrive in the bright conditions of a kitchen window.
The key to making this look designed rather than improvised is uniformity — identical jars, identical twine, consistent label sizing. Within that framework you can vary the herb, the chalkboard text style, and the twine knot type for enough variation to feel curated.
🌿 Best herbs to grow in mason jars on your kitchen windowsill 🔗 Penn State Extension: Growing Herbs Indoors
Fresh herbs, beautiful display, and dinner upgrades on demand — the mason jar herb row is the kitchen windowsill dream!
12. DIY Patterned Gravel Tray for a Cohesive Display Base
Here’s an idea that ties your entire windowsill display together instantly — a decorative gravel tray as the base that all your pots sit on. It looks designed, keeps moisture contained, and creates a cohesive foundation that makes even a mismatched pot collection look curated.
Use a shallow wooden tray, a vintage baking dish, or a reclaimed rectangular tin. Fill it with pebbles or horticultural gravel and arrange your pots on top. You can create simple patterns with the gravel beneath — stripes of alternating light and dark stone, a geometric border, or concentric rectangles — visible between the pots for an extra layer of visual detail.
The gravel tray also acts as a passive humidity tray: keeping the stones moist under the pots raises local humidity slightly, which benefits most houseplants on a sunny, dry windowsill.
Pro Tip: Make sure pots sit ON TOP of the gravel surface, not sunk into it — the pot base should never sit in standing water, just above it. This gives you humidity benefit without the root rot risk.
🌿 How to create a cohesive windowsill plant display 🔗 University of Florida IFAS: Container Plant Care
One tray of gravel and your whole collection suddenly looks like it was styled by a professional — brilliant!
13. Fairy Lights and Climbing Plant Window Frame Display
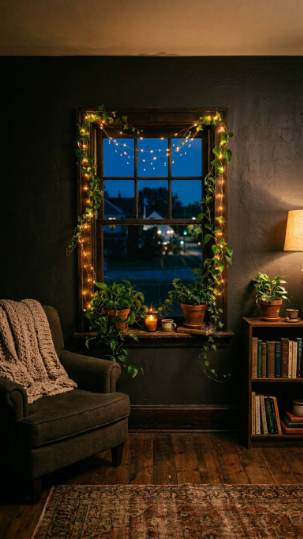
This is easily the most magical-looking entry in our budget DIY windowsill plant decor ideas — and it costs almost nothing extra if you already have fairy lights. The combination of trailing climbing plants and warm LED string lights around a window frame creates an absolutely dreamy, botanical display.
Start with two fast-growing trailing plants on your windowsill — pothos, ivy, tradescantia, or jasmine are all brilliant. As they grow, guide the vines up and around your window frame with small removable adhesive hooks (Command strips work perfectly). Weave battery-operated warm white or amber fairy lights through the vines as they grow.
Within a few months the whole window is framed in living green with a warm glowing halo — it looks like something from a fairytale boutique hotel, and it cost you a pot of pothos and a £3 string of lights.
🌿 Best trailing plants for decorating window frames indoors 🔗 The Sill: Best Low-Maintenance Trailing Houseplants
The most romantic windowsill display idea on this list — your whole room looks different once the vines grow in!
14. Stencilled Hessian Pot Wrap for a Boho Windowsill Vibe
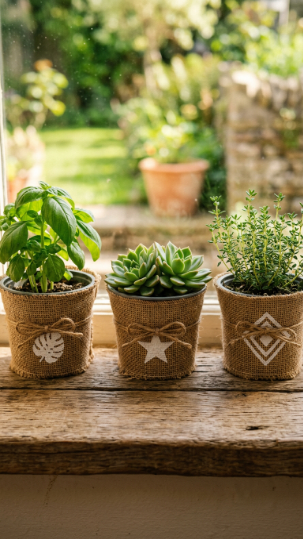
You’ve totally got this one — it’s easier than it sounds and the results are genuinely beautiful. Hessian or burlap fabric bought by the metre (very cheap at fabric shops or online) wraps around nursery pots effortlessly, transforming ugly black plastic into something that looks like it came from a lifestyle boutique.
Cut rectangles of hessian to fit around your pots, secure with a dab of hot glue or a loop of twine, and then go one step further: use a simple stencil and white craft paint to add a leaf motif, geometric pattern, or botanical illustration to the front of each wrap. Different stencil designs, same fabric and paint colour, across your whole display.
The boho, earthy aesthetic of natural hessian with white stencilling works beautifully with herbs, succulents, and trailing foliage plants alike.
Pro Tip: Keep hessian wraps removable rather than permanently glued so you can take them off for watering, let the pot drain fully, then replace the wrap. This prevents the fabric from getting waterlogged and developing mould.
🌿 Budget boho plant pot cover ideas for windowsills 🔗 Gardeners’ World: Decorating Pots and Containers
Boho, botanical, and completely budget — this wrapping technique is your secret weapon for a cohesive display!
15. DIY Miniature Fairy Garden Windowsill Scene
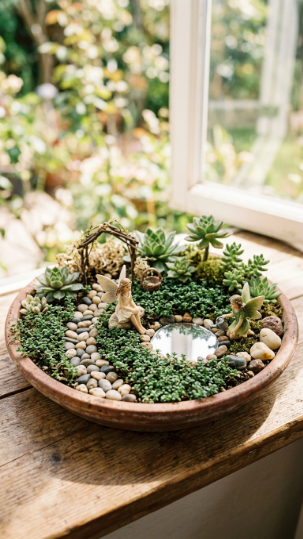
One of the most creative budget DIY windowsill plant decor ideas you can try — a miniature fairy garden in a wide, shallow saucer takes one afternoon to make and brings joy every single day you look at it. The magic is entirely in the tiny details.
Use a terracotta saucer at least 3–4 inches deep as your base. Fill it with potting mix and create a miniature landscape: creeping thyme or baby tears as a lawn, small echeveria rosettes as trees, a pebble pathway, a mirror shard as a pond, and tiny figurines from a craft store or pound shop. A sprig of dried moss adds instant aged texture.
You can build the whole thing for under £5 using materials you mostly already have — and unlike a full garden, it’s easily refreshed and rearranged as seasons change. Swap in tiny pumpkins for autumn, tiny baubles for winter, mini Easter eggs for spring.
🌿 How to make a miniature fairy garden in a container 🔗 Gardeners’ World: Fairy Garden Plants and Ideas
Once you start building a miniature garden, you genuinely cannot stop — it is the most addictive DIY project on this entire list!
16. Colour-Blocked Window Ledge Using Bold Paint and Pots
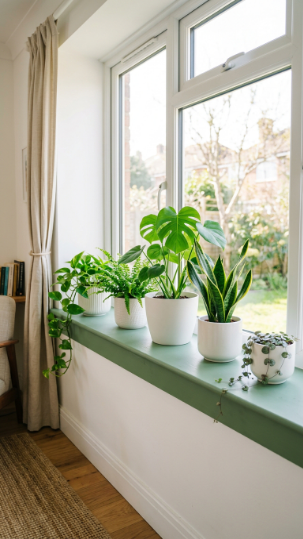
Here’s the most surprisingly impactful idea in the list — paint your windowsill ledge itself as a bold colour block. Just a strip of paint on the ledge surface, contrasting with the wall colour, instantly makes your whole plant display look intentional and designed.
Deep sage green, terracotta, rich navy, warm mustard — pick one bold colour and paint just the top surface and front face of your sill. Use a small pot of chalk paint (great coverage, no primer needed, easily changed later) for maximum impact with minimum cost. The colour-blocked ledge becomes the backdrop that makes every pot pop.
This trick works especially well in rentals where you can’t paint walls — painting the windowsill ledge is low-commitment, reversible, and technically just painting furniture.
Pro Tip: If you’re a renter or nervous about commitment, use wide decorating tape to mask off the ledge and paint within the tape lines. Chalk paint can be repainted over in minutes if you change your mind — so you really have nothing to lose by going bold.
🌿 How to style your windowsill for maximum visual impact 🔗 RHS: Making the Most of Your Indoor Growing Spaces
One pot of paint and your whole room gets a focal point — this is the quickest transformation on the list, full stop!
17. Hanging Test Tube Planter Wall in the Window Frame
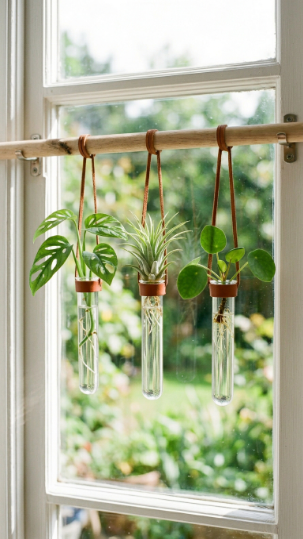
Talk about a conversation piece! A DIY test tube planter display mounted across your window frame is one of those ideas that looks incredibly expensive and bespoke but costs almost nothing to make.
You need three to five small glass test tubes (under £5 for a set online), a length of leather cord or copper wire, and a tension rod or small wooden dowel across your window frame. Hang each test tube on its own loop of cord at slightly different heights and fill with water propagations, air plants, or single stems of trailing plants.
The glass catches the light as it streams through the window, the cuttings look like tiny botanical specimens, and the whole thing has a minimalist laboratory-meets-botanical-garden aesthetic that works in every style of home.
🌿 DIY test tube and glass planter ideas for windowsills 🔗 The Sill: Air Plant and Propagation Display Ideas
Minimal effort, maximum style — this one gets photographed by every single person who visits your home!
18. Seasonal Swap Windowsill Display With a Rotating Prop Box
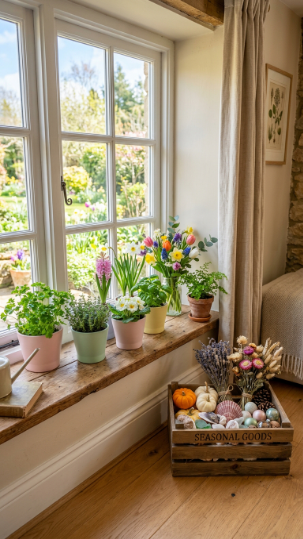
Here’s the best system to keep your budget DIY windowsill plant decor ideas feeling fresh all year long: a rotating prop box. Keep a small basket, crate, or shoebox of seasonal accessories — seashells for summer, mini pumpkins and dried leaves for autumn, small pinecones and baubles for winter, pressed flowers and pastel stones for spring.
Your plants stay the same (mostly!) but the surrounding props and accessories swap out every few months to completely transform the feel of the display. Add a small seasonal vase of cut flowers, a couple of thematic objects, and rearrange the pot positions for a whole new scene in under 15 minutes.
This approach means your windowsill is never boring, always seasonally relevant, and always an inexpensive refresh away from something that feels new and exciting. It’s the budget decorator’s secret weapon.
Pro Tip: Photograph your windowsill display each time you style it — you’ll build up a personal lookbook of arrangements to revisit, and you’ll get better at styling each time you do it. It becomes genuinely addictive.
🌿 How to style your windowsill for every season 🔗 Gardeners’ World: Seasonal Indoor Plant Displays
A rotating prop box is the secret to a windowsill that always looks styled — and the whole system costs you almost nothing to set up!
Frequently Asked Questions
How do I make a windowsill plant display look expensive on a budget?
The biggest tricks are consistency and finishing details. Using matching or coordinating pot colours, adding decorative top-dressing to bare soil surfaces, labelling your plants neatly, and grouping pots on a unified base (like a wooden tray) all create a polished, curated look without spending much. The secret is removing visual clutter — a few well-styled pots always look better than a crowded ledge of mismatched nursery containers.
What are the best budget plants for a windowsill display?
Pothos, tradescantia, spider plants, and ivy are the ultimate budget windowsill plants — all grow fast, propagate freely, and cost almost nothing from supermarkets or garden centres. For sunny windowsills, succulents and small cacti are equally affordable and low maintenance. Herbs like basil, mint, and thyme are under £1 from most supermarkets and look beautiful while also being genuinely useful.
How do I keep a windowsill display looking good all year round?
Use a rotating seasonal prop system (idea 18!) and dedicate 10 minutes a month to maintenance: removing dead leaves, freshening top-dressing, rotating pots so all sides get even light, and replacing any plant that’s declined beyond recovery with a fresh propagation. Keep your display edited rather than continuously adding — removing one tired plant is often more impactful than adding a new one.
Can I do DIY windowsill plant decor in a rented home?
Absolutely! Almost every idea in this list is completely renter-friendly — painted pots, upcycled tin cans, tiered crate displays, mason jar herbs, and fabric wraps involve zero permanent changes to the property. Even the colour-blocked windowsill idea uses chalk paint that goes over itself in minutes. Tension rods across window frames (for hanging displays) leave no holes. You can have a completely transformed windowsill without touching a single wall.
How many plants look best on a windowsill?
Odd numbers — three, five, or seven — always arrange more naturally than even numbers and avoid that symmetrical, overly formal look. On a standard windowsill, five plants of varied heights and textures is usually the sweet spot: enough to look lush and abundant, but not so many that the display becomes cluttered. Always leave an inch or two between pots for air circulation and to make watering easier without knocking everything over.
A Few Final Thoughts
Your windowsill is genuinely one of the most impactful decorating opportunities in your entire home — and as these budget DIY windowsill plant decor ideas prove, you don’t need to spend much (or anything) to make it something truly special. A tin can, a coat of paint, a handful of pebbles, a cutting from a plant you already own — these are the raw ingredients of a display that makes you smile every time you walk past it.
The key is just to start. Pick one idea from this list today — paint a couple of pots, rescue some tin cans from the recycling, set up a propagation jar on the ledge — and build from there. Once you start, you won’t stop, and your windowsill will evolve into something that feels completely personal and alive.
Creativity and a little effort beat budget every single time. Your dream windowsill is closer than you think — now go make it happen!

