You’ve been doing everything “right” with your compost pile — layering browns and greens, turning it regularly, keeping it moist — and yet it’s still slow, smelly, or just sitting there doing absolutely nothing. Sound familiar? Here’s the exciting news: there’s a ridiculously simple, embarrassingly cheap trick that experienced composters swear by, and it costs literally two dollars or less at any hardware or grocery store. This one small addition can transform a sluggish, frustrating pile into a hot, fast-working composting machine in a matter of days. Ready to find out what it is? Let’s dive in!
At a Glance
- The $2 trick involves adding a single, readily available nitrogen-rich activator to your compost pile — it jumpstarts microbial activity and dramatically accelerates decomposition from day one.
- Compost activation works by feeding the billions of microorganisms in your pile the nitrogen they need to multiply rapidly and generate the heat that breaks down organic material fast.
- A properly activated compost pile can reach internal temperatures of 130–160°F within 24–48 hours — hot enough to kill weed seeds and pathogens while breaking down material in weeks rather than months.
- The carbon-to-nitrogen ratio of your pile is the single most important factor in compost speed — the $2 trick corrects imbalances almost instantly without expensive commercial activators.
- Finished compost produced with this method is richer in beneficial microbes and nutrients than slow cold-composted material, making it significantly more valuable as a soil amendment.
What Is the $2 Trick and Why Does It Work?
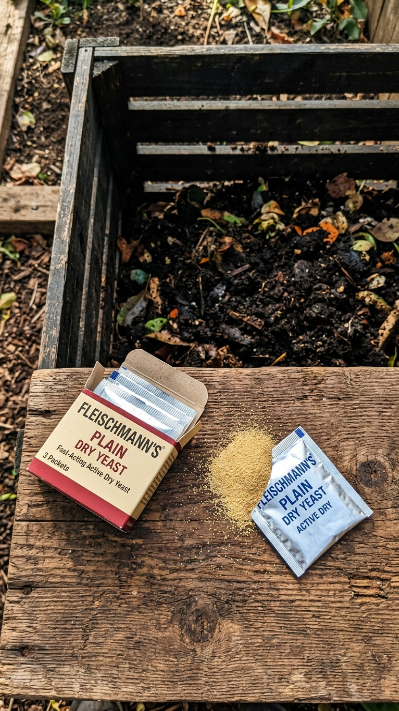
Drumroll please — the $2 trick is dry active yeast. Specifically, the same plain, inexpensive dry yeast packets you find in the baking aisle of any grocery store, usually sold in strips of three packets for around $2. That’s it. That’s the whole secret.
Before you click away thinking this sounds too simple — hear this out! Yeast (Saccharomyces cerevisiae) is one of the most prolific and fast-acting biological activators available to gardeners. When added to a compost pile with adequate moisture, it explodes in population almost overnight and begins producing exactly the enzymes and microbial activity your pile needs to heat up and start breaking down material rapidly.
Here’s what makes yeast so special as a compost activator:
- It produces enzymes that break down complex carbohydrates in carbon-rich materials like cardboard, straw, and woody stems
- It generates heat as a metabolic byproduct — directly contributing to that hot core temperature your pile needs
- It stimulates other microbial populations already present in your pile, acting as a catalyst for the entire ecosystem
- It’s completely natural and organic — no synthetic chemicals, no weird additives, totally safe for food gardens
- It works in cold or warm conditions, making it useful even in early spring or late fall when pile temperatures naturally drop
💡 Pro Tip: Don’t use instant yeast or rapid-rise yeast — stick with regular active dry yeast. The active dry variety contains live dormant organisms that activate on contact with moisture; instant yeast is pre-activated and loses potency quickly in an outdoor compost environment.
The commercial compost activator products you see at garden centers — often selling for $15–$30 a bottle — contain essentially the same biological principle: introducing active microorganisms to jumpstart decomposition. You’re getting the same result for a fraction of the price.
Learn more about building a high-performance home compost system to pair with this trick for maximum results.
According to the Natural Resources Defense Council, home composting with biological activators can reduce organic waste going to landfills by up to 30% per household — small action, massive collective impact.
Two dollars has genuinely never done so much work in a garden before!
The Science Behind Perfect Compost (Simplified!)
You don’t need a biology degree to make great compost — but understanding a tiny bit of the science makes everything click into place and helps you diagnose problems instantly. Here’s the deal, broken down as simply as possible.
Perfect compost is really just managed decomposition. You’re creating ideal conditions for billions of naturally occurring microorganisms — bacteria, fungi, and actinomycetes — to eat organic material and break it down into stable, nutrient-rich humus. Your job is to be a good host: provide the right food, moisture, air, and warmth.
The four pillars of fast, perfect compost:
| Pillar | Ideal Condition | What Goes Wrong Without It |
| Carbon-to-Nitrogen ratio | 25–30:1 (C:N) | Too high = slow pile; too low = smelly pile |
| Moisture | 40–60% (wrung sponge feel) | Too dry = stalled; too wet = anaerobic/smelly |
| Oxygen | Regular turning or aeration | Without it = slow, smelly anaerobic process |
| Temperature | 130–160°F core | Below = slow decomposition, weed seeds survive |
The carbon-to-nitrogen ratio is where most home composters go wrong — and it’s precisely what the $2 yeast trick corrects so elegantly. Most backyard piles are too carbon-heavy (too many dry leaves, cardboard, straw) because green nitrogen-rich materials are less available. Yeast introduces a massive nitrogen-hungry microbial population that rapidly processes the available carbon and generates heat in the process.
💡 Pro Tip: Think of carbon materials as the “food” and nitrogen materials as the “cooks.” Too much food and not enough cooks means nothing gets processed. Yeast essentially hires thousands of new cooks overnight!
The Cornell Waste Management Institute is one of the world’s leading composting research centers and offers a fantastic free composting science guide — worth bookmarking for any serious home composter.
Explore our deep dive into understanding compost ratios for beginners for a full breakdown of browns vs. greens.
Once you understand what your pile actually needs, giving it to the pile becomes incredibly easy!
How to Use the $2 Trick Step by Step
Ready to actually do this? The application process is beautifully simple — this is genuinely a five-minute job that can transform your pile’s performance within 48 hours. Here’s exactly how to use the yeast compost activator trick:
What you need:
- 1–2 packets of active dry yeast ($1–$2)
- 1 cup of warm water (not hot — around 100°F, comfortable on your wrist)
- 1 teaspoon of sugar (optional but helpful — feeds the yeast during activation)
- A watering can or garden hose
Step-by-step application:
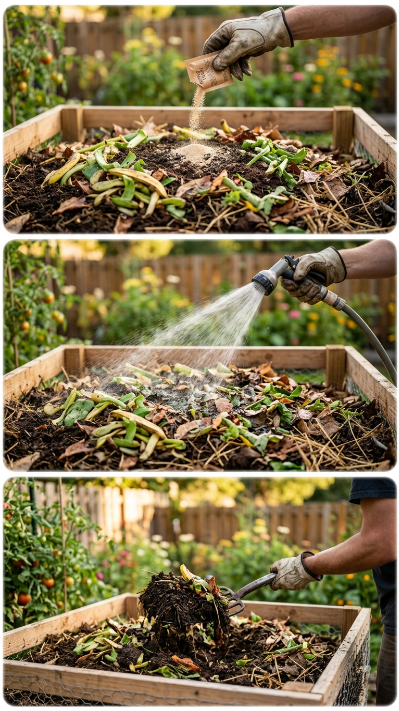
- Mix your activator solution — Dissolve one yeast packet and one teaspoon of sugar in one cup of warm water. Let it sit for 5–10 minutes until it becomes slightly foamy — this confirms the yeast is alive and active.
- Loosen and turn your pile — Before applying, give your pile a quick turn with a garden fork to introduce oxygen. This is critical — yeast and the other aerobic microbes it stimulates need air to work.
- Moisten your pile — If your pile feels dry (it should feel like a wrung-out sponge), water it thoroughly with a hose before applying yeast. The yeast needs moisture to activate and spread through the pile.
- Pour the solution over the pile — Drizzle your activated yeast mixture evenly over the top of the pile, then use your fork to work it into the center mass where temperatures will build. Don’t just pour on top — get it into the core.
- Cover the pile — Use a tarp, old compost bin lid, or even a flattened cardboard box to cover the pile and retain heat and moisture. This is where the magic happens.
- Check in 24–48 hours — Plunge your hand (or better, a compost thermometer) into the center. If you feel genuine heat — significantly warmer than the outside air — your activation worked!
Repeat the yeast application every 4–6 weeks or whenever your pile seems to stall out between turnings.
Find our complete guide to activating and managing a backyard compost bin for ongoing management tips.
Five minutes of effort, forty-eight hours to results — this trick really is that fast!
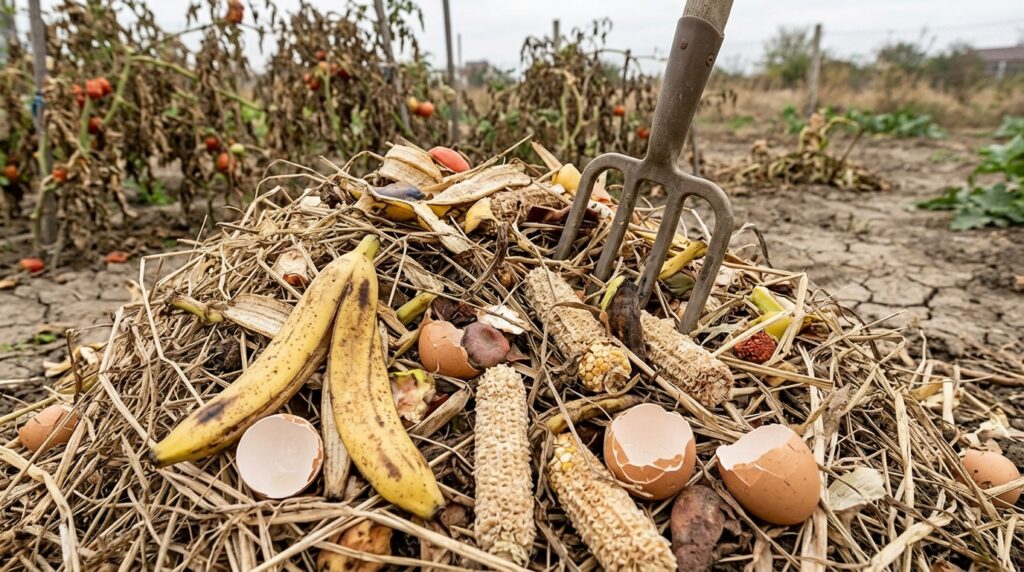
What Materials Work Best With This Method
The yeast trick works best when your pile has the right raw material balance to begin with. Think of yeast as the spark — but you still need good fuel for the fire to take hold. Here’s exactly what to feed your activated pile for the fastest, richest results.
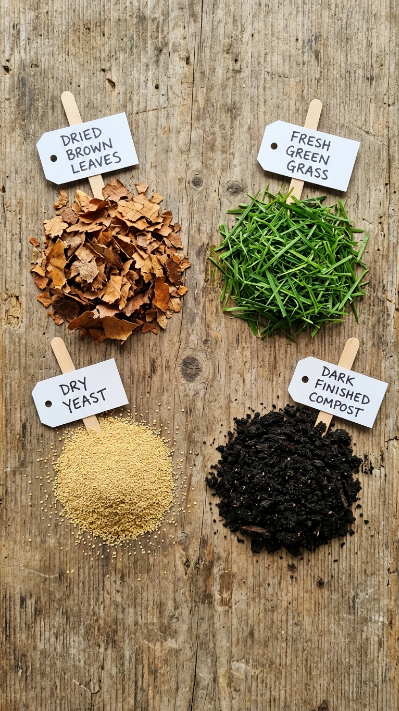
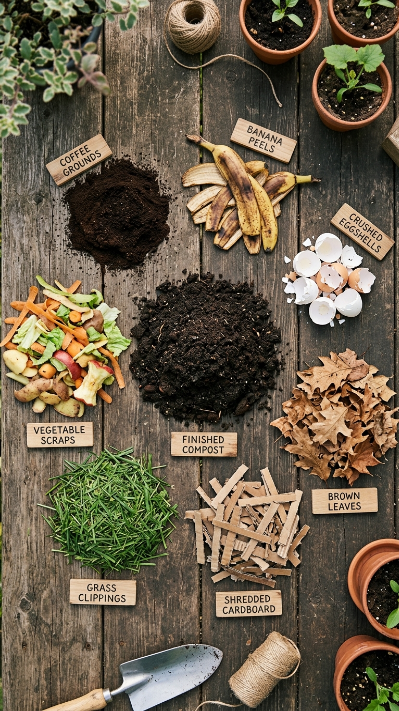
Best “brown” carbon materials (aim for 60–70% of pile volume):
- Shredded cardboard and paper (no glossy pages)
- Dried autumn leaves — shredded if possible
- Straw (not hay — remember, hay has seeds!)
- Woody plant stems, chopped small
- Paper egg cartons and paper bags
- Shredded newspaper — great carbon source, breaks down quickly
Best “green” nitrogen materials (aim for 30–40% of pile volume):
- Fresh grass clippings — one of the highest-nitrogen free materials available
- Kitchen vegetable and fruit scraps
- Coffee grounds — surprisingly high in nitrogen, slightly acidic, absolutely loved by worms
- Fresh plant trimmings and garden waste
- Crushed eggshells (adds calcium too!)
- Aged animal manure — chicken or rabbit manure is composting gold
💡 Pro Tip: Chop or shred everything before adding it to your pile — smaller particles mean exponentially more surface area for microbes (and your newly added yeast!) to work on. A pile of whole cabbage leaves decomposes in months; the same leaves shredded decompose in weeks.
Materials to always avoid in your compost pile regardless of method:
- Meat, fish, or dairy products — attract pests and create anaerobic smell problems
- Diseased plant material — pathogens may survive even in hot piles
- Pet waste — contains harmful pathogens
- Treated or painted wood — chemical contamination risk
- Invasive weed species that have gone to seed
Browse our full guide to what to compost and what to avoid for a complete materials reference.
The right materials plus the $2 yeast trick is a combination that practically runs itself!
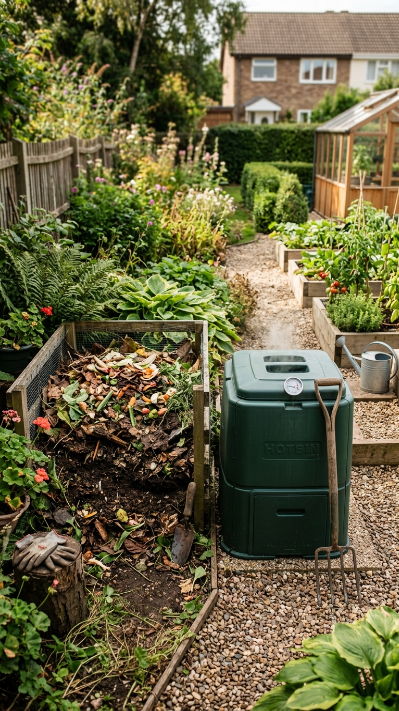
Signs Your Compost Pile Is Finally Working
After applying your yeast activator, you want confirmation that it’s actually working. Here are the clear, unmistakable signs that your pile has finally woken up and started doing its job properly.
You’ll know your pile is activated and working when:
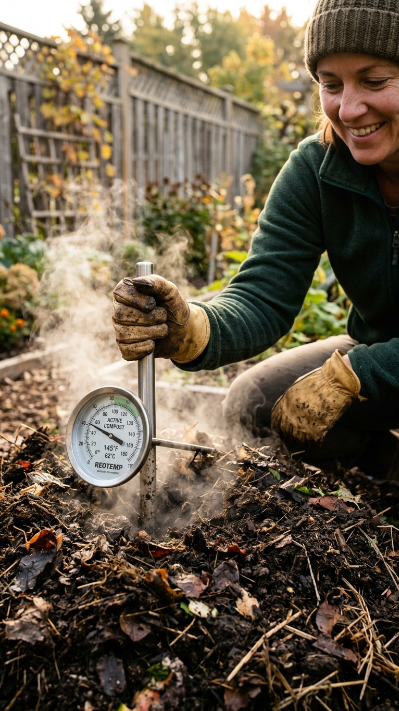
- Heat builds in the core — reach into the center and it feels noticeably warm to hot. A compost thermometer reading 130°F+ is the gold standard confirmation.
- Steam rises from the pile on cool mornings — this is one of the most satisfying sights in gardening. Visible steam means serious microbial activity and real heat generation.
- The pile shrinks noticeably within a week — active decomposition consumes volume. A pile that drops 20–30% in height within the first two weeks is performing beautifully.
- Earthy, pleasant smell replaces any sour or ammonia odors — a properly activated aerobic pile smells like rich forest floor, not garbage.
- White fungal threads (mycelium) visible through the pile when you turn it — this is a fantastic sign of healthy fungal activity working alongside your yeast.
💡 Pro Tip: Invest $8–$15 in a long-stem compost thermometer — it’s the single most useful composting tool you can own, giving you objective data on pile performance and telling you exactly when to turn (temperature drops back below 110°F) and when your compost is finished (temperature stabilizes near ambient air temperature).
If you don’t see heat within 48–72 hours of applying yeast, the most common causes are too dry (add water), too much carbon (add green material), or insufficient oxygen (turn the pile more thoroughly). We’ll troubleshoot all of these in a later section!
Track your pile’s progress with our compost performance tracking guide to optimize every batch.
Seeing steam rise from your pile for the first time is genuinely one of gardening’s great moments — celebrate it!
Common Composting Mistakes This Trick Fixes
Here’s something genuinely exciting: the yeast activation trick doesn’t just speed things up — it actively corrects several of the most frustrating and common composting mistakes at the same time. Let’s look at what it fixes.
Mistake #1: The “nothing is happening” pile A pile that sits unchanged for months is almost always either too dry, too carbon-heavy, or lacking sufficient microbial populations. Yeast addresses all three simultaneously — introducing active microbes, driving moisture uptake, and stimulating nitrogen-hungry bacterial populations.
Mistake #2: The sour, vinegary-smelling pile Sour smells indicate anaerobic fermentation — your pile is too wet and compacted, creating conditions where bad bacteria thrive. Turn the pile to introduce oxygen, add dry carbon materials, then apply yeast to reintroduce healthy aerobic microbial populations.
Mistake #3: The ammonia-smelling pile Sharp ammonia odor means too much nitrogen relative to carbon — too many grass clippings, food scraps, or manure without enough browns to balance them. Add shredded cardboard or dried leaves, then use yeast to redirect microbial activity toward processing that excess nitrogen productively.
Mistake #4: Pile only works in summer Many home composters find their piles stall completely in cool weather. Yeast is particularly valuable here — it generates its own metabolic heat and can kickstart biological activity at lower temperatures than naturally occurring soil bacteria alone.
Mistake #5: Pile takes 12+ months to finish Long composting times almost always indicate inadequate microbial population and incorrect C:N ratio. With yeast activation, proper moisture, and regular turning, most piles can go from fresh materials to finished compost in 6–10 weeks.
See our complete guide to diagnosing and fixing compost pile problems for solutions to every common issue.
According to Washington State University Extension, properly managed hot compost piles finish 4–6 times faster than unmanaged cold piles — and yeast activation is one of the fastest ways to achieve and maintain hot pile temperatures.
One $2 packet fixing five different problems at once — you really can’t argue with that value!
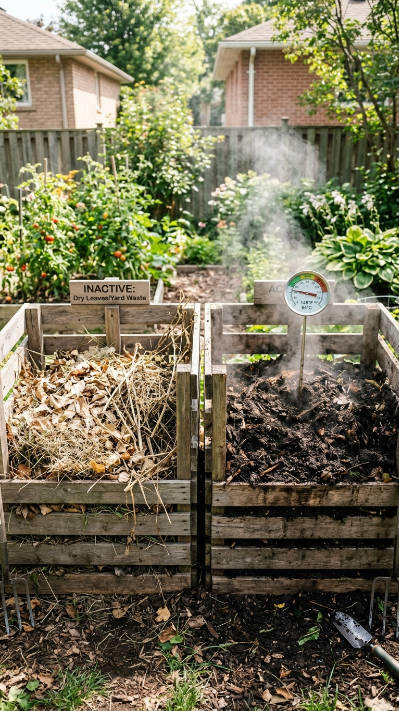
Hot Composting vs. Cold Composting: Which Should You Use?
Now that you have the $2 yeast trick in your toolkit, you have a genuine choice about how intensively you want to compost. Understanding the difference between hot and cold composting helps you decide which approach fits your lifestyle and gardening goals.
| Feature | Hot Composting | Cold Composting |
| Speed | 6–12 weeks | 6–18 months |
| Effort required | Moderate (regular turning) | Minimal (almost none) |
| Weed seed kill | ✅ Yes (130°F+) | ❌ No |
| Pathogen kill | ✅ Yes | ❌ Not reliably |
| Yeast trick benefit | ✅✅ Maximum impact | ✅ Still helps |
| Best for | Large volumes, fast results | Small spaces, passive gardeners |
Hot composting is where the yeast trick shines brightest. You’re actively managing the pile — monitoring temperature, turning regularly, adjusting moisture — and the yeast supercharges every stage of that active management. The payoff is rich, finished compost in as little as six weeks.
Cold composting is the “set it and mostly forget it” approach — you add materials over time and eventually get compost, but slowly. Yeast still helps here by accelerating the pace, but the real magic of the $2 trick is in a managed hot pile.
💡 Pro Tip: You don’t have to choose one method exclusively! Many experienced gardeners run a hot pile for kitchen scraps and fresh garden waste (processing it quickly) alongside a cold pile for autumn leaves (processing slowly over winter). The yeast trick makes both work better.
Which approach should you use? If you have a larger garden needing regula