
A bare balcony wall is missed opportunity in its purest form — vertical space that costs nothing to use and transforms completely with the addition of a well-built pallet shelf loaded with plants. If you’ve been eyeing your balcony wall and wondering how to turn it from blank render into a lush, layered garden feature, these 18 DIY pallet plant shelves for balconies will show you exactly how, from the simplest single-pallet lean-to all the way to built-in planter shelf hybrids with integrated irrigation. Most of these projects cost under £20 in materials, take one afternoon to build, and create results that look like they belong in a garden magazine. Ready? Let’s explore all 18 of them.
Why DIY Pallet Plant Shelves for Balconies Are Worth Your Time
Pallet plant shelves solve the single biggest constraint of balcony gardening: floor space. Most balconies have far more vertical wall surface than usable floor area, and a pallet shelf immediately multiplies your growing capacity without occupying an extra centimetre of standing room. A standard euro pallet (80 × 120cm) provides shelf space for 8–12 pots in the footprint of a floor area smaller than a doormat — the most space-efficient structure a balcony garden can have.
The cost argument is equally significant. Pallets are available free or for a nominal charge from supermarkets, garden centres, builders’ merchants, and online marketplaces. The additional materials — screws, brackets, wood oil — typically total £10–£20. Equivalent commercial shelving units for outdoor plant display retail for £60–£200. The savings are real, and the customisation to your specific wall dimensions and aesthetic is something no commercial product can match.
One important fact many DIY guides overlook: not all pallets are safe for garden use. Always check the pallet’s stamp — HT (heat treated) pallets are safe; MB (methyl bromide chemically treated) pallets are not. An HT stamp indicates the wood was heat-treated to eliminate pests without chemical residue. This distinction is critical if you’re growing edible plants on the shelf.
These projects are ideal for apartment dwellers, first-time DIY gardeners, balcony renters (freestanding options only), and anyone who wants a significant visual impact from a weekend project.
1. Classic Upright Pallet Wall Shelf with Terracotta Pots
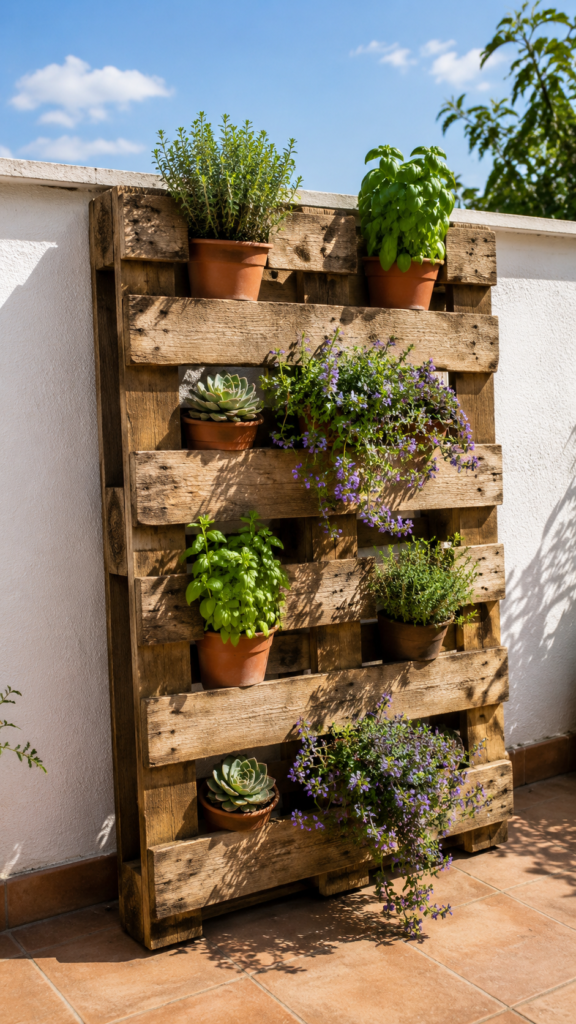
The classic upright pallet wall shelf requires zero cutting, zero specialist tools, and produces immediate visual impact — the pallet’s horizontal gaps are perfectly sized to grip most 10–14cm terracotta pots without any additional fixings.
Source an HT-stamped euro pallet (80 × 120cm) from a local garden centre or builders’ merchant. Sand all surfaces with 80-grit sandpaper to remove splinters, then wipe with a damp cloth. Lean the pallet against the balcony wall and secure to the wall using two large cup hooks screwed into the wall at the pallet’s top corners, with short lengths of wire looped through the pallet frame — this prevents forward toppling on windy days without requiring permanent brackets.
Slot 10cm terracotta pots into each gap between the pallet planks. The standard gap between euro pallet planks (approximately 8–10cm) grips pots at roughly their mid-point, holding them securely. Plant the upper, sunniest positions with sun-loving herbs (basil, thyme); the lower, shadier positions suit trailing Lobelia or shade-tolerant ferns.
The pro insight: treat the pallet with a coat of exterior-grade decking oil before assembly — this extends the wood’s outdoor life from 1–2 seasons to 4–5 years without significantly changing the wood’s appearance.
💡 Pro Tip: Place a rubber furniture pad under the pallet base before standing it against the wall — it prevents the pallet from sliding on smooth balcony tiles in wind and protects any floor surface from scratching.
Learn more about classic pallet wall shelves for balcony container gardens and find balcony and container gardening guidance from the RHS.
A single upright pallet transforms a blank balcony wall into a productive plant display in under an hour.
2. Painted Pallet Shelf in Exterior Chalk Paint
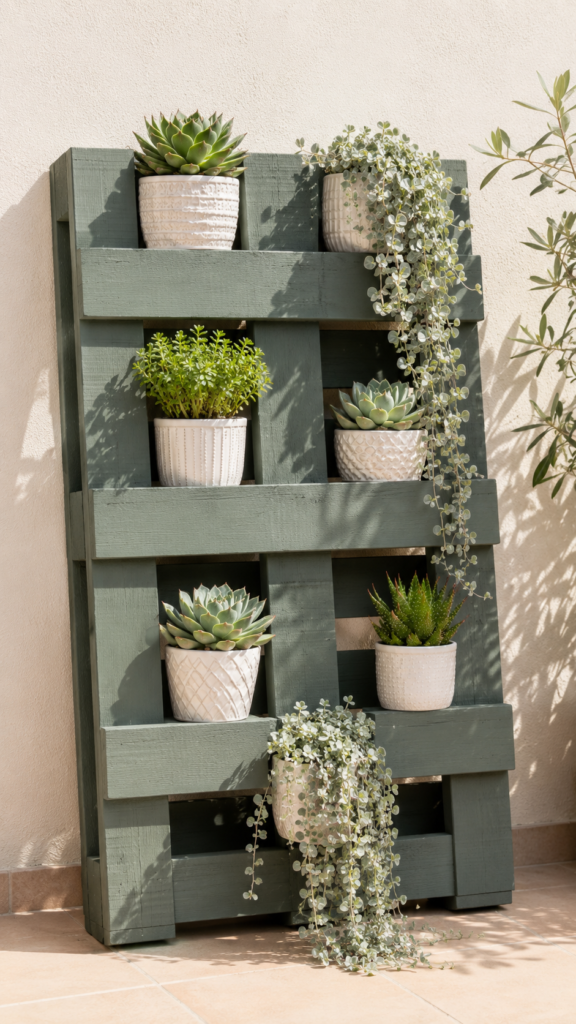
Painting a pallet shelf in exterior chalk paint in a deliberate colour immediately elevates it from salvaged lumber to an intentional design feature — and the paint adds genuine weather protection that roughly doubles the untreated wood’s outdoor lifespan.
Apply two coats of exterior chalk paint with a wide brush, working paint into all grain and crevices. Allow 2 hours of dry time between coats. Good colour choices for balcony pallet shelves: deep sage green (coordinates with virtually every plant colour), charcoal grey (creates a sophisticated backdrop that makes plant foliage read vividly), and white (maximises perceived brightness on a shaded north-facing balcony). Seal with a matte exterior varnish for additional weather resistance.
Exterior chalk paint adheres to rough pallet timber without primer and produces a dense, opaque, matte finish that looks genuinely premium. Unlike gloss paint, it doesn’t peel in sheets when the wood flexes in changing temperatures — a critical practical advantage for outdoor timber.
Pair painted sage green pallets with white ceramic pots and silver-foliage plants: Dichondra argentea ‘Silver Falls’ trailing from the upper shelves creates a striking two-tone composition against the sage background.
Best plant and colour combinations for painted pallet shelves:
- Sage green + white pots + silver Dichondra + white alyssum
- Charcoal grey + terracotta + orange marigolds + coral geraniums
- Chalk white + black pots + deep purple Petunia + lime Helichrysum
Discover painting techniques for DIY pallet plant shelves and balcony garden furniture and read outdoor plant display and container arrangement ideas from BHG.
A painted pallet shelf makes the difference between a garden project and a garden design — the colour choice does half the aesthetic work before a single plant is placed.
3. DIY Pallet Plant Shelves for Balconies with Built-In Guttering Trough
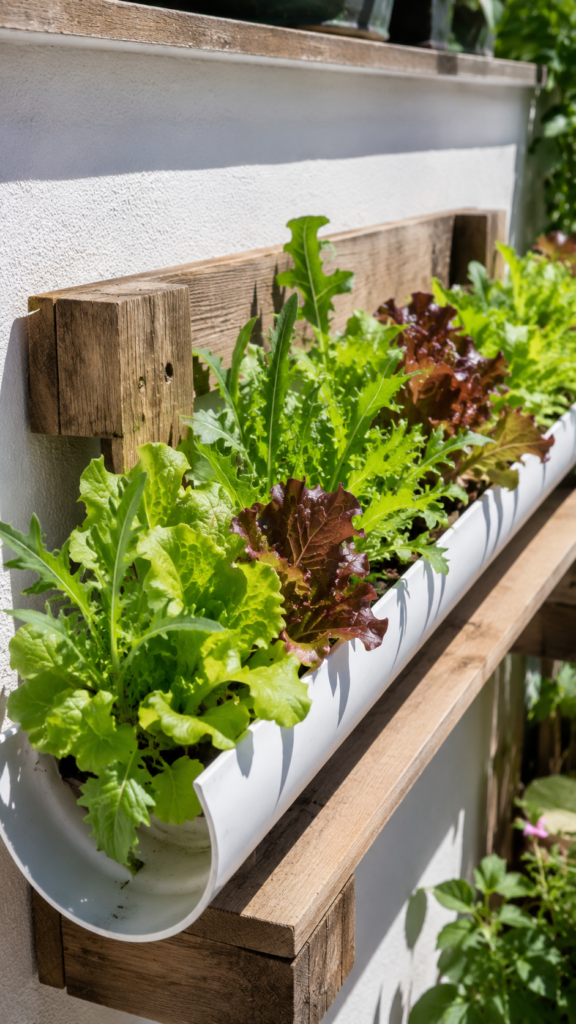
Fixing a length of plastic guttering along the front lip of a pallet shelf creates a continuous built-in trough that is ideal for cut-and-come-again salad crops — one of the most productive DIY pallet plant shelves for balconies you can build.
Purchase a 1.2m length of 100mm wide plastic guttering from a builders’ merchant — available for around £4–£6. Drill a drainage hole every 20cm along the base. Fix two guttering brackets to the front face of the pallet’s lowest shelf board using 40mm screws, then click the guttering section into the brackets. The resulting trough is approximately 8cm deep and 10cm wide — the ideal depth for shallow-rooted salad crops.
Fill with a moisture-retentive peat-free multipurpose compost. Sow cut-and-come-again seeds directly: red oak lettuce (Lactuca sativa ‘Red Oak’), rocket (Eruca vesicaria), and mustard leaves all germinate within 5–10 days and are harvestable at 7–10cm height in 3–4 weeks. The continuous trough allows succession sowing — sow a new section every 2 weeks for a rolling harvest through the growing season.
💡 Pro Tip: Drill drainage holes in the guttering before fixing it to the pallet — attempting to drill through mounted guttering risks cracking the plastic and splitting the brackets. Work on the ground, then fix in position.
Find pallet shelf guttering trough salad garden ideas for balconies and read growing salad leaves in containers from Gardeners’ World.
A guttering trough shelf combines carpentry and kitchen gardening in the most practical way a small balcony can express.
4. Freestanding Pallet A-Frame Shelf Unit
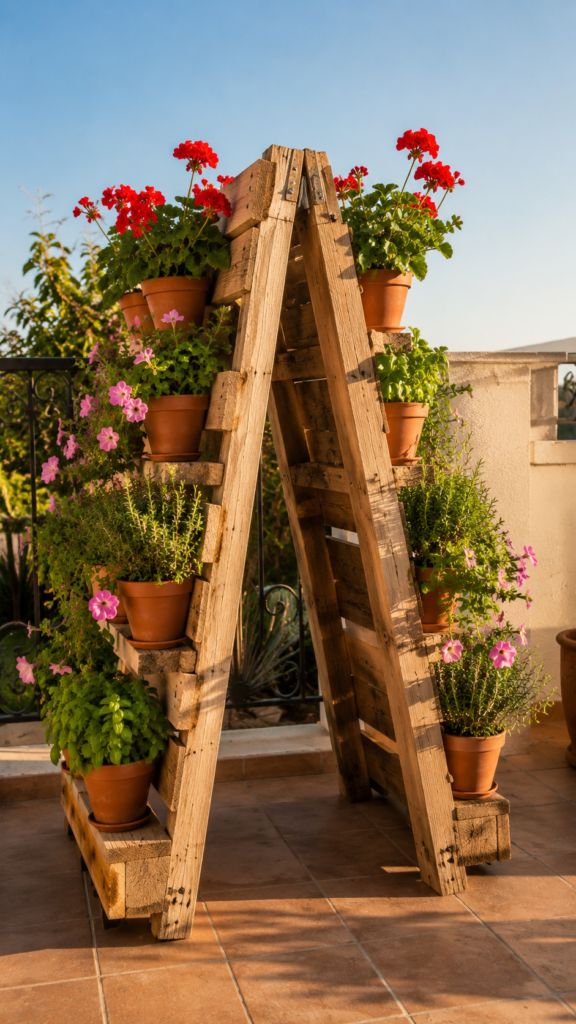
An A-frame pallet shelf uses two pallets hinged at the top — creating a freestanding double-sided unit that plants on both faces, requires no wall fixing, and can be repositioned freely across the balcony.
Hinge two HT pallets together at the top using two heavy-duty metal strap hinges (75mm minimum, rated for outdoor use). Open the A-frame to a stable angle of approximately 60° — at this angle the structure self-supports without toppling on a level balcony floor. For additional stability on windy balconies above the third floor, anchor the base of each pallet to the balcony floor with two bolt-down D-ring anchors and nylon webbing straps.
The A-frame plants on both faces: position sun-loving species (herbs, succulents, annual flowers) on the south-facing side and shade-tolerant plants (ferns, ivy, Chlorophytum) on the north-facing side. This dual-aspect growing simultaneously doubles the planting capacity and uses the shade created by the structure productively.
The practical advantage of the freestanding design: renters can use it without any wall fixings, and the unit can be moved indoors or to a sheltered corner during winter storms without disassembly.
💡 Pro Tip: Attach a length of robust galvanised chain between the two pallet bases at the front — this acts as a stay that prevents the A-frame from spreading open under heavy pot load, eliminating the risk of collapse without needing floor anchors.
Read about freestanding A-frame pallet shelf units for balcony container gardens and find balcony garden design ideas from Gardeners’ World.
A pallet A-frame is the ideal solution for renters who want maximum planting capacity with zero permanent fixtures.
5. Horizontal Stepped Pallet Shelf Tower
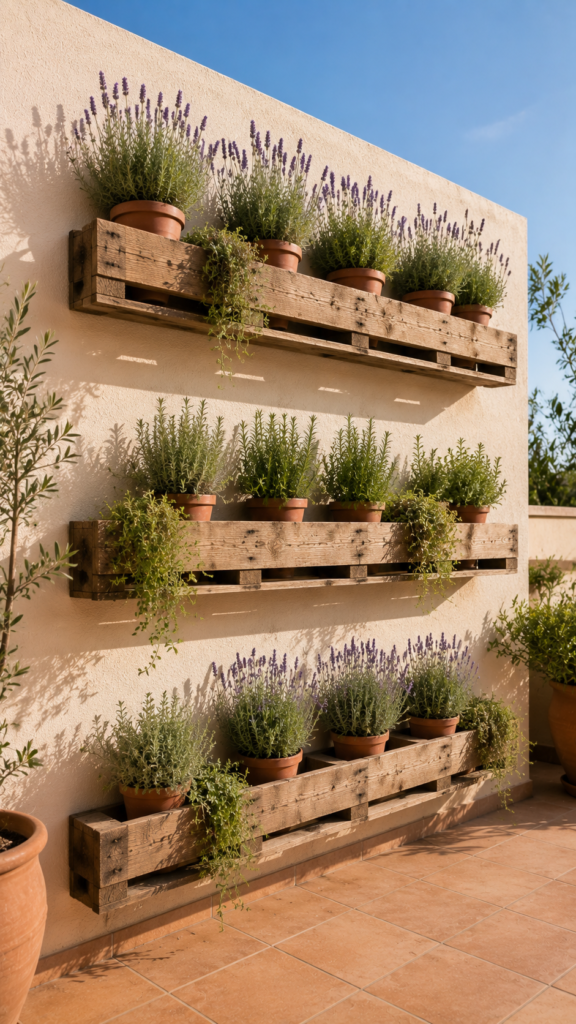
Mounting pallets horizontally in a stepped staircase arrangement creates a dramatic multi-level plant display that functions as an entire garden wall in the footprint of a single pallet width.
Cut three pallets to 80cm width if needed and mount each horizontally to the balcony wall using two heavy-duty shelf brackets per pallet (rated 30kg minimum, to accommodate the weight of several filled pots). Space the shelves at 40cm vertical intervals: 30cm from the floor for the lowest, 70cm for the mid shelf, and 110cm for the highest. This spacing allows plants on each shelf to grow 30–35cm before reaching the shelf above.
Plant each level with species of appropriate mature height: trailing varieties (lobelia, thyme, ivy) on the uppermost shelf where they cascade attractively down the wall face; bushy mid-height herbs (rosemary, basil, oregano) on the centre shelf; compact ground-level plants (sempervivum, compact geraniums) at the lowest shelf. The overall composition creates a layered green wall effect that reads as a single unified display.
Use L-shaped shelf brackets rated for outdoor use — standard indoor shelf brackets corrode within one season when exposed to rain and morning dew.
Explore horizontal stepped pallet shelf tower ideas for balcony walls and find herb container growing guidance from The Old Farmer’s Almanac.
A three-level stepped shelf transforms a single wall into a complete vertical garden with room for fifteen or more plants.
6. Pallet Shelf with Integrated Drip Irrigation
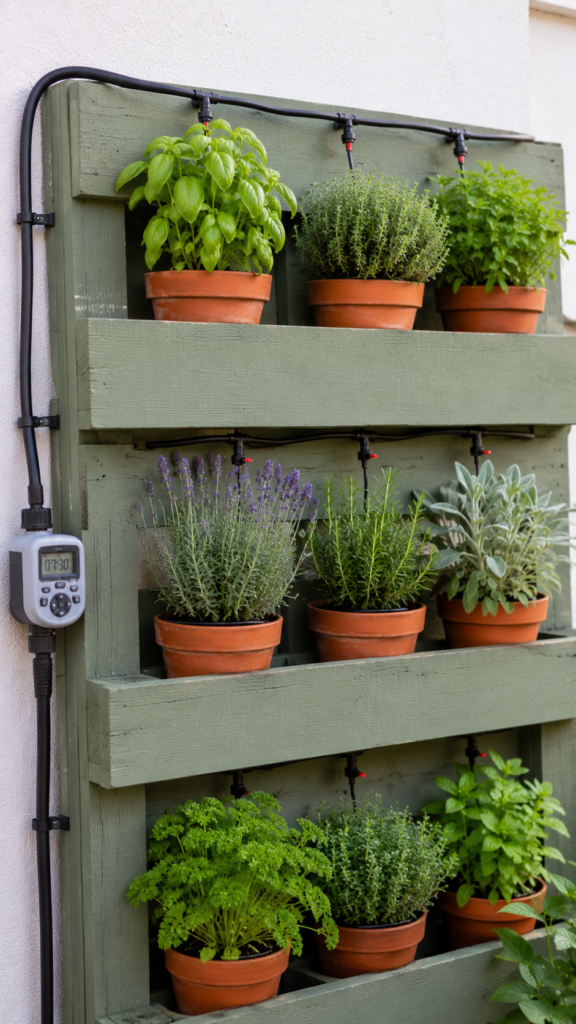
A pallet shelf with integrated drip irrigation eliminates the main maintenance burden of a multi-shelf balcony plant display — the moment you automate watering, your collection can grow as large as the shelf space allows.
Route 13mm main supply tubing along the back top edge of the pallet, secured with pipe clips at 30cm intervals. Drop 4mm distribution tubing down to each shelf level, running along the back rail. Press a drip emitter into the compost of each pot, directing the nozzle to the base of the plant stem. Connect the main supply to your outdoor tap with a programmable timer — set to water for 10–15 minutes each morning.
Use pressure-compensating drip emitters (rather than standard flow emitters) when your shelf has pots at different heights — pressure-compensating emitters deliver equal flow regardless of the height difference, preventing upper-shelf pots from receiving more water than lower ones. This is one of the most practically important technical details in any balcony drip irrigation system.
The most common installation mistake: routing tubing in front of pot openings rather than behind — you’ll be rearranging pots constantly and the tubing gets in the way. Always run supply lines along the back of each shelf rail, out of sight and out of the way.
Learn about integrating drip irrigation systems into pallet plant shelves for balconies and find container watering and irrigation guidance from Penn State Extension.
Integrated irrigation turns your pallet shelf from a weekend project into a nearly self-maintaining balcony garden.
7. Pallet Corner Shelf Unit for 90° Balcony Walls
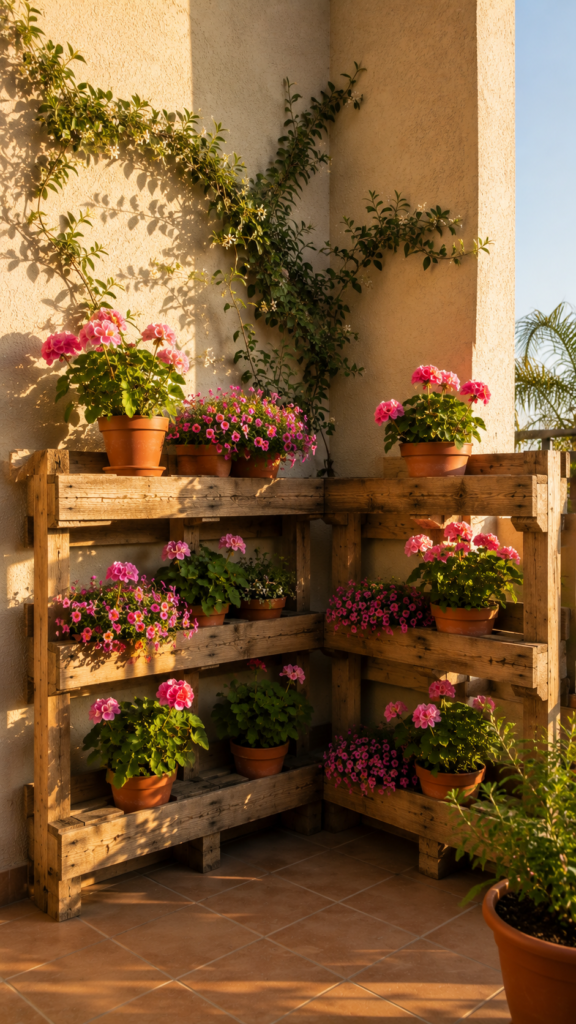
A 90° corner pallet unit uses dead corner space on a balcony to create the most densely planted and visually enclosed section of any balcony garden — surrounding you with plants on two sides simultaneously.
Join two upright pallets at a 90° angle using four heavy-duty 100mm corner brackets and 60mm screws at the top, mid, and base junction points. The joined unit stands in the corner with each pallet face aligned to one wall — the inner corner angle is self-bracing and far more stable than a single pallet standing free. Fix to each wall using one cup hook and wire per pallet.
The corner unit creates a naturally enclosed, sheltered microclimate where plants experience significantly less wind exposure than those on the exposed balcony railing. This is genuinely valuable: wind stress reduces growth, increases water demand, and can damage flowering stems on delicate plants. A corner pallet unit is, in effect, a natural shelter for your most wind-sensitive species.
Plant the inner corner face (most sheltered) with fragrant climbing jasmine (Jasminum officinale) trained up a trellis fixed to the wall behind — within one season it will create a flowering green canopy across the corner that adds scent as well as visual enclosure.
Best plants for a corner pallet shelf unit:
- Inner corner: Jasminum officinale (fragrant climber)
- Mid-shelf: trailing Petunia, Fuchsia, Calibrachoa
- Lower shelf: compact geraniums, herbs, sempervivum
- Top: architectural succulents, Agave in terracotta
Read about corner pallet shelf units and balcony corner garden design and find climbing plant and balcony garden ideas from Gardeners’ World.
A corner pallet unit is where a balcony stops being a ledge and starts being a room.
8. Pallet Shelf with Chalkboard-Painted Plant Labels
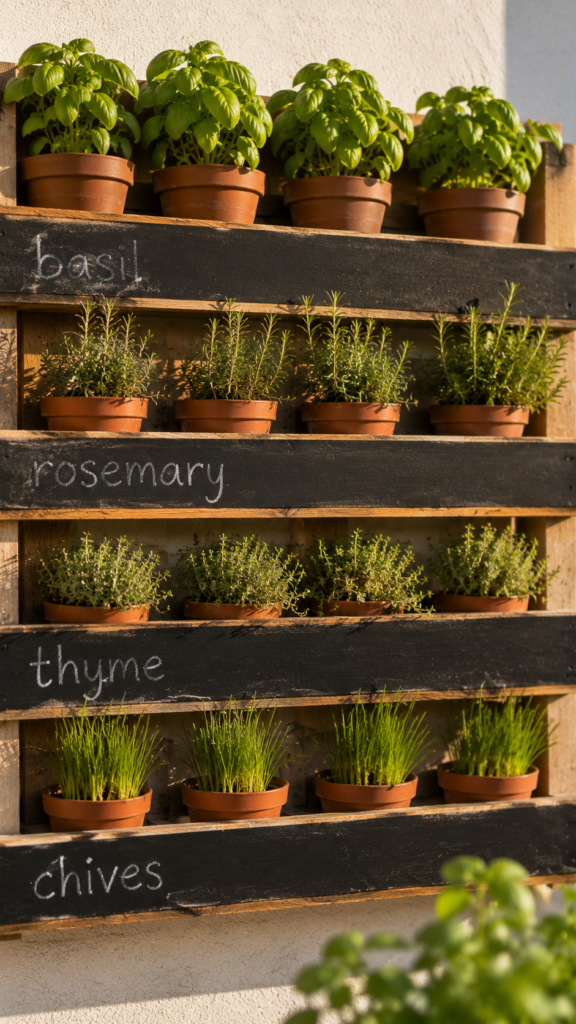
Painting the front face of each pallet shelf plank with a strip of chalkboard paint creates a built-in, erasable labelling system for your plant collection — functional, beautiful, and completely free to update each season.
Apply masking tape along the top and bottom edge of each shelf plank’s front face to create a clean 4–5cm chalkboard strip. Apply two coats of chalkboard paint (available in standard black or slate grey) with a small brush, removing the tape while the second coat is still slightly wet for a sharp edge. Allow to cure for 24 hours before writing on the surface.
Condition each strip by rubbing the flat side of a chalk stick across the entire surface and wiping away — this prevents ghosting of the first text. Write plant names, watering schedules, or last feeding dates using chalk pen (more weather-resistant than standard chalk on an outdoor shelf, where rain would wash regular chalk away within days).
The practical value goes beyond aesthetics: a clearly labelled shelf means every person in your household waters and feeds correctly, and you’ll never again mistake a thyme seedling for a rosemary seedling in early spring when the two look almost identical.
💡 Pro Tip: Use chalk pen rather than standard chalk for outdoor chalkboard labels — chalk pen is water-resistant for 2–3 weeks of rain before requiring reapplication, whereas regular chalk washes away in the first shower.
Find chalkboard label ideas for pallet plant shelves and balcony herb gardens and explore herb growing in outdoor containers from BHG.
A chalkboard-labelled shelf makes your balcony garden feel like a genuine, well-managed productive space.
9. Staggered Double Pallet Shelf for Visual Depth
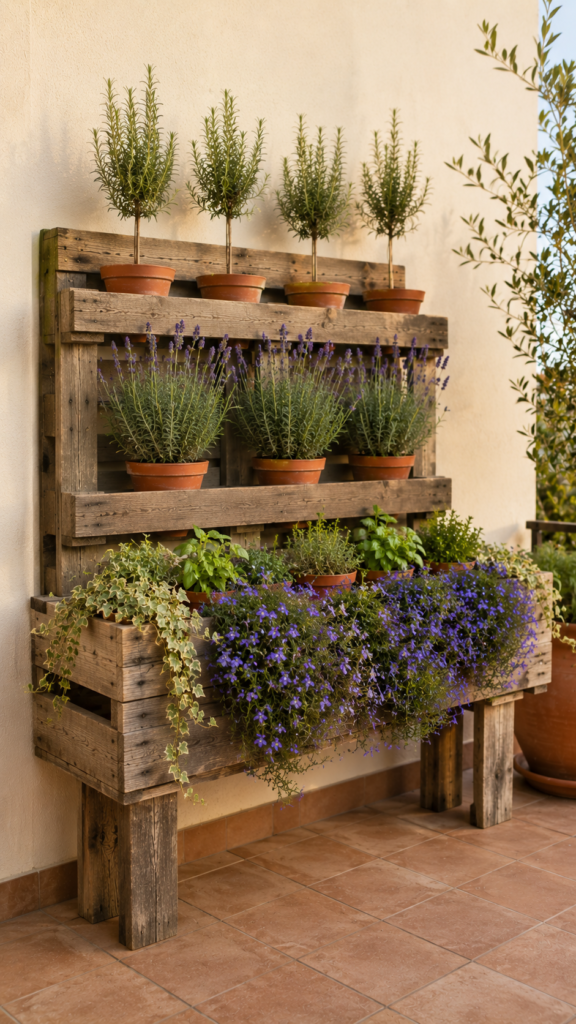
Mounting one pallet flush to the wall and a second pallet 25–30cm in front of it creates a layered double display with genuine planting depth — the visual equivalent of a border garden transplanted onto a vertical plane.
Fix the rear pallet to the wall using four heavy-duty shelf brackets. Build the front pallet on two short 30cm wooden legs, screwing 4cm × 4cm timber uprights into each corner base. Align the front pallet to overlap the rear so both are visible simultaneously — the stagger in depth means pots on both pallets read as separate layers rather than a single flat display.
Planting principle for the staggered pair: taller, more architectural plants (rosemary standards, small lavender) at the rear pallet; trailing and cascading plants (lobelia, trailing thyme, Sedum) at the front pallet where their downward cascade is fully visible and unobstructed. This rear-tall, front-trailing arrangement mirrors the planting structure of a traditional herbaceous border in miniature.
The secondary benefit: the gap between pallets creates a sheltered air channel that improves air circulation around plants, reducing the risk of fungal diseases like powdery mildew — a challenge many balcony gardeners face in warm, humid summer conditions.
Discover staggered pallet shelf ideas and depth planting for balcony displays and find container plant arrangement guidance from Missouri Botanical Garden.
A double staggered pallet shelf is where a balcony display transitions from flat decoration to genuine three-dimensional garden design.
10. DIY Pallet Plant Shelves for Balconies with Hanging Rail
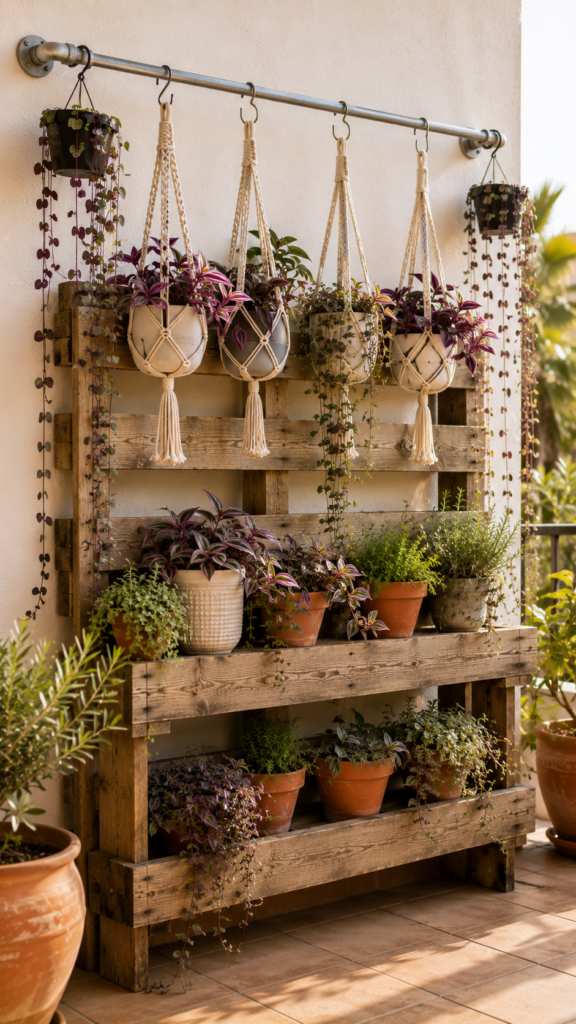
Adding a horizontal hanging rail above a pallet shelf extends the display upward into the space above the shelf — a simple modification that roughly doubles the planting capacity of the same floor footprint.
Fix a length of 22mm steel conduit or a thick wooden dowel (minimum 40mm diameter for load-bearing strength) horizontally above the top of the pallet, supported at each end by two screw-in conduit saddle brackets fixed to the balcony wall. The rail should extend the full width of the pallet at a height of 150–170cm from the floor — high enough for trailing plants to hang without reaching the shelf below.
Hang macramé planters or S-hook pot holders from the rail at 20–25cm intervals. Combine trailing and hanging plants with the shelf-level pots to create a complete vertical composition: shelf plants read as a solid planted base; hanging plants above create an airy canopy that softens the visual boundary between the shelf and the sky.
Tradescantia zebrina (trailing purple-silver leaves) and Ceropegia woodii (string of hearts) are both ideal hanging rail plants: lightweight, fast-trailing, and tolerant of the slightly exposed conditions of an outdoor balcony on sheltered positions.
💡 Pro Tip: Use stainless steel S-hooks rather than galvanised iron hooks on the outdoor rail — galvanised hooks corrode and leave orange rust streaks on both the wood and any pots beneath within one rainy season.
Read about hanging rail additions to pallet plant shelves for balconies and find trailing plant care for outdoor displays from The Sill.
A hanging rail above your pallet shelf transforms it from a single plane display into a three-dimensional living installation.
11. Pallet Herb Wall with Built-In Planting Pockets
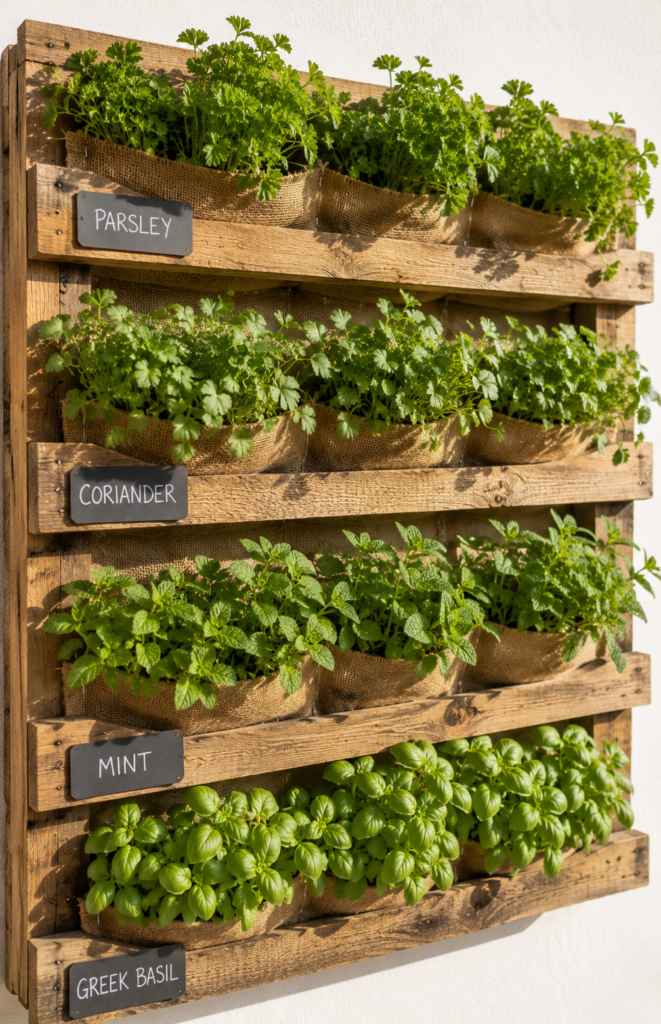
Building fabric planting pockets into the back board of a pallet creates a planted wall surface rather than a shelf surface — ideal for shallow-rooted herbs that thrive in 10–15cm of compost depth.
Cut hessian fabric into 20cm × 30cm rectangles. Fold the lower 10cm upward and staple both side edges firmly to the inside back board of each pallet gap using a heavy-duty staple gun — minimum 14mm staples for outdoor use. This creates a fabric pocket approximately 10cm deep and 20cm wide. Line each pocket with a single sheet of polythene pierced with 4–5 drainage holes before filling with compost.
Fill pockets with a lightweight peat-free multipurpose compost — standard compost is too heavy for the fabric pockets to support long-term. Plant shallow-rooted compact herbs: Ocimum basilicum ‘Greek’ (dwarf basil, excellent for pockets), Origanum vulgare (oregano), and flat-leaf parsley all suit the 10cm soil depth well. Avoid deep-rooted herbs like rosemary and sage — they need at least 20cm of root depth to perform adequately.
Water pockets using a small watering can with a narrow spout directed at the back of each pocket — water flows downward through the fabric naturally rather than running straight through the compost surface.
💡 Pro Tip: Replace hessian pockets every 2 seasons — natural hessian degrades when permanently wet and the staple fixings can pull through degraded fabric, causing pockets to fail suddenly. Check the fabric integrity at the start of each growing season.
Explore pallet herb wall planting pocket guides for balcony kitchen gardens and find herb growing in containers from Almanac.com.
A pocket-planted pallet herb wall is the most productive use of a square metre of balcony wall space currently possible.
12. Pallet Planter Box Conversion with Deep Soil Beds
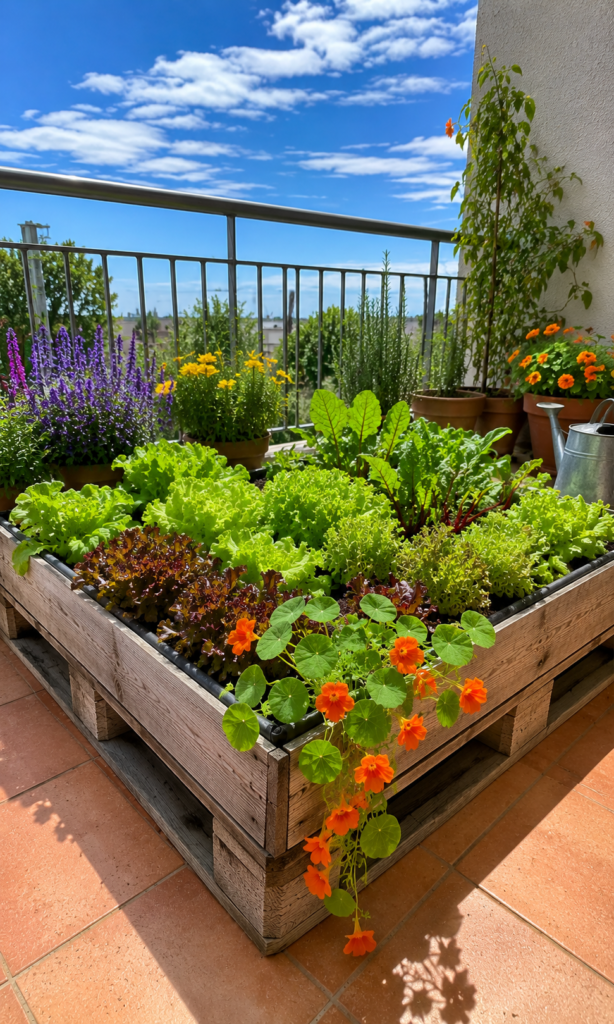
Converting a flat pallet into a raised planter box provides the deepest possible growing soil depth on a balcony — up to 30cm — enabling you to grow root vegetables and established perennials that standard window boxes and pots cannot accommodate.
Lay an HT pallet flat on the balcony floor. Attach 20cm timber side boards (25mm thick, treated exterior-grade softwood) around all four outer edges using 80mm screws at 30cm intervals. Line the interior base with a double layer of weed-suppressing fabric, allowing 5–10cm to fold up the inside of the side boards. Fill with a peat-free multipurpose compost mixed with 20% topsoil for structural body — pure multipurpose compost compacts excessively in a deep bed over one season.
Weight is the most important consideration for balcony raised beds. A fully filled pallet bed of 80 × 120cm × 20cm depth weighs approximately 60–80kg when wet — always check your balcony’s structural load rating before building. Most modern UK apartment balconies are rated for 150–200kg per square metre, which accommodates a single pallet bed comfortably, but older buildings and cast concrete balconies should be checked with a structural engineer if uncertain.
Discover pallet planter box conversion guides for deep balcony raised beds and find raised bed and container soil guidance from Penn State Extension.
A pallet raised bed opens up the full range of edible crops to a balcony — including root vegetables that no pot or window box could ever support.
Converting a flat pallet into a raised planter box provides the deepest possible growing soil depth on a balcony — up to 30cm — enabling you to grow root vegetables and established perennials that standard window boxes and pots cannot accommodate.
Lay an HT pallet flat on the balcony floor. Attach 20cm timber side boards (25mm thick, treated exterior-grade softwood) around all four outer edges using 80mm screws at 30cm intervals. Line the interior base with a double layer of weed-suppressing fabric, allowing 5–10cm to fold up the inside of the side boards. Fill with a peat-free multipurpose compost mixed with 20% topsoil for structural body — pure multipurpose compost compacts excessively in a deep bed over one season.
Weight is the most important consideration for balcony raised beds. A fully filled pallet bed of 80 × 120cm × 20cm depth weighs approximately 60–80kg when wet — always check your balcony’s structural load rating before building. Most modern UK apartment balconies are rated for 150–200kg per square metre, which accommodates a single pallet bed comfortably, but older buildings and cast concrete balconies should be checked with a structural engineer if uncertain.
Discover pallet planter box conversion guides for deep balcony raised beds and find raised bed and container soil guidance from Penn State Extension.
A pallet raised bed opens up the full range of edible crops to a balcony — including root vegetables that no pot or window box could ever support.
13. Pallet Succulent and Cactus Display Wall
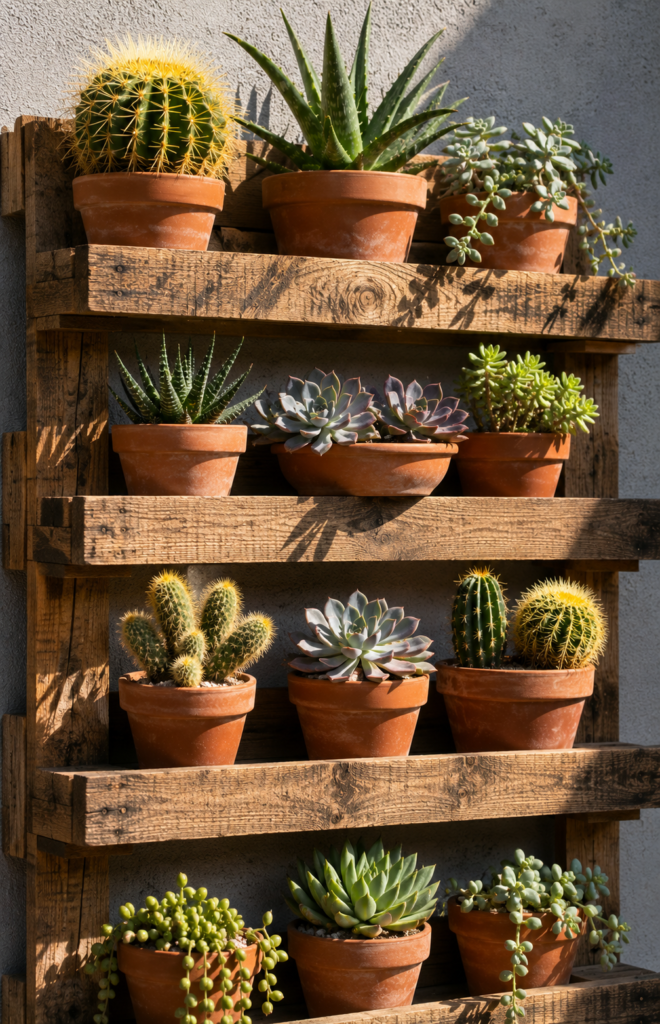
A south-facing balcony pallet shelf planted exclusively with cacti and succulents is the most low-maintenance DIY pallet plant shelf you can build — watered monthly in winter and fortnightly in summer, and requiring almost no other intervention.
This design works only on a south or west-facing balcony with a minimum of 5–6 hours of direct sun daily — direct honesty matters here. In less sun, succulents etiolate (stretch toward light), losing their compact form entirely within a single season. Given adequate sun, however, a cactus and succulent display on a pallet shelf is genuinely extraordinary: bold textures, striking shadows, minimal cost, and almost zero ongoing maintenance.
Pot in a specialist cactus compost (or multipurpose compost cut 50/50 with sharp sand) in terracotta pots with drainage holes — the terracotta is essential for this application because it wicks away excess moisture actively, preventing the root rot that is the primary cause of succulent death in outdoor display.
Arrange from tallest to shortest: Echinocactus grusonii (golden barrel, architectural) at the rear of the top shelf; medium Aloe vera and Agave on the mid shelf; compact rosette Echeveria and trailing Sedum on the lowest. The descending height creates a visual perspective that appears designed rather than incidental.
Read about DIY pallet plant shelves for balconies planted with cacti and succulents and find succulent and cactus outdoor care from University of Florida Extension.
A succulent pallet display rewards you most by requiring the least — every neglected day it holds its beauty patiently.
14. Pallet Shelf with Built-In Seat and Storage Drawer
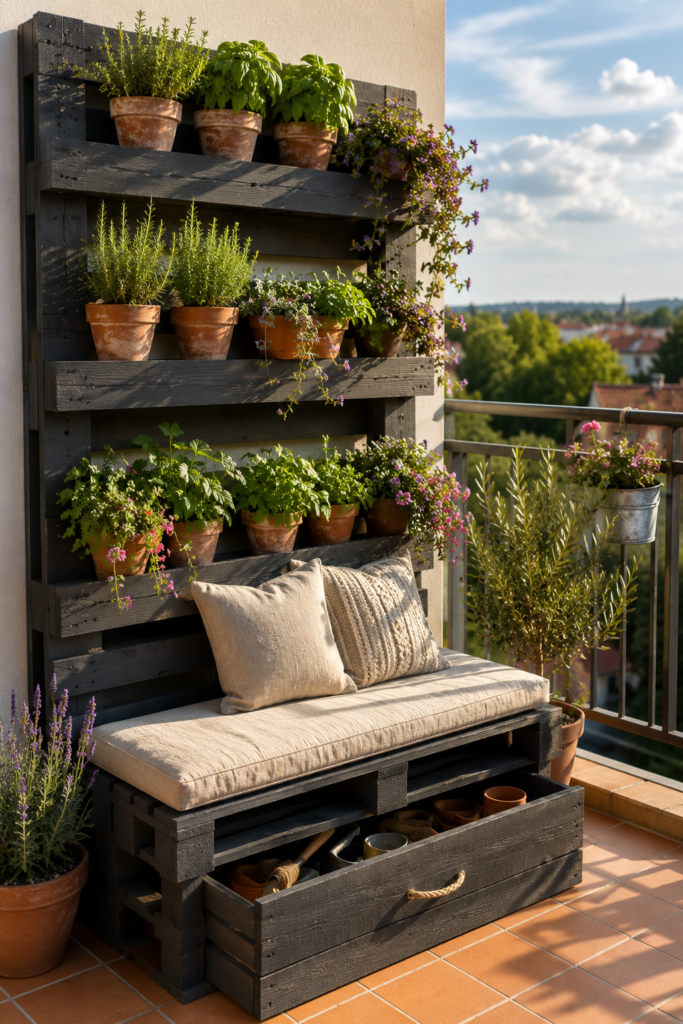
A pallet shelf with an integrated bench seat and storage drawer underneath transforms a single structure into three separate functions: garden display, outdoor seating, and weatherproof storage — the pinnacle of multi-functional DIY pallet plant shelves for balconies.
Build the base frame from two pallets standing on edge as the side walls, connected at the front by a wide pallet plank seat (minimum 40cm deep for comfortable seating). The upper section above seat height becomes the plant shelf, using a third pallet’s planks as shelf boards. The space below the seat accommodates a simple pull-out drawer: a shallow box (10cm deep) on wooden runners fixed to the inside of the base frame, used for storing gardening tools, seeds, or a folded tarpaulin.
Paint the entire unit in exterior chalk paint in a single coordinating colour — charcoal grey or navy blue creates a premium, designed appearance that disguises the salvage origins of the materials entirely. Add a weatherproof cushion to the seat using outdoor-rated foam and UV-resistant fabric.
Beginner vs. Advanced version:
- Beginner: Two pallets as sides, plank seat, single upper shelf for pots
- Advanced: Mitre-jointed seat corners, dovetailed drawer, LED lighting under shelf, hidden cable management for irrigation timer
Learn about multi-functional pallet plant shelf and seat combinations for balconies and find outdoor garden furniture building guidance from Gardeners’ World.
A pallet shelf-seat hybrid makes every square centimetre of your balcony earn its keep in at least two ways simultaneously.
15. Pallet Vertical Garden with Cascade Watering System
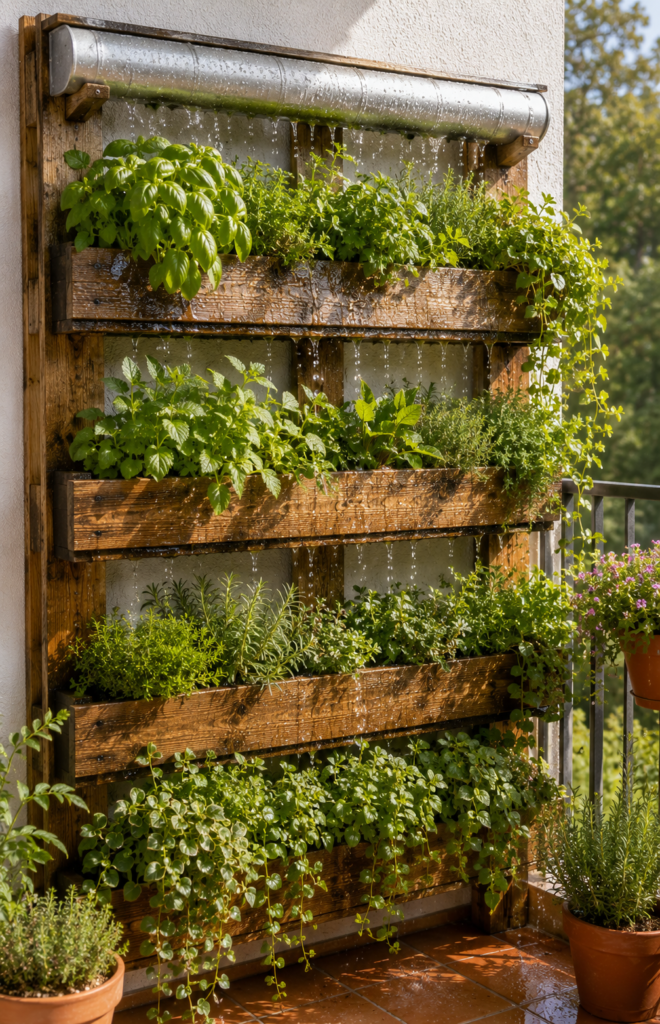
A cascade watering system delivers water from a single top reservoir down through gravity-fed holes to each shelf level in sequence — eliminating the need to water individual pots and providing consistent moisture to every shelf simultaneously.
Install a 2-litre plastic bottle or a piece of 100mm guttering capped at each end as a top reservoir, fixed above the highest shelf of the pallet. Drill a 5mm hole in the base of the reservoir directly above each pot position on the upper shelf. Water falling into the upper shelf’s pots and through their drainage holes falls to the second shelf below, and so on in cascade. The flow rate is controlled by varying the reservoir hole diameter: 5mm delivers approximately 500ml per hour per hole in a gravity system.
The system works best with moisture-tolerant herbs (mint, parsley, chives) and trailing plants rather than drought-sensitive species like succulents. The cascading water also adds a genuine sound element to the balcony — the gentle sound of water on terracotta and foliage is unexpectedly soothing.
💡 Pro Tip: Add a single drop of liquid seaweed fertiliser to the reservoir each time you fill it — the diluted feed is distributed to every plant simultaneously with each watering cycle, making feeding effortless and consistent.
Find cascade watering system guides for pallet plant shelves and vertical gardens and find container irrigation and watering tips from Penn State Extension.
A cascade system turns the daily watering chore into a single weekly reservoir refill — one of the most elegant practical upgrades a pallet shelf can receive.
16. Weatherproofed Pallet Shelf with Copper Pipe Edging
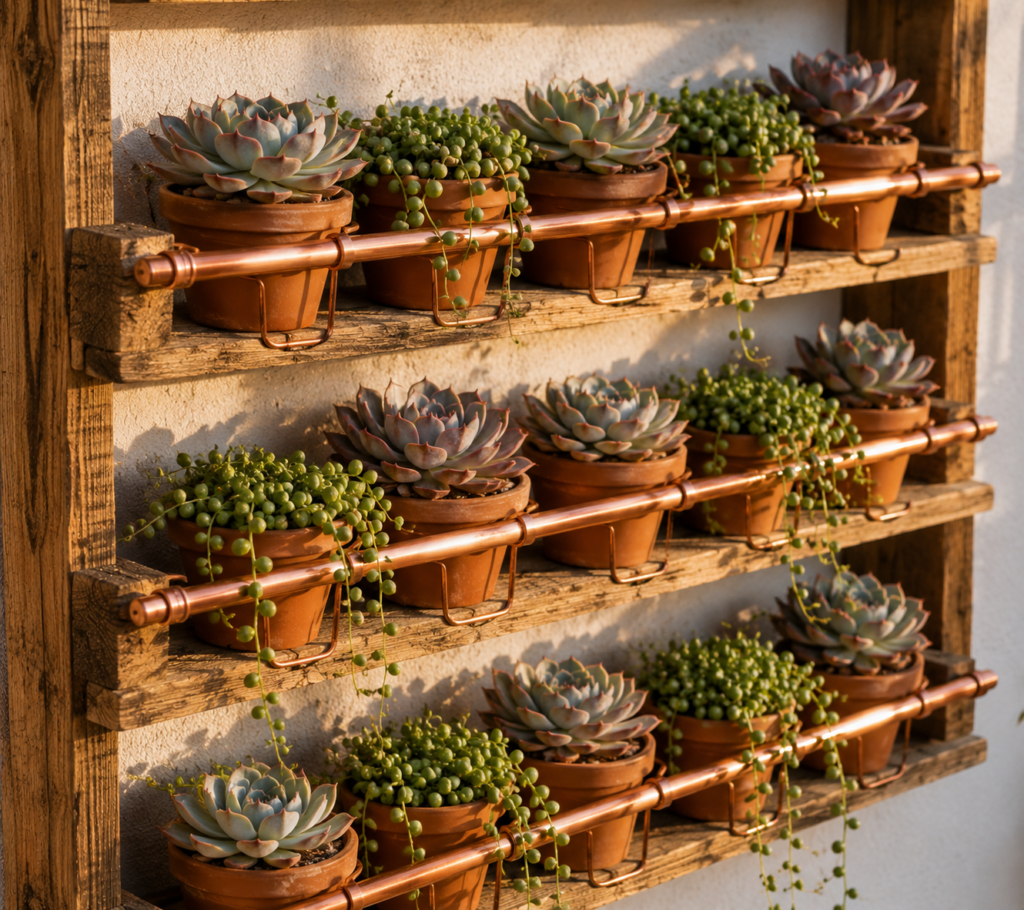
Adding 15mm copper pipe along the front edge of each pallet shelf plank transforms salvaged wood into something with genuine artisan quality — and the copper provides structural rigidity that prevents the plank edges from warping or splitting over multiple outdoor seasons.
Cut copper pipe to the shelf plank width using a pipe cutter (hand-operated, no power tools needed) and fix along the front edge of each plank using copper pipe clips at 25cm intervals. The pipe stiffens the front edge of the plank, which is the part most prone to moisture-related warping in outdoor conditions — the copper’s rigidity counteracts the wood’s natural seasonal movement.
The copper develops a natural patina within 6–12 months outdoors: from bright copper through warm gold to a characteristic verdigris green. Each stage is beautiful in a different way, and the patina process is entirely weather-dependent — you don’t need to accelerate or prevent it. The shelf ages beautifully rather than simply deteriorating.
Add copper S-hooks over the pipe at 20cm intervals for hanging small pots, air plants in glass globes, or small macramé hangers — the copper pipe becomes both structural support and hanging rail simultaneously.
Explore copper pipe edging for weatherproofed pallet shelves and balcony display ideas and find container display and plant combination ideas from BHG.
Copper pipe edging is the single detail that makes a pallet shelf look entirely intentional and genuinely handcrafted.
17. Pallet Shelf Wildflower and Pollinator Display
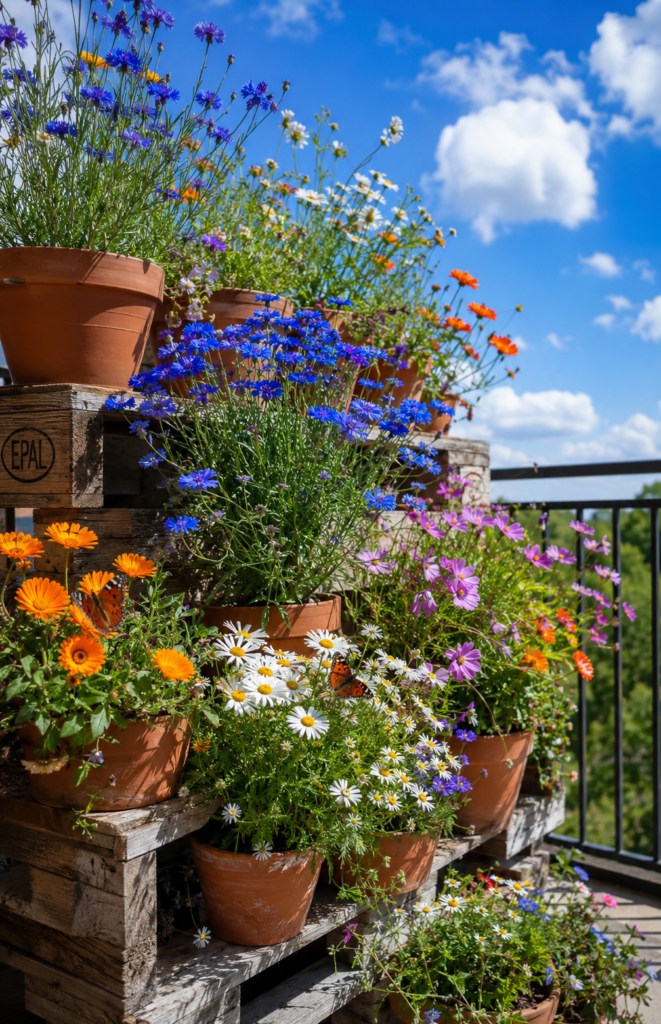
A pallet shelf planted exclusively with native and pollinator-friendly wildflowers creates an ecological corridor on your balcony — a food source for bees and butterflies in a location where such resources are usually absent entirely.
Plant each shelf position with individual terracotta pots of native wildflowers sown from seed: cornflowers (Centaurea cyanus, 30cm compact varieties), pot marigolds (Calendula officinalis), cosmos (Cosmos bipinnatus ‘Sonata’ — dwarf variety ideal for containers at 40cm), and ox-eye daisies (Leucanthemum vulgare). Use a low-fertility growing mix of 60% multipurpose peat-free compost and 40% horticultural sand — wildflowers produce more flowers in poor soil.
The pallet shelf arrangement keeps individual species in their own pots, allowing you to remove finished or spent plants and replace with the next succession of sown wildflowers through the season. This rolling replacement is simpler to manage than a mixed planting in a single large container.
Deadhead every 7–10 days to extend flowering from June through October. Gardeners consistently find that a single well-maintained pallet wildflower display on a balcony attracts noticeable pollinator activity within 2–3 weeks of first bloom — including urban bee species that rarely visit balconies without specifically nectar-rich plants.
💡 Pro Tip: Include one pot of single-flowered Helenium or Rudbeckia per shelf — their flat, accessible flower heads provide a landing platform for larger bees that struggle with the tube-shaped flowers of some wildflower species.
Read about wildflower pollinator pallet shelf displays for balcony gardens and find growing native wildflowers in containers from the RHS.
A wildflower pallet shelf is the most ecologically generous thing an urban balcony can offer — to the insects and to yourself.
18. DIY Pallet Plant Shelves for Balconies with Grow Lights for Year-Round Use
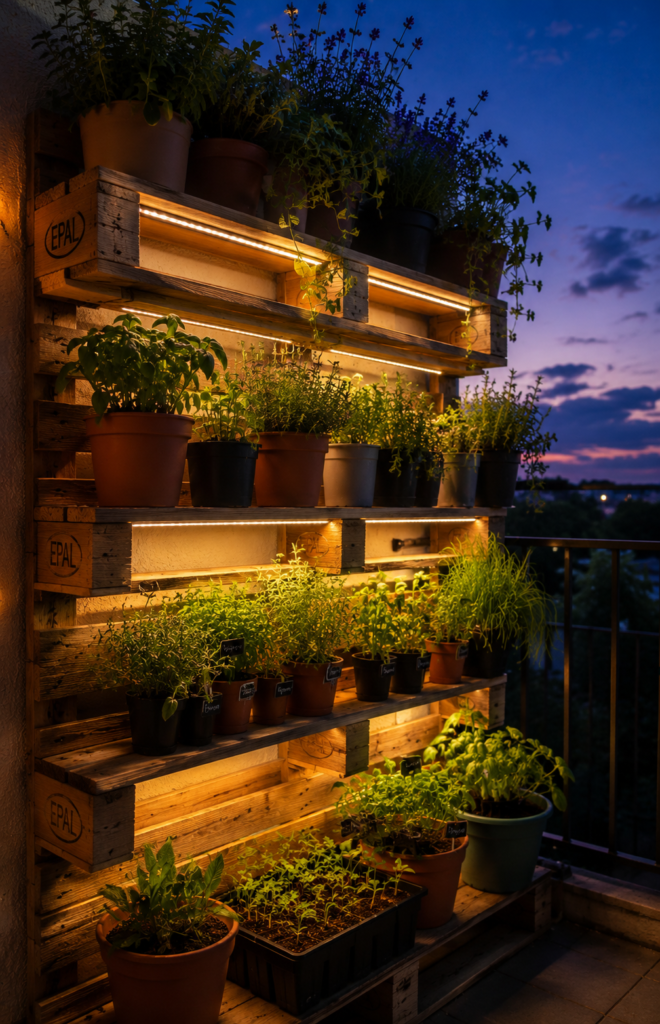
Mounting LED grow light strips on the underside of each pallet shelf extends the growing season on a balcony well beyond summer and into autumn and winter — particularly transformative on north-facing or shaded balconies that struggle with low light from October through March.
Fix 12V LED grow light strips (full-spectrum, 2700K–6500K combined, red and blue diodes for photosynthesis) to the underside of each pallet shelf plank using self-adhesive mounting channels. Strips should span the full plank width for even coverage. Run a connecting cable along the back edge of the pallet to a single 12V transformer — a 5-metre strip system typically draws 25–40W, similar to a single small incandescent bulb.
Set grow lights on a timer for 14–16 hours of supplemental light per day in winter — this mimics summer day length and maintains active growth in herbs, salad leaves, and compact flowering plants. Full-spectrum LED strips produce negligible heat at 10–15cm distance, meaning they can sit very close to plant foliage without burning.
The most important specification to check when purchasing: ensure the LED strip contains both red (630–660nm) and blue (450–470nm) diodes — blue light drives vegetative leaf growth; red light drives flowering and fruiting. White-only LED strips, however bright, do not provide the specific wavelengths plants require for productive growth.
Learn about adding grow lights to pallet plant shelves for year-round balcony growing and find grow light guidance for container plants from Missouri Botanical Garden.
Grow lights turn your pallet shelf from a seasonal summer project into a year-round productive garden that winter cannot touch.
Getting Started With DIY Pallet Plant Shelves for Balconies
The simplest starting point today is sourcing a single HT-stamped pallet and leaning it upright against your balcony wall. No tools are needed for this first step — the lean-to pallet wall shelf (section 1) requires only two cup hooks, two lengths of wire, and a tube of exterior wood oil. You can have a functional, planted pallet shelf on your balcony this weekend for under £5 in materials.
The most important mistake to avoid before you begin: using an MB-stamped pallet. Always check the small stamp on the side of the pallet for the letters HT (safe, heat-treated) or MB (unsafe, chemically treated with methyl bromide). This distinction is non-negotiable if you’re growing edible herbs or vegetables on the shelf, and always worthwhile even for ornamental displays. Most garden centres and timber merchants will confirm their pallet treatment on request.
For your first deliberate purchase, make it targeted: one bag of peat-free multipurpose compost (enough for 6–8 small pots), a 4-pack of 10cm terracotta pots with drainage, and one packet of mixed herb seeds or a small tray of young herb plants from a garden centre. These three items give you everything needed to plant up a first pallet shelf immediately.
Expect your pallet herb shelf to show visible growth within 2–3 weeks and to look fully established and impressive within 6–8 weeks — faster than most people anticipate from a project that cost less than £20 total.
Frequently Asked Questions
How do I treat a pallet to make it safe for balcony use?
Always verify the pallet carries an HT (heat treated) stamp before use — this confirms it was pest-treated with heat rather than chemicals. Once confirmed safe, sand all surfaces with 80-grit sandpaper to remove splinters, wipe clean, and apply one to two coats of exterior-grade decking oil or wood preservative. This treatment protects the timber from moisture penetration and UV degradation, extending an outdoor pallet shelf’s life from 1–2 seasons to 4–5 years. Re-apply the oil treatment once each year at the start of the growing season for consistent protection.
What are the best plants for a shaded balcony pallet shelf?
A north or east-facing balcony pallet shelf receives little or no direct sun, which significantly limits plant choices. What actually works: Chlorophytum comosum (spider plant), Hedera helix (English ivy), ferns (Asplenium, Dryopteris), Hostas in deep shade, and Impatiens (busy Lizzies) for flowering colour. Mint (Mentha spicata) tolerates partial shade better than most culinary herbs and produces adequate leaf growth with just 2–3 hours of indirect light. Avoid sun-requiring herbs (basil, rosemary, thyme) and succulents on a shaded shelf — they will decline rapidly without direct sun regardless of care.
How much weight can a balcony pallet shelf hold?
A standard euro pallet in good condition supports a static load of 500–1000kg in industrial use, far beyond any domestic planting scenario. The limiting factor for balcony pallet shelves is the mounting system: cup hooks and wire connections to the wall should be rated and tested for 50kg minimum for an upright pallet with multiple pots. For horizontal shelf pallets mounted on wall brackets, use brackets rated for 30kg per bracket and use two brackets per shelf plank minimum. For raised bed conversions laid flat on the balcony floor, check your balcony’s structural load rating — most modern balconies handle 150–200kg per square metre comfortably.
Can I use DIY pallet plant shelves for balconies if I rent?
Many pallet shelf designs are genuinely renter-friendly. Freestanding designs (the A-frame in section 4, the lean-to in section 1 with removable wire hooks) require no permanent wall fixings and can be removed without any trace. Where wall hooks are used, small cup hooks leave minimal evidence and can be filled on moving out. For tenants in doubt, adhesive outdoor hooks rated 5–10kg (available from hardware stores) are a completely non-permanent alternative that supports lighter pallet shelf configurations. Always check your tenancy agreement regarding external fittings before installing anything that requires drilling.
How do I prevent my pallet shelf plants from drying out so quickly in summer?
A challenge many balcony gardeners face is rapid soil drying in exposed, windy conditions. Three solutions work reliably in practice: switch from terracotta to glazed ceramic pots (which don’t breathe moisture through their walls), add 10% water-retaining gel crystals to the compost at potting time, and apply a 2–3cm layer of gravel mulch over the pot surface (this reduces evaporation from the soil surface by up to 30% in sunny conditions). Installing a drip irrigation timer (section 6) is the most comprehensive solution, eliminating daily watering entirely and maintaining consistent moisture regardless of temperature and wind speed.
A Few Final Thoughts
These 18 DIY pallet plant shelves for balconies cover every skill level, budget, and balcony size you could encounter — from a first lean-to shelf requiring no tools, to an integrated planter-seat-storage unit that changes how the entire balcony functions. The truth every experienced balcony gardener knows is that a pallet shelf changes the character of a balcony more dramatically than any other single project, because it fills vertical space that was previously blank and plants it with living things that grow and change with the seasons. Even beginning with the most basic version — one HT pallet, two wall hooks, six terracotta pots — is enough to transform a bare wall into a garden. Your pallet shelf project is one pallet, one bag of compost, and one afternoon away from existing. Now go find that pallet and make it happen.